1. Inleiding
This manual provides comprehensive instructions for the safe and effective use, maintenance, and troubleshooting of your Dasqua 3230-8115-A Digital Dual-Column Height Gauge. Please read this manual thoroughly before operating the device to ensure optimal performance and longevity.
1.1 Productoverschotview
The Dasqua 3230-8115-A is a precision digital height gauge designed for accurate measurement of height, depth, and step dimensions. It features a robust dual-column design for stability and a clear digital display for easy reading.

Figuur 1.1: Voorzijde view of the Dasqua 3230-8115-A Digital Dual-Column Height Gauge, showing the digital display and measuring jaw.

Afbeelding 1.2: Achter view of the height gauge, showing the handwheel for precise vertical adjustment.

Afbeelding 1.3: Gedetailleerd view highlighting key features such as the fine adjustment mechanism, measuring scale, and stable base.
2. Veiligheidsinstructies
To ensure safe operation and prevent damage to the instrument or injury to the user, please observe the following safety guidelines:
- Always handle the height gauge with care to avoid dropping or impacting the instrument, which can affect its precision.
- Keep the instrument clean and free from dust, debris, and corrosive liquids.
- Do not attempt to disassemble or modify the height gauge. Repairs should only be performed by qualified personnel.
- Store the height gauge in its protective case when not in use to prevent damage.
- Vermijd blootstelling van het instrument aan extreme temperaturen of vochtigheid.
3. Instellen
3.1 Uitpakken en eerste inspectie
Carefully remove the height gauge from its packaging. Inspect the instrument for any signs of damage that may have occurred during transit. Ensure all components listed in the packing list are present.
3.2 Batterij installatie
The digital display requires a CR2032 lithium coin cell battery. To install or replace the battery:
- Locate the battery compartment cover on the side of the digital display unit.
- Schuif het deksel open in de richting die wordt aangegeven door de pijl.
- Plaats een nieuwe CR2032-batterij met de positieve (+) kant naar boven.
- Sluit het batterijklepje goed.
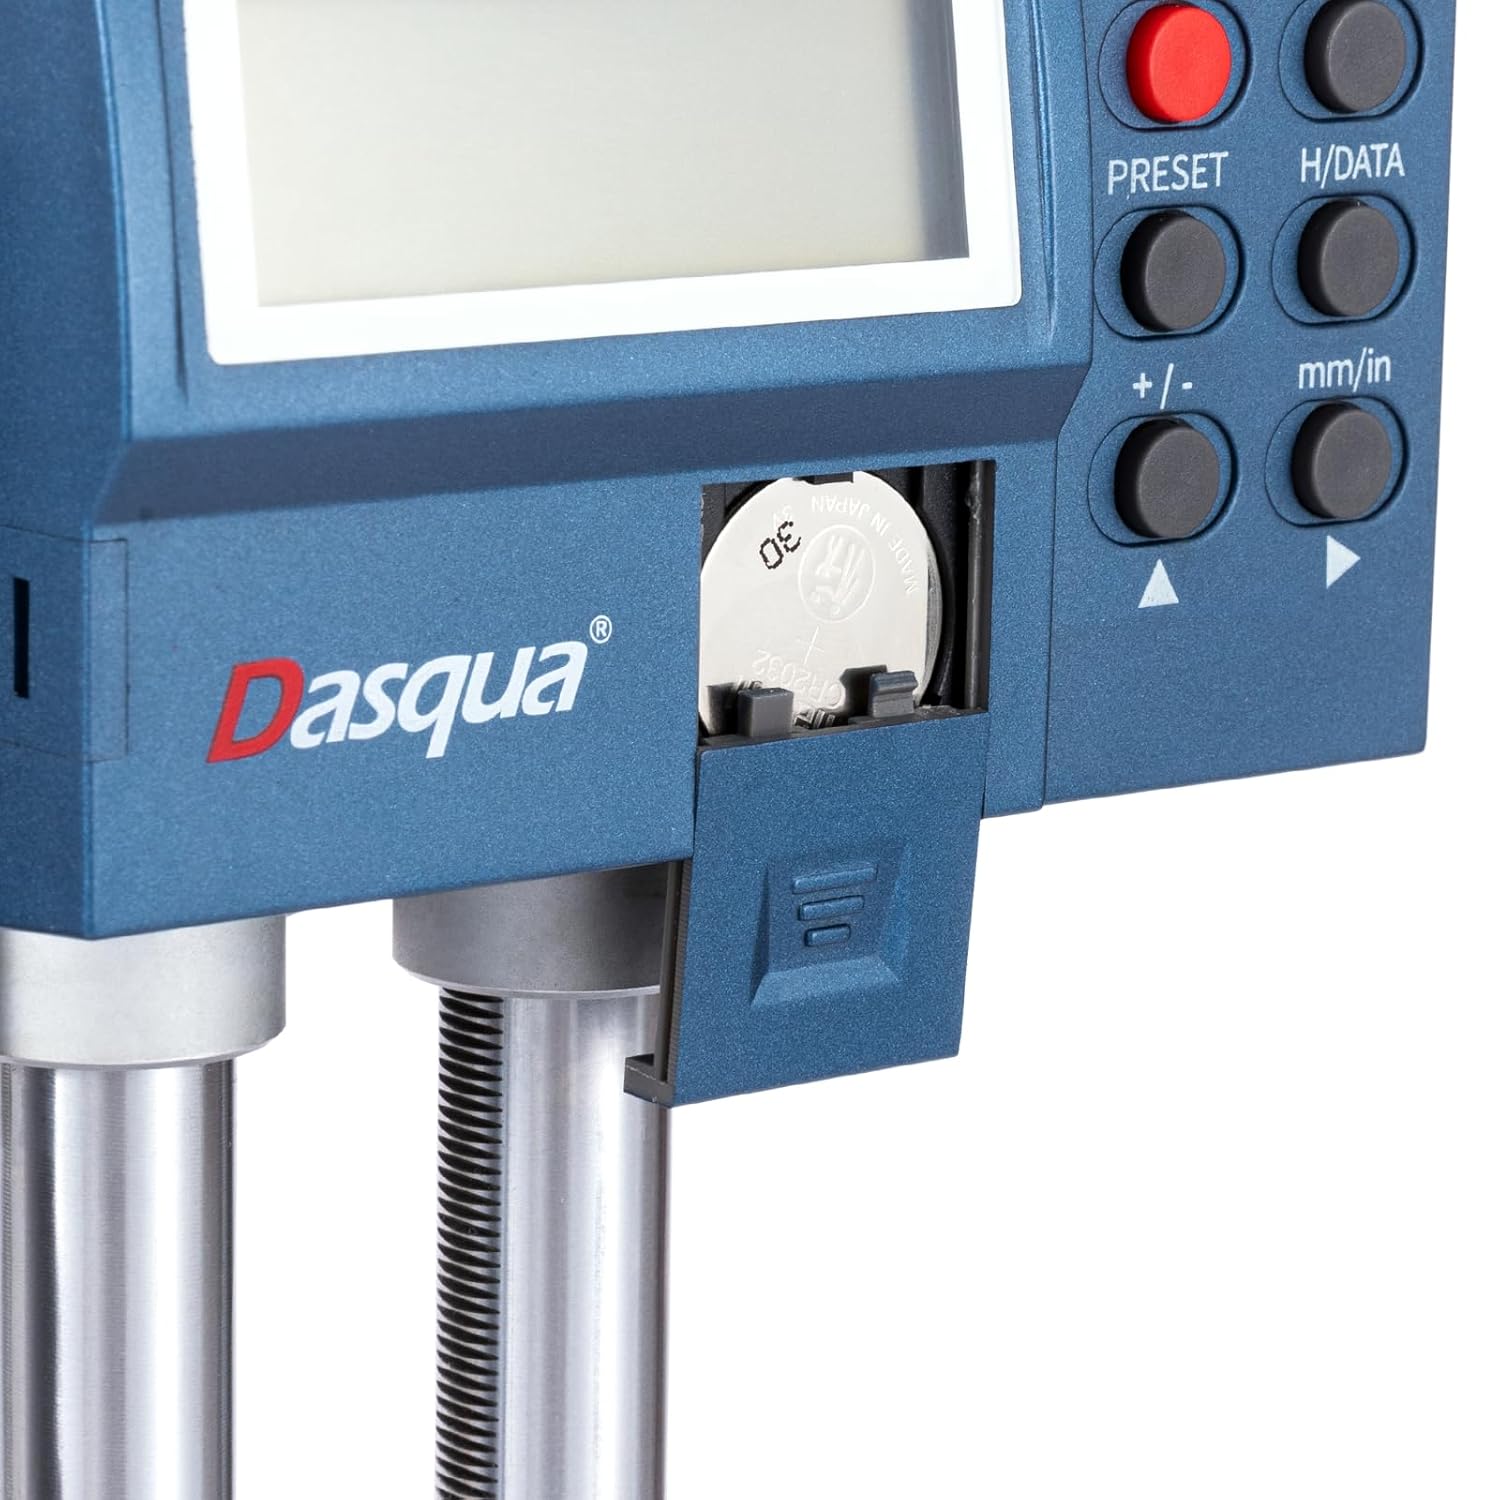
Figure 3.1: Close-up of the battery compartment, showing the location for CR2032 battery insertion.
3.3 Voorbereiden op meting
Place the height gauge on a stable, flat, and clean surface. Ensure the measuring surface of the workpiece is also clean and free of burrs or debris.
4. Gebruiksaanwijzing
4.1 Configuratiescherm voorbijview
Familiarize yourself with the functions of the buttons on the digital display unit:

Figure 4.1: Digital display control panel with numbered buttons and their corresponding functions.
- 1. AAN/UIT: Hiermee schakelt u het apparaat in of uit.
- 2. ZERC/ABS: Switches between Absolute (ABS) and Incremental (INC) measurement modes.
- 3. H/DATA: Holds the displayed value.
- 4. VOORINSTELLING: Sets a preset value or origin.
- 5. mm/in: Toggles between millimeter (mm) and inch (in) measurement units.
- 6. +/- / Direction Arrows: Adjusts preset values or moves the cursor in certain modes.
4.2 Basic Measurement Procedure
- Druk op de AAN/UIT button to power on the height gauge.
- Select the desired unit of measurement (mm or inch) by pressing the mm/inch knop.
- Clean the measuring surface of the height gauge base and the workpiece.
- Lower the measuring jaw until it makes contact with the reference surface (e.g., the surface the workpiece rests on).
- Druk op de ZERC/ABS button to set the display to zero at this reference point. This establishes your measurement origin.
- Carefully raise the measuring jaw using the handwheel until it makes contact with the feature you wish to measure on the workpiece.
- De meting kan direct van het digitale display worden afgelezen.
4.3 Adjusting the Measuring Jaw
The measuring jaw can be adjusted for different measurement tasks. Loosen the locking screw, slide the jaw to the desired position, and then tighten the screw to secure it.

Figure 4.2: Illustration of how to adjust and secure the measuring jaw for various applications.
5. Onderhoud
5.1 Reinigen
Regular cleaning is essential for maintaining the accuracy and lifespan of your height gauge. Use a clean, soft, lint-free cloth to wipe down all surfaces. For stubborn dirt, a small amount of isopropyl alcohol can be used, but avoid contact with the digital display. Never use abrasive cleaners or solvents.
5.2 Opslag
When not in use, store the height gauge in its original protective case in a dry, temperature-controlled environment. Avoid areas with high humidity, dust, or direct sunlight. Ensure the measuring jaw is not clamped tightly to prevent unnecessary stress on the mechanism.
5.3 Batterij vervangen
Replace the CR2032 battery when the display becomes dim or shows a low battery indicator. Refer to Section 3.2 for detailed battery installation instructions.
6. Probleemoplossing
This section addresses common issues you might encounter with your height gauge. If the problem persists after attempting these solutions, please contact customer support.
| Probleem | Mogelijke oorzaak | Oplossing |
|---|---|---|
| Scherm gaat niet aan. | Batterij is leeg of verkeerd geplaatst. | Vervang de batterij (CR2032) en zorg ervoor dat deze met de juiste polariteit is geplaatst. |
| Onnauwkeurige metingen. | Dirty measuring surfaces; instrument not zeroed correctly; environmental factors (temperature fluctuations). | Clean all measuring surfaces. Re-zero the instrument. Ensure stable operating environment. |
| Display flickering or unstable. | Low battery; electromagnetic interference. | Replace battery. Move the instrument away from strong electromagnetic fields. |
| Measuring jaw movement is stiff. | Accumulated dirt or debris on the columns; locking screw too tight. | Clean the columns thoroughly. Loosen the locking screw slightly. |
7. Specificaties
Technical specifications for the Dasqua 3230-8115-A Digital Dual-Column Height Gauge:
| Functie | Detail |
|---|---|
| Modelnummer | 3230-8115-A |
| Meetbereik | 0 - 600 mm |
| Fabrikant | Dasqua |
| Pakket afmetingen | 89x30x18.5cm |
| Artikelgewicht | 10.92 kg |
| Eerste beschikbare datum | 26 jan. 2024 |
8. Garantie en ondersteuning
Dasqua products are manufactured to high quality standards and are typically backed by a manufacturer's warranty. Please refer to the warranty letter included with your product for specific terms and conditions regarding coverage and duration.

Figure 8.1: The height gauge shown alongside its packaging and the included warranty letter.
For technical assistance, spare parts, or warranty claims, please contact your authorized Dasqua dealer or the customer support channel provided at the point of purchase. When contacting support, please have your model number (3230-8115-A) and purchase details ready.


