1. Inleiding
This manual provides essential information for the safe and effective operation of your VICTOR 8145C Digital Bench Multimeter. The VICTOR 8145C is a high-precision, 4½-digit (22000 count) bench-type multimeter featuring True RMS measurement, auto-ranging capabilities, and a large LCD display with backlight. It is designed for accurate electrical measurements in both laboratory and mobile service environments, offering a wide range of functions including DC/AC voltage and current, resistance, capacitance, frequency, and temperature.
Please read this manual thoroughly before using the device to ensure proper handling, optimal performance, and safety.
2. Veiligheidsinformatie
WARNING: To avoid electric shock or personal injury, please read and understand all safety information before using this multimeter.
- Always ensure the multimeter is in good working condition and free from damage before use.
- Niet toepassen voltage or current that exceeds the maximum specified limits for the selected range. The device is rated CAT III 600V.
- Use only the test leads provided or approved replacements. Ensure test leads are fully seated into the input jacks.
- Never use the multimeter if the test leads are damaged or if the meter itself appears damaged.
- Wees voorzichtig bij het werken met volume.tages boven 30V AC RMS, 42V piek of 60V DC. Deze voltagZe vormen een gevaar voor elektrische schokken.
- Schakel de stroom naar het circuit uit en ontlaad alle hoogspanningscondensatoren.tage condensatoren voordat u weerstands-, continuïteits-, diode- of capaciteitsmetingen uitvoert.
- Gebruik de multimeter niet in omgevingen met explosieve gassen, dampen of stof.
- Always select the correct function and range before making a measurement.
- Houd uw vingers tijdens de metingen achter de vingerbeschermingen op de testpennen.
3. Inhoud van het pakket
Carefully unpack the VICTOR 8145C Digital Bench Multimeter and check for the following items:
- VICTOR 8145C Digital Bench Multimeter
- Testkabels (rood en zwart)
- Stroomkabel
- USB-communicatiekabel
- PC-software-cd
- Gebruiksaanwijzing
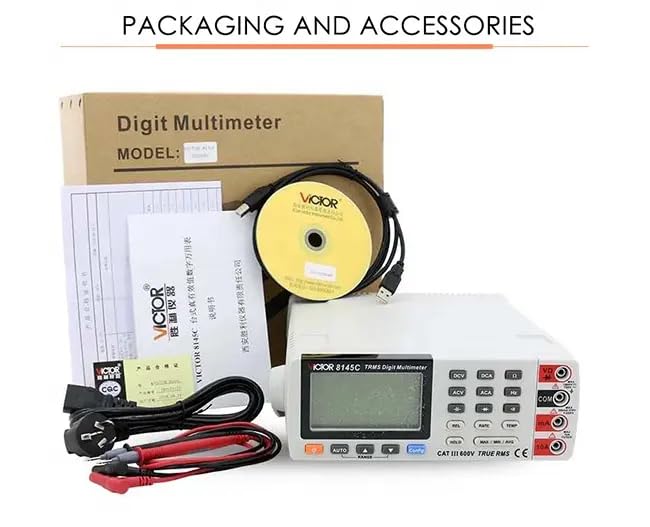
Figure 3.1: The image displays the product packaging and the accessories that come with the VICTOR 8145C, including the multimeter, test leads, power cord, USB cable, software CD, and user manual.
4. Product voorbijview
4.1 Voorpaneel
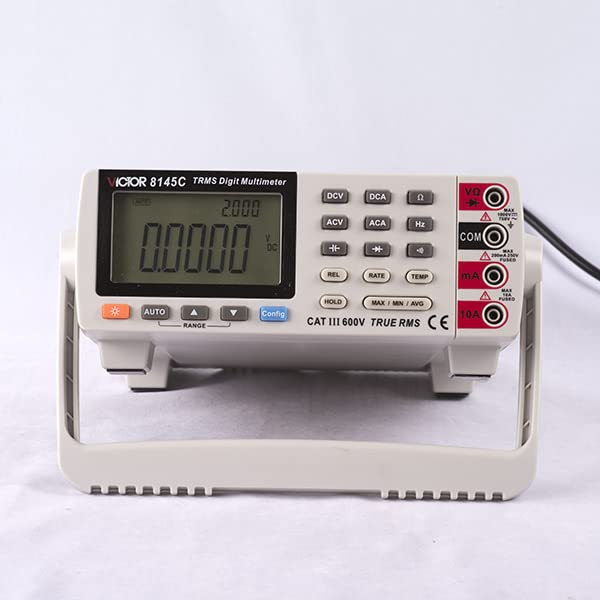
Figure 4.1: This image shows the front panel of the VICTOR 8145C Digital Bench Multimeter, highlighting its large LCD screen, function buttons, and input terminals.
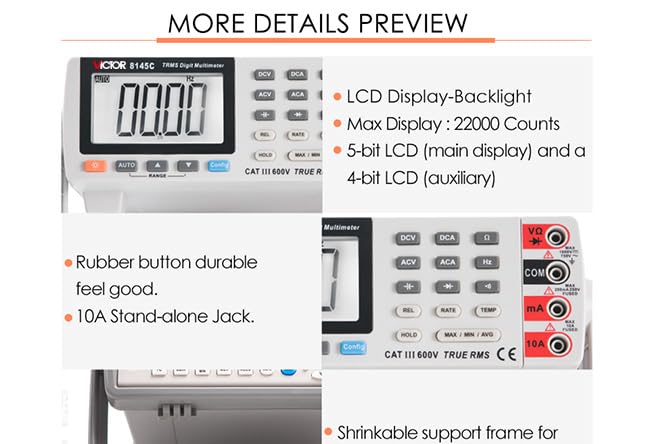
Figuur 4.2: Een close-up view highlighting the multimeter's LCD display with backlight, 22000 count capability, durable rubber buttons, and the 10A stand-alone input jack.
- LCD-scherm: Large, backlit display with a maximum count of 22000. Features a 5-bit main display for primary readings and a 4-bit auxiliary display for secondary information.
- Functieknoppen: Dedicated buttons for selecting measurement types (DCV, DCA, ACV, ACA, Hz, TEMP) and special functions (REL, RATE, HOLD, MAX/MIN/AVG, Config).
- AUTO/RANGE Buttons: For automatic or manual range selection.
- Ingangsaansluitingen:
- VΩ: Ingang voor voltage, weerstand, capaciteit, frequentie, diode en continuïteitsmetingen.
- COM: Gemeenschappelijke (massa) ingang voor alle metingen.
- mA: Invoer voor milliamphuidige metingen.
- 10A: Ingang voor metingen met hoge stroomsterkte (tot 10A).
4.2 Achterpaneel
The rear panel typically includes the main power switch, AC power input, and a USB port for PC connectivity.
4.3 Belangrijkste kenmerken
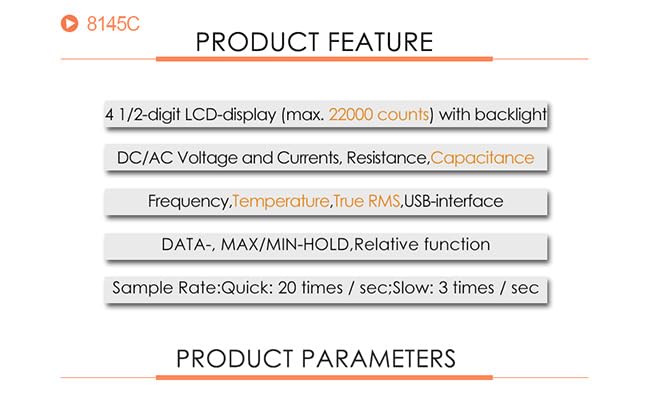
Figure 4.3: This graphic summarizes the main features of the VICTOR 8145C, including its 4 1/2-digit LCD, measurement capabilities (DC/AC Voltage, Current, Resistance, Capacitance, Frequency, Temperature, True RMS), USB interface, and data functions.
- 4½-digit LCD display (max. 22000 counts) with backlight.
- Meet DC/AC Voltage and Currents, Resistance, Capacitance, Frequency, and Temperature.
- Echte RMS-meting voor nauwkeurige aflezing van niet-sinusoïdale golfvormen.
- USB interface for PC connectivity and data logging.
- DATA HOLD, MAX/MIN/AVG, and Relative function.
- Sample Rate: Quick (20 times/sec) and Slow (3 times/sec).
5. Specificaties

Figure 5.1: A detailed table outlining the technical specifications of the VICTOR 8145C Digital Bench Multimeter, including measurement ranges, basic accuracy, display words, and special functions.
| Functie | Beschrijving |
|---|---|
| Weergave | 22000 Counts, 4½-digit LCD with backlight |
| DC voltage Bereik | 200mV / 2V / 20V / 200V / 1000V |
| DC voltage Basic Accuracy | ± (0.05% + 4dgt) |
| AC voltage Bereik | 200mV / 2V / 20V / 200V / 750V |
| AC voltage Basic Accuracy | ± (0.5% + 40dgt) |
| DC-stroombereik: | 0.2mA / 2mA / 20mA / 200mA / 10A |
| DC Current Basic Accuracy | ± (0.2% + 10dgt) |
| AC-stroombereik: | 0.2mA / 2mA / 20mA / 200mA / 10A |
| AC Current Basic Accuracy | ± (0.8% + 30dgt) |
| Weerstandsbereik | 200Ω / 2kΩ / 20kΩ / 200kΩ / 2MΩ / 20MΩ / 60MΩ |
| Resistance Basic Accuracy | ± (0.2% + 5dgt) |
| Capaciteitsbereik | 10nF / 100nF / 1000nF / 10uF / 100uF / 1000uF |
| Capacitance Basic Accuracy | ± (5% + 5dgt) |
| Frequentiebereik | 10 Hz ~ 10 MHz |
| Frequency Basic Accuracy | ± (0.02% + 4dgt) |
| Thermokoppelbereik | K indexing: -200.0°C ~ 1372.0°C |
| Thermocouple Basic Accuracy | ±(0.5%+5°C) |
| Meetsnelheid: | Quick: 20 times/sec; Slow: 2.5 times/sec |
| Automatic / Manual Range | Ja |
| Echte RMS | Ja |
| Bandbreedte | 1kHz |
| Diode Test | Ja |
| Continuïteit Pieper | Ja |
| MAX / MIN / GEM | Ja |
| Relatieve waardemeting | Ja |
| Gegevens vasthouden | Ja |
| Reference Junction Compensation | Ja |
| °C / °F Conversion | Ja |
| Energiebron | AC Power (1 LR41 battery included for internal functions) |
| Productafmetingen (L x B x H) | 20 x 15 x 18 cm (7.87 x 5.91 x 7.09 inch) |
| Artikelgewicht | 1 kg (2.2 lbs) |
| Fabrikant | Xi'an Beicheng Electronics Co.Ltd (VICTOR and Ruoshui) |
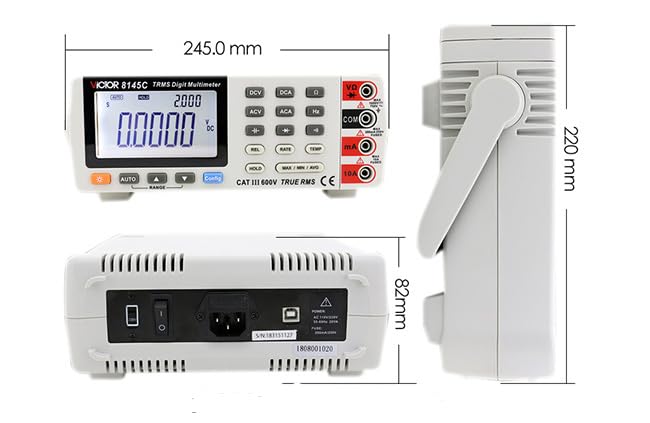
Figure 5.2: This diagram illustrates the physical dimensions of the VICTOR 8145C Digital Bench Multimeter, showing its length, width, and height in millimeters.
6. Instellen
6.1 Stroomaansluiting
- Ensure the multimeter's power switch (located on the rear panel) is in the OFF position.
- Connect the provided power cord to the AC power input on the rear panel of the multimeter.
- Steek het andere uiteinde van het netsnoer in een geschikt stopcontact.
- Flip the power switch to the ON position to power on the device.
6.2 Aansluiting van de testkabel
Always connect the test leads to the appropriate input jacks based on the measurement you intend to perform.
- Voor de meeste metingen (voltage, resistance, capacitance, frequency, diode, continuity): Insert the red test lead into the VΩ Jack en de zwarte test leiden naar de COM krik.
- Voor milliampere current measurements: Insert the red test lead into the mA Jack en de zwarte test leiden naar de COM krik.
- For high current (up to 10A) measurements: Insert the red test lead into the 10A Jack en de zwarte test leiden naar de COM krik.
6.3 mm USB-aansluiting (optioneel)
To connect the multimeter to a computer for data logging or control:
- Install the provided PC software from the CD onto your computer.
- Connect one end of the USB communication cable to the USB port on the rear panel of the multimeter.
- Sluit het andere uiteinde van de USB-kabel aan op een beschikbare USB-poort op uw computer.
- Follow the instructions in the PC software manual for establishing communication and using data logging features.
7. Gebruiksaanwijzing
7.1 Basisstappen voor metingen
- Ensure the multimeter is powered on and test leads are correctly connected for the desired measurement type.
- Select the appropriate function by pressing the corresponding button (e.g., DCV for DC Voltagen).
- The multimeter will typically operate in auto-ranging mode. If manual ranging is desired, press the RANGE button to cycle through available ranges.
- Sluit de testpennen aan op het te testen circuit of onderdeel.
- Lees de meetwaarde af op het lcd-scherm.
- Disconnect the test probes from the circuit after measurement.
7.2 Specifieke meetfuncties
- DC/AC-voltage (DCV/ACV): Druk op de DCV or ACV button. Connect probes in parallel with the circuit.
- DC/AC Current (DCA/ACA): Druk op de DCA or ACA button. Connect probes in series with the circuit. Ensure correct jack (mA or 10A) is used.
- Weerstand (Ω): Druk op de Ω button. Disconnect power from the circuit. Connect probes across the component.
- Capaciteit (F): Druk op de F button. Disconnect power and discharge the capacitor before connecting probes.
- Frequentie (Hz): Druk op de Hz button. Connect probes to the signal source.
- Temperatuur (TEMP): Druk op de TIJDELIJK button. Connect a K-type thermocouple (not included) to the appropriate input terminals.
- Diodetest: Druk op de Diode button. Connect probes across the diode. Forward bias will show a voltage drop, reverse bias will show OL.
- Continuïteitstest: Druk op de Continuïteit button. Connect probes across the circuit. A beep indicates continuity (low resistance).
7.3 Speciale functies
- HOUDEN: Druk op de UITSTEL Knop om de huidige waarde op het display te bevriezen. Druk nogmaals om los te laten.
- MAX/MIN/GEMIDDELDE: Druk op de MAX / MIN / GEM button to record the maximum, minimum, and average values over a period. Press repeatedly to cycle through MAX, MIN, AVG, and exit.
- REL (Relatieve Meting): Druk op de REL button to store the current reading as a reference value. Subsequent measurements will be displayed as the difference from this reference. Press again to exit.
- Configuratie: Used for advanced settings and configurations, refer to the detailed software manual for specific options.
8. Onderhoud
8.1 Reinigen
Om de multimeter schoon te maken, veegt u de behuizing schoon met een doekje.amp cloth and a mild detergent. Do not use abrasives or solvents. Ensure the device is powered off and disconnected from all power sources before cleaning.
8.2 Battery Replacement (Internal)
The multimeter includes an LR41 battery, typically for internal memory or clock functions. If the display shows signs of memory loss or incorrect time (if applicable), this battery may need replacement. This procedure should ideally be performed by qualified personnel to avoid damaging internal components.
8.3 Zekering vervangen
If the current measurement function fails, the internal fuse may need replacement. Refer to the detailed service manual or contact customer support for fuse specifications and replacement procedures. Always replace with a fuse of the identical type and rating.
8.4 Opslag
When not in use for extended periods, store the multimeter in a dry, dust-free environment, away from direct sunlight and extreme temperatures. Disconnect all test leads and the power cord.
9. Probleemoplossing
| Probleem | Mogelijke oorzaak | Oplossing |
|---|---|---|
| Geen weergave wanneer ingeschakeld | No AC power; Power cord loose; Power switch off | Check AC power connection; Ensure power switch is ON. |
| Onjuiste metingen | Wrong function/range selected; Poor test lead connection; Damaged test leads | Select correct function/range; Reconnect test leads firmly; Inspect/replace test leads. |
| Stroommeting werkt niet | Blown fuse; Incorrect jack used | Check/replace fuse (refer to service manual); Ensure red lead is in mA or 10A jack. |
| Continuity beeper not working | Circuit resistance too high; Beeper function not selected | Ensure circuit resistance is low; Select continuity function. |
| USB-communicatiefout | Driver not installed; Loose USB cable; Software issue | Install USB drivers from CD; Reconnect USB cable; Consult software manual. |
10. Garantie en ondersteuning
For warranty information, please refer to the documentation provided at the time of purchase or contact your retailer. The manufacturer of this product is Xi'an Beicheng Electronics Co.Ltd (VICTOR and Ruoshui).
If you encounter any issues not covered in this manual or require technical assistance, please contact the seller or authorized service center for support.


