1. Inleiding
This manual provides detailed instructions for the operation and maintenance of your Jectse X7 NFC Card Reader and RFID Duplicator. Please read this guide thoroughly before using the device to ensure proper functionality and to understand its full capabilities. This device is designed for reading, writing, and duplicating various IC and ID cards across multiple frequencies.
2. Product voorbijview
The Jectse X7 is a portable, handheld NFC and RFID card duplicator featuring a full-color screen and a numeric keypad for easy interaction. It supports a wide range of frequencies and offers functions like smart cloning, advanced operations, frequency detection, and system settings.

Image 2.1: Jectse X7 NFC Card Reader with included UID buckles, UID cards, USB Type-C cable, and USB adapter.
2.1 Apparaatcomponenten

Image 2.2: Key components of the Jectse X7 device.
- Beeldscherm: Full-color screen with protective lens, scratch and pressure resistant.
- Aan/uit-knop: Recessed design to prevent accidental pressing.
- Function Buttons (READ/WRITE): Used for reading and writing card data.
- Cijfertoetsen (0-9): For inputting card numbers or other data.
- Switching Button (*): Used for navigating menus or changing modes.
- Confirm Button (#): Used to confirm selections or actions.
3. Kenmerken
- Full Frequency Support: Supports ID and IC full frequency bands including 13.56MHz, 125KHz, 175KHz, 250KHz, 300KHz, 375KHz, and 500KHz.
- Ingebouwde batterij: Integrated 400mAh lithium battery for portable use.
- Type-C-connectiviteit: Supports Type-C for communication and power supply.
- NFC Simulation: Independent NFC simulation function allows devices with NFC capabilities to simulate encrypted IC cards with a single button.
- App-verbinding: Connects to a computer or compatible phone (Android and HarmonyOS) for quick upgrades and advanced functions.
- Belangrijkste functies: Efficient decryption, editing, analysis, card packet management, and one-key encryption.

Image 3.1: Visual representation of the Jectse X7's core features.
4. Inhoud van het pakket
Het standaardpakket omvat:
- 1 x Jectse X7 NFC Card Reader and RFID Duplicator
- 5 x UID Buckles
- 5 x UID Cards
- 1 x USB Type-C-kabel
- 1 x USB-adapter
5. Instellen
5.1 Eerste keer opladen
Before first use, ensure the device is fully charged. Connect the provided USB Type-C cable to the device and a compatible USB power source (e.g., computer USB port, wall adapter). The charging indicator on the device will show its status.
5.2 In-/uitschakelen
- Inschakelen: Press and hold the recessed Power Button (⏻) totdat het scherm oplicht.
- Uitschakelen: Houd de aan/uit-knop (⏻) until the device shuts down.
5.3 Connecting to a Computer or Phone
The device can be connected to a computer or a compatible Android/HarmonyOS phone for software upgrades and advanced functions. Use the provided USB Type-C cable.

Image 5.1: Device connected to a computer for upgrades or data management.

Image 5.2: Device connected to a mobile phone for app-based functions. Note: Only supports Android and HarmonyOS.
6. Gebruiksaanwijzing
The Jectse X7 offers several modes of operation accessible via its main menu. Navigate using the number keys and the switching/confirm buttons.

Image 6.1: Main menu options on the Jectse X7 display.
6.1 Basic Read and Write (Smart Clone)
This mode allows for one-key reading and writing, automatically recognizing the card model and frequency.
- Selecteer in het hoofdmenu "Smart Clone".
- Place the source card (the card you want to copy) on the device's reading area.
- Druk op de LEZEN button. The device will scan and display the card information.
- Remove the source card and place a blank UID card or buckle on the reading area.
- Druk op de SCHRIJVEN button to transfer the copied data to the new card.
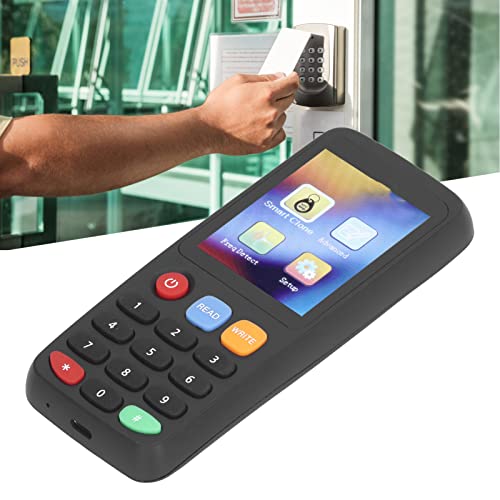
Image 6.2: Reading a card with the Jectse X7.
6.2 Frequency Detection (Freq Detect)
This function helps identify the frequency band of an unknown card.
- Selecteer in het hoofdmenu "Freq Detect".
- Place the card on the reading area.
- The device will automatically detect and display the card's frequency.
6.3 Geavanceerde bewerkingen
The "Advanced" menu provides options for formatting, reading, and writing GDM cards and certain special card types. Refer to the on-screen prompts for specific steps within this mode.
6.4 NFC Simulation
The Jectse X7 features an independent NFC simulation function, allowing it to emulate encrypted IC cards for use with NFC-enabled devices.
- Ensure the IC card data is successfully read and stored on the device.
- Navigate to the NFC Simulation option (if available in the menu or via a dedicated button).
- Activate the simulation. The device will then act as the original IC card when presented to an NFC reader.

Image 6.3: Using the NFC simulation feature.
6.5 App Connection and Upgrade
Connect the device to a computer or a compatible mobile phone (Android/HarmonyOS) using the Type-C cable to access the companion application. This app allows for quick upgrades, advanced decoding, and data management.

Image 6.4: App decoding interface on a connected smartphone.
7. System Settings (Setup)
The "Setup" menu allows you to customize various device parameters.
- Schermhelderheid: Adjust the display's illumination level.
- Uitschakeltijd: Configure automatic power-off duration.
- Keystore Clearing: Erase stored card data.
- Taal: Selecteer de gewenste taal.
- Systeeminformatie: View device details and firmware version.
8. Onderhoud
- Houd het apparaat schoon en vrij van stof en vocht. Gebruik een zachte, droge doek voor het reinigen.
- Laat het apparaat niet vallen en stel het niet bloot aan extreme temperaturen.
- Bewaar het apparaat op een koele, droge plaats wanneer het niet in gebruik is.
- Regularly check for software updates via the app connection to ensure optimal performance and compatibility.
9. Probleemoplossing
If you encounter issues with your Jectse X7, consider the following:
- Apparaat gaat niet aan: Zorg ervoor dat de batterij is opgeladen. Sluit het apparaat aan op een stroombron en probeer het opnieuw.
- Unable to read card:
- Ensure the card is placed correctly on the reading area.
- Verify the card type is supported by the device (ID or IC).
- Try using the "Freq Detect" function to confirm the card's frequency.
- Some encrypted cards may require advanced decryption methods via the app.
- Unable to write card:
- Ensure you are using a compatible writable card (e.g., UID card for IC, T5577 for ID).
- Verify the source card was read successfully.
- Check if the target card is damaged or already contains data that prevents overwriting.
- Problemen met app-verbinding:
- Zorg ervoor dat de USB-kabel goed is aangesloten.
- Confirm your phone's operating system is Android or HarmonyOS.
- Check for the latest version of the companion app.
10. Specificaties
| Modelnaam | Jectseew0uki26ga-12 |
| Merk | Jekt |
| Ondersteunde frequenties | 13.56MHz, 125KHz, 175KHz, 250KHz, 300KHz, 375KHz, 500KHz |
| Mediatype | IDCard, IC Card |
| Connectiviteitstechnologie | USB Type-C |
| Batterij | 400mAh lithiumbatterij (ingebouwd) |
| Compatible Devices (App) | Android, HarmonyOS |
| Pakket afmetingen | 7.36 x 6.18 x 2.2 inch |
| Artikelgewicht | 7.41 ons |
11. Belangrijke opmerkingen
The Jectse X7 is designed to read and write ID and IC cards. It is crucial to verify the type of card you intend to use before attempting any operations, as not all card types are universally compatible or writable.

Image 11.1: Reminder regarding card type compatibility.
12. Garantie en ondersteuning
For warranty information, technical support, or further assistance, please refer to the contact details provided with your purchase or visit the official Jectse website. Bewaar uw aankoopbon voor garantieclaims.


