1. Inleiding
This user manual provides comprehensive instructions for the installation, operation, and maintenance of your HDWR videoCAR-L300 Dash Cam. Please read this manual thoroughly before using the device to ensure proper functionality and to maximize its lifespan. Keep this manual for future reference.
2. Product voorbijview
The HDWR videoCAR-L300 is a versatile dash camera designed to enhance your driving safety and record your journeys. It functions as both a front and rear recording device, integrated into a rearview mirror with a touchscreen display.
Belangrijkste kenmerken:
- Full HD-video-opname: The front camera records in Full HD (1920x1080) resolution, providing clear and detailed video footage.
- Functionaliteit van de achtercamera: The rear camera offers VGA (640x480) recording resolution and can also serve as a reverse camera for parking assistance.
- Integrated 4.7-inch Touchscreen Display: The wide mirror, approximately 30 cm, features a built-in 4.7-inch touchscreen for easy operation and increased rear visibility.
- 120-Degree Wide-Angle Lens: The front camera's lens offers a 120-degree viewing angle, capturing a broad area in front of your vehicle.
- Automatische bediening: Features include automatic camera start and stop, motion detection, and adjustable sensitivity.
- G-Sensor for Impact Detection: Automatically protects recordings from being overwritten in the event of sudden braking or a collision.
- Ondersteuning voor microSD-kaarten: Supports microSD memory cards up to 32GB for storing recorded video and audio files.

Figuur 2.1: Voorzijde view of the HDWR videoCAR-L300 Dash Cam, showing the mirror display with a car image.
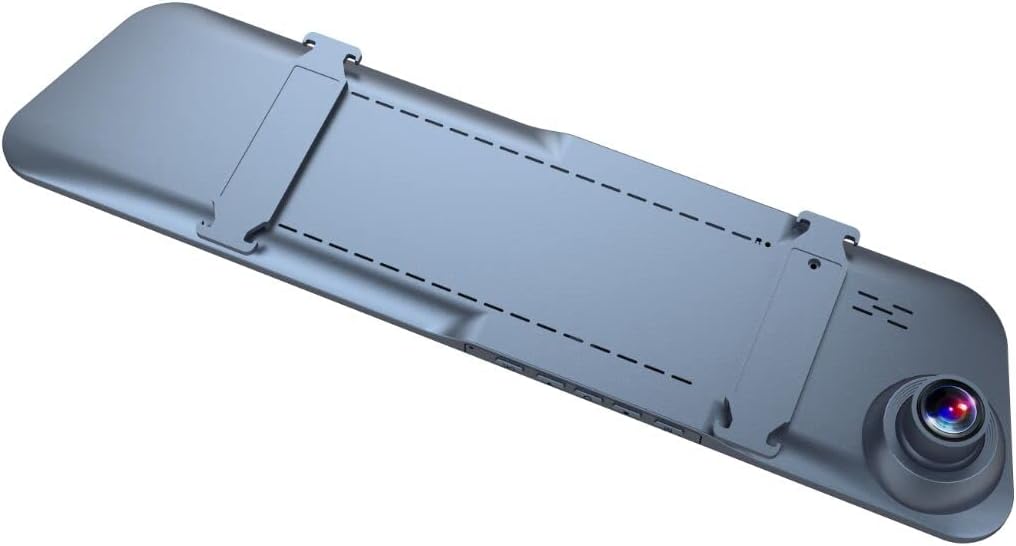
Afbeelding 2.2: Achter view of the HDWR videoCAR-L300 Dash Cam, highlighting the mounting clips for installation.
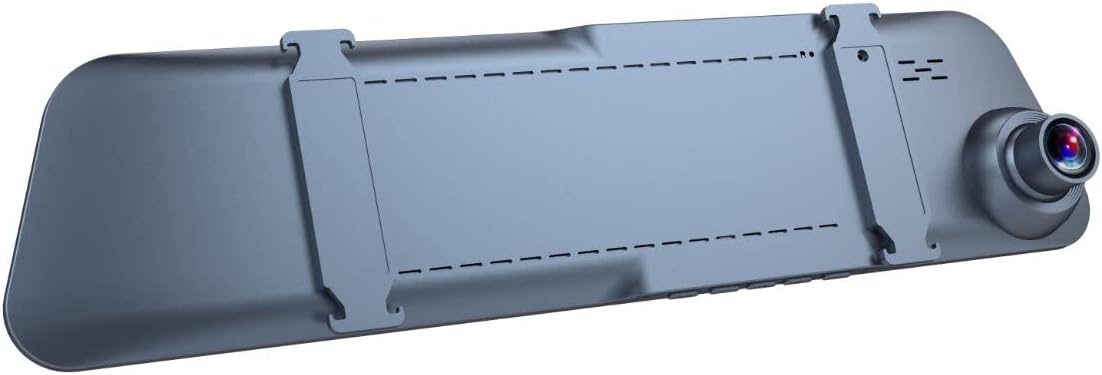
Figuur 2.3: Schuine achterkant view of the HDWR videoCAR-L300 Dash Cam, showing the camera lens and mounting clips.

Figuur 2.4: Geëxplodeerd view illustrating the various perspectives of the HDWR videoCAR-L300 Dash Cam.
3. Installatie en installatie
3.1 Wat zit er in de doos?
Controleer voordat u met de installatie begint of alle onderdelen aanwezig zijn:
- HDWR videoCAR-L300 Dash Cam Unit
- Oplaadkabel
- Installatietool
- Gebruikershandleiding (dit document)
3.2 Installation Steps (Windshield Mount)
The videoCAR-L300 is designed for windshield mounting, typically over your existing rearview spiegel.
- Bereid het apparaat voor: Gently unbox the dash cam and ensure the protective film is removed from the screen and lens.
- Montage: Securely attach the dash cam to your vehicle's rearview mirror using the integrated clips. Ensure it is firmly in place and does not obstruct your view.
- Sluit stroom aan: Use the provided charging cable to connect the dash cam to your vehicle's 12V power outlet (cigarette lighter socket). Route the cable neatly to avoid interference with driving.
- Achteruitrijcamera installeren (optioneel): If using the rear camera, connect it to the main unit and route its cable to the rear of the vehicle. Mount the rear camera in a suitable location, typically near the license plate or inside the rear window, ensuring a clear view.
- MicroSD-kaart plaatsen: Insert a compatible microSD card (up to 32GB, not included) into the designated slot on the dash cam. Ensure it is inserted correctly until it clicks into place.
- Eerste keer inschakelen: Start your vehicle. The dash cam should automatically power on. If not, press the power button.
- Hoek aanpassen: Adjust the angle of the front camera lens to ensure it captures the road ahead clearly. Use the live view on the touchscreen display for precise alignment.

Figure 3.1: The dash cam installed on the vehicle's rearview mirror, showing its integration into the car's interior.
4. Gebruiksaanwijzing
4.1 In-/uitschakelen
- Automatische bediening: The device is designed to automatically power on and begin recording when your vehicle's ignition is turned on, and power is supplied. It will automatically power off when the ignition is turned off.
- Handmatige bediening: To manually power on or off, press and hold the power button located on the device.
4.2 Touchscreen-navigatie
The 4.7-inch touchscreen display allows for intuitive navigation through menus and settings.
- Hoofdinterface: Toont live view from the front and/or rear cameras.
- Toegang tot menu's: Tap the screen to reveal menu icons. Swipe left/right or up/down to navigate through options.
- Opties selecteren: Tik op een pictogram of optie om deze te selecteren.

Figure 4.1: The dash cam's screen showing a live road view, indicating active recording.
4.3 Opnamemodi
- Loop-opname: The dash cam continuously records video in segments (e.g., 1, 3, or 5 minutes). When the memory card is full, the oldest unlocked fileworden automatisch overschreven.
- G-sensor (noodopname): In the event of sudden braking or a collision, the built-in G-Sensor detects the impact and automatically locks the current video segment, preventing it from being overwritten by loop recording.
- Bewegingsdetectie: When enabled, the camera will automatically start recording if it detects movement in front of the vehicle while parked. This feature requires continuous power supply.
4.4 Afspelen
opnieuwview opgenomen footage:
- From the main screen, tap to access the menu.
- Select the "Playback" or "Gallery" option.
- Browse through the recorded video and audio fileS. Op slot files (from G-Sensor events) will typically be in a separate folder.
- Tik op een file to play it back on the screen.
4.5 Instellingen aanpassen
Access the settings menu to customize various parameters:
- Videoresolutie: Adjust recording quality (e.g., Full HD, VGA).
- Duur van de lusopname: Set the length of video segments.
- Gevoeligheid G-sensor: Adjust the sensitivity of the impact detection.
- Bewegingsdetectie: Schakel deze functie in of uit.
- Datum/Tijd Stamp: Ensure the correct date and time are set for accurate recording timestamps.
- Audio-opname: Enable or disable microphone recording.
- Screensaver: Set the display to turn off after a period of inactivity to avoid distraction while driving.
5. Onderhoud
Regelmatig onderhoud zorgt voor optimale prestaties en een lange levensduur van uw dashcam.
- De lens reinigen: Gebruik een zachte, pluisvrije doek om de cameralenzen voorzichtig af te vegen. Vermijd schurende materialen of agressieve chemicaliën die krassen op de lens kunnen veroorzaken.
- Het scherm schoonmaken: Wipe the touchscreen display with a soft, dry cloth. For stubborn smudges, slightly dampen de doek met water.
- Onderhoud van MicroSD-kaart: Format the microSD card regularly (e.g., once a month) within the camera's settings to prevent data corruption and ensure smooth recording. Back up any important footage vóór het formatteren.
- Temperatuur: Avoid exposing the device to extreme temperatures (very hot or very cold) for extended periods, as this can affect battery life and component performance.
- Veilige montage: Controleer regelmatig of de dashcam stevig is gemonteerd om te voorkomen dat trillingen de videokwaliteit beïnvloeden of ervoor zorgen dat het apparaat valt.
6. Probleemoplossing
If you encounter issues with your HDWR videoCAR-L300, refer to the following common problems and solutions:
| Probleem | Mogelijke oorzaak | Oplossing |
|---|---|---|
| Apparaat gaat niet aan. | No power supply; loose cable connection; faulty power adapter. | Check the charging cable connection to the device and the vehicle's power outlet. Ensure the vehicle's ignition is on. Try a different power outlet or cable if available. |
| De opname stopt of bevriest. | Full or corrupted microSD card; slow microSD card; G-Sensor triggered too often. | Format the microSD card (back up data first). Use a high-speed (Class 10 or U1/U3) microSD card. Adjust G-Sensor sensitivity in settings. |
| Video footage is wazig of onduidelijk. | Dirty lens; protective film still on lens; improper camera angle. | Clean the camera lens with a soft cloth. Remove any protective film. Adjust the camera angle to ensure a clear view van de weg. |
| Het scherm reageert niet. | Tijdelijke softwarestoring. | Perform a soft reset by pressing and holding the power button until the device restarts. If unresponsive, disconnect power and reconnect. |
| Achtercamera werkt niet. | Loose connection; faulty cable or camera. | Controleer de verbinding van de kabel van de achteruitrijcamera met het hoofdtoestel. Controleer of de kabel niet beschadigd is. |
If the problem persists after trying these solutions, please contact HDWR customer support for further assistance.
7. Specificaties
| Functie | Detail |
|---|---|
| Merk | HDWR |
| Modelnaam | videoCAR |
| Artikelmodelnummer | L300 |
| Productafmetingen | 3.5D x 29.7W x 7H cm; 180 grams |
| Schermgrootte | 4.7 inch |
| Videoresolutie (voorzijde) | Volledige HD (1920x1080p) |
| Videoresolutie (achterkant) | VGA (640x480) |
| Viewhoek: | 120 graden |
| Flash-geheugentype | microSD (tot 32GB) |
| Connectiviteitstechnologie | Hulp |
| Speciale kenmerken | Motion Sensor, G-Sensor |
| Controlemethode | Aanraken |
| Montagetype | Voorruitbevestiging |
| Batterijen inbegrepen | Nee |
| Compatibele apparaten | Smartphone |
8. Garantie en ondersteuning
For warranty information and technical support, please refer to the official HDWR website or contact their customer service directly. Details regarding warranty periods and service procedures are typically provided with your purchase documentation or on the manufacturer's webplaats.
Voor verdere assistentie kunt u terecht op: www.hdwr.eu


