1. Inleiding
This user manual provides essential information for the safe and efficient operation of your HYCHIKA 3.6V Cordless Electric Rechargeable Screwdriver Drill Set. Please read this manual thoroughly before first use and keep it for future reference.
The HYCHIKA 3.6V Cordless Electric Screwdriver is designed for various screwing and light drilling tasks around the home. It features a maximum torque of 6 N-m, a 6.35 mm quick-change chuck, and a versatile design that allows for both pistol and straight grip configurations.
2. Veiligheidsinstructies
Neem altijd de basisveiligheidsmaatregelen in acht bij het gebruik van elektrisch gereedschap om het risico op brand, elektrische schokken en persoonlijk letsel te beperken.
- Veiligheid werkgebied: Houd uw werkplek schoon en goed verlicht. Rommelige of donkere ruimtes zijn een risico op ongelukken. Gebruik geen elektrisch gereedschap in explosieve atmosferen, zoals in de buurt van ontvlambare vloeistoffen, gassen of stof.
- Elektrische veiligheid: Vermijd lichamelijk contact met geaarde oppervlakken zoals leidingen, radiatoren, fornuizen en koelkasten. Stel elektrisch gereedschap niet bloot aan regen of vocht.
- Persoonlijke veiligheid: Always wear eye protection. Use safety glasses, goggles, or a face shield. Wear hearing protection when operating noisy tools. Dress properly; avoid loose clothing or jewelry.
- Gebruik en onderhoud van gereedschap: Forceer het elektrische gereedschap niet. Gebruik het juiste elektrische gereedschap voor uw toepassing. Haal de stekker uit het stopcontact en/of verwijder de accu voordat u aanpassingen uitvoert, accessoires verwisselt of elektrisch gereedschap opbergt.
- Gebruik en onderhoud van de batterij: Laad de accu alleen op met de door de fabrikant aangegeven lader. Gebruik de accu niet met ander elektrisch gereedschap. Houd de accu, wanneer deze niet in gebruik is, uit de buurt van andere metalen voorwerpen.
3. Inhoud van het pakket
Controleer of alle hieronder vermelde artikelen in uw pakket zitten. Als er artikelen ontbreken of beschadigd zijn, neem dan contact op met de klantenservice.
- 1 x HYCHIKA 3.6V Cordless Screwdriver
- 19 x schroevendraaier Bits
- 1 x Extension Bar
- 1 x Oplaadadapter
- 1 x Gebruikershandleiding

Figure 3.1: Contents of the HYCHIKA 3.6V Cordless Screwdriver package, including the screwdriver, various bits, and charging adapter.
4. Productkenmerken en componenten
Familiarize yourself with the different parts of your cordless screwdriver.

Figure 4.1: Key components of the screwdriver, including the magnetic chuck, PUSH button, front LED light, On/Off switch, LED charger indicator, 3.5mm charger port, and forward & reverse button.
- Magnetic Chuck: 1/4 inch (6.35mm) quick-change chuck for easy bit installation and removal.
- LED-voorlicht: Illuminates the work area for improved visibility in dark environments.
- Aan/uit-schakelaar: Activates and deactivates the screwdriver.
- Forward & Reverse Button: Controls the rotation direction for screwing and unscrewing.
- LED Charger Indicator: Provides status of battery charging.
- 3.5mm Charger Port: Connection point for the charging adapter.
- Druk op de knop: Used to adjust the grip configuration from pistol to straight.
5. Instellen
5.1 De batterij opladen
The screwdriver is powered by a 3.6V 2000 mAh Lithium-Ion battery. Before first use, fully charge the battery.
- Connect the charging adapter to the 3.5mm charger port on the screwdriver.
- Steek de oplaadadapter in een standaard stopcontact.
- The LED charger indicator will illuminate during charging. Once fully charged, the indicator may change color or turn off depending on the model.
- Haal de stekker van de oplader uit het stopcontact zodra het opladen voltooid is.

Figure 5.1: The screwdriver connected to its charging adapter, indicating a full charge.
The screwdriver is designed to maintain full power output even when the battery is low, ensuring consistent performance until the battery is depleted.
5.2 Schroevendraaierbits installeren
The screwdriver features a 1/4 inch (6.35mm) magnetic quick-change chuck for easy bit installation.
- Selecteer de juiste schroevendraaierbit voor uw taak.
- Insert the bit into the magnetic chuck until it is securely seated. The magnetic chuck will hold the bit firmly in place.
- To remove a bit, simply pull it out of the chuck. Bits with grooves are designed for easier removal.

Figure 5.2: Visual guide for inserting a bit into the magnetic chuck and removing it.
6. Gebruiksaanwijzing
6.1 Adjusting Grip Configuration
The screwdriver can be used in two grip configurations: pistol grip or straight grip, for enhanced versatility and comfort.
- To change the grip, press and hold the "PUSH" button located at the top of the screwdriver.
- While holding the button, rotate the handle ninety degrees to switch between pistol and straight configurations.
- Release the "PUSH" button once the desired configuration is achieved. The handle will lock into place.
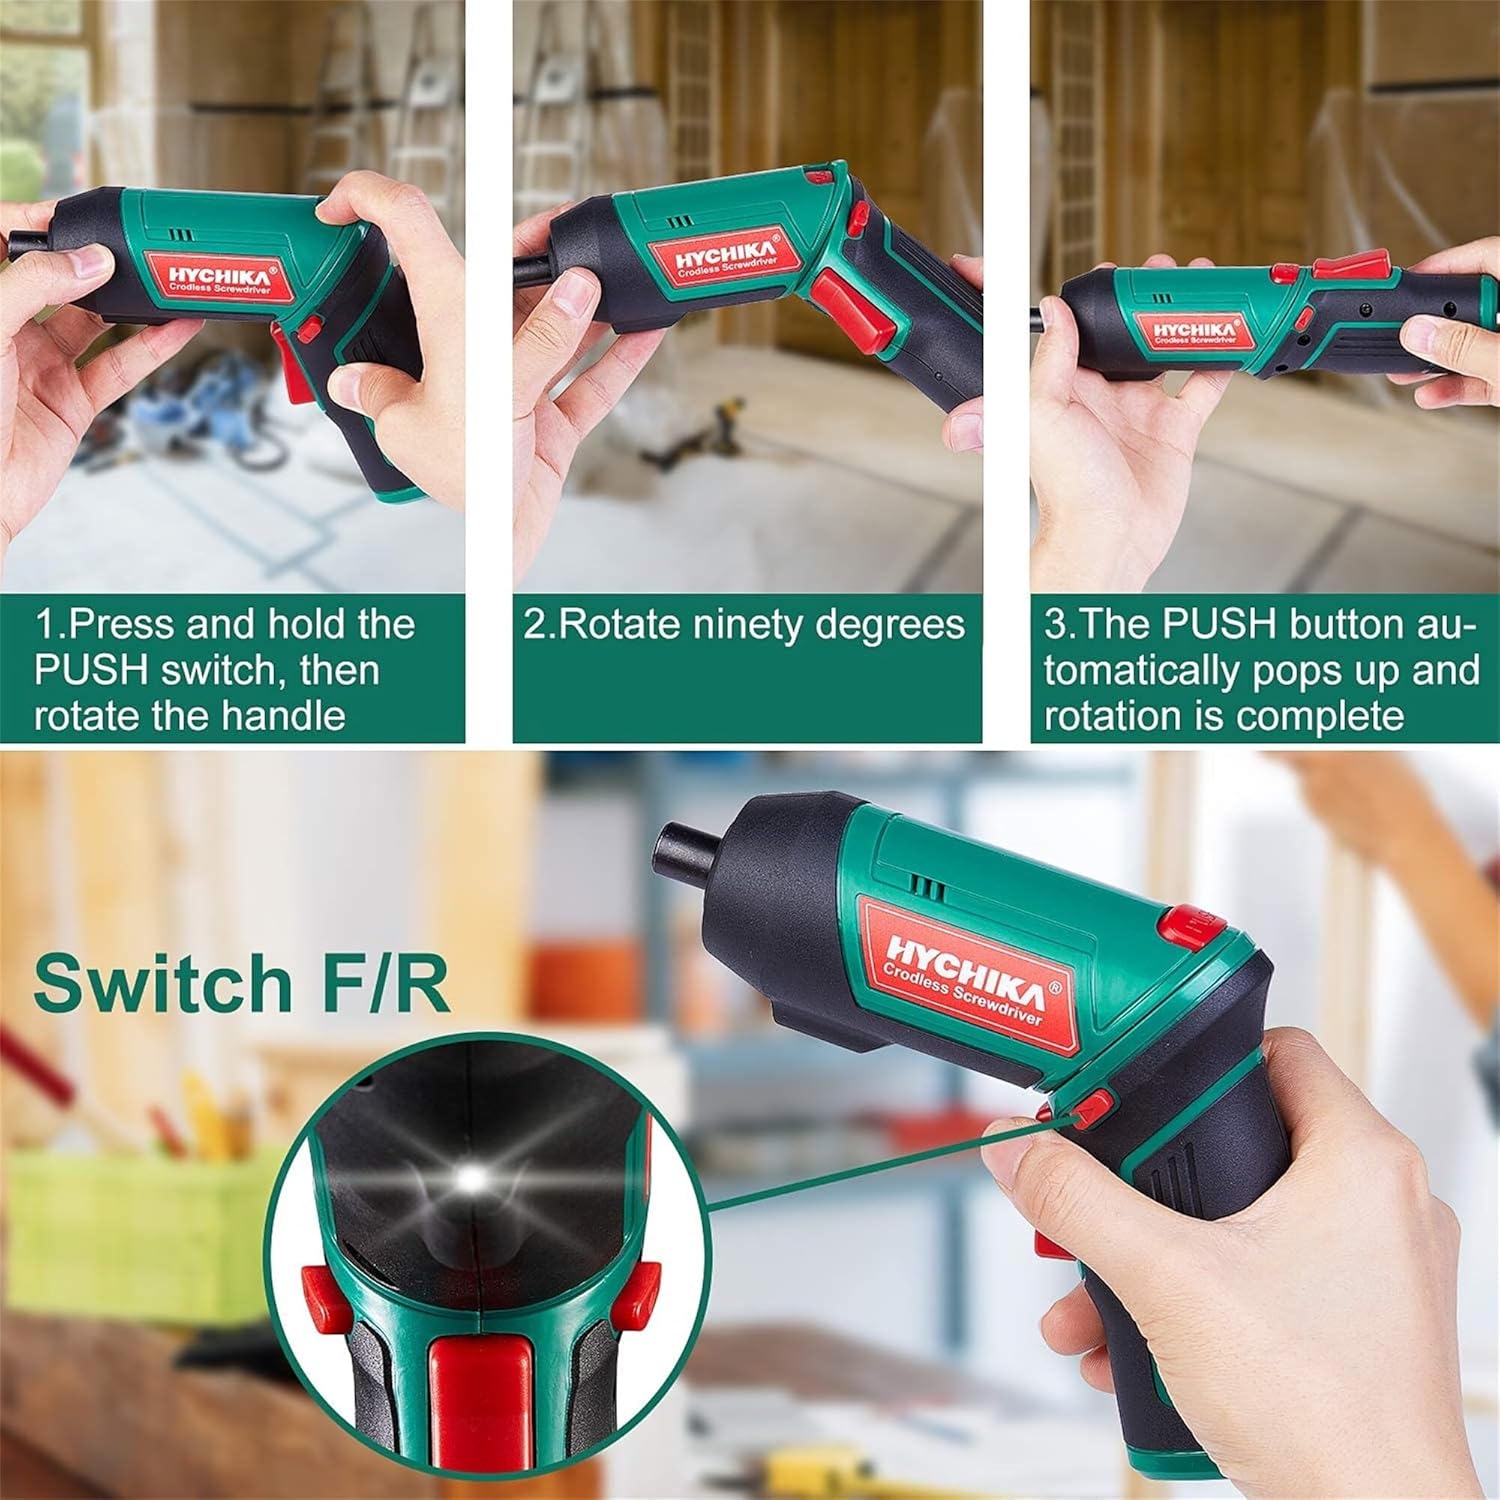
Figure 6.1: Demonstrates the process of transforming the screwdriver's grip by pressing the PUSH button and rotating the handle.
6.2 Vooruit- en achteruitrijden
The forward/reverse button controls the direction of rotation for screwing and unscrewing.
- To drive screws (forward rotation), push the forward/reverse button to the left (when viewvanaf de achterkant van het gereedschap).
- To remove screws (reverse rotation), push the forward/reverse button to the right.
- When the button is in the center position, the tool is locked, preventing accidental activation.
6.3 Het LED-werklicht gebruiken
The built-in LED light automatically illuminates when the screwdriver is in operation, providing visibility in dimly lit areas.

Figure 6.2: The integrated LED light provides clear illumination for working in dark environments.
7. Onderhoud
Regular maintenance ensures the longevity and optimal performance of your screwdriver.
- Schoonmaak: Houd de ventilatieopeningen schoon en stofvrij. Gebruik een zachte, droge doek.amp doek om het gereedschap schoon te maken casing. Gebruik geen agressieve chemicaliën of schurende reinigingsmiddelen.
- Bitverzorging: Clean screwdriver bits after use. Store them in the provided case to prevent loss and damage.
- Batterijopslag: If storing the tool for an extended period, ensure the battery is partially charged (around 50%) and store it in a cool, dry place. Recharge the battery every 3-6 months to maintain its health.
- Algemene Inspectie: Periodically check for any loose screws, damaged cords, or worn parts. Do not use the tool if any damage is observed.
8. Probleemoplossing
This section addresses common issues you might encounter with your screwdriver.
| Probleem | Mogelijke oorzaak | Oplossing |
|---|---|---|
| Schroevendraaier gaat niet aan. | Batterij is leeg. De vooruit/achteruit-schakelaar staat in de middelste (vergrendelde) stand. | Laad de batterij volledig op. Duw de vooruit/achteruit schakelaar naar links of rechts. |
| De schroevendraaier verliest snel zijn vermogen. | Batterij niet volledig opgeladen. Battery life degraded. | Zorg ervoor dat de batterij volledig is opgeladen voor gebruik. If battery life is significantly reduced, contact customer support for replacement options. |
| Bits are not held securely in the chuck. | Bit is not fully inserted. Chuck is vuil of beschadigd. | Push the bit firmly into the chuck until it clicks into place. Clean the chuck area. If damage is visible, contact customer support. |
Als het probleem blijft bestaan nadat u deze oplossingen hebt geprobeerd, neem dan contact op met de klantenservice.
9. Specificaties
| Functie | Specificatie |
|---|---|
| Merk | Overstock (HYCHIKA) |
| Modelnummer | c131a012-0da9-4306-aeab-b1d9ff5cd4b7 |
| Deeltage | 3.6 Volt |
| Energiebron | Op batterijen |
| Snelheid | 180 toeren per minuut |
| Artikel koppel | 6 Newton Meters (6 N-m) |
| Batterijtype | Lithium-ion |
| Batterijcapaciteit | 2000mAh |
| Chuck-maat | 1/4 inch (6.35 mm) |
| Materiaal | Kunststof, Rubber |
| Kleur | Groente |
| UPC | 616859793583 |
10. Garantie en ondersteuning
Overstock offers lifetime after-sales service for this product. For any questions, concerns, or technical assistance, please contact our customer support team.
Please have your model number (c131a012-0da9-4306-aeab-b1d9ff5cd4b7) and purchase information ready when contacting support.


