1. Inleiding
This manual provides detailed instructions for the safe and efficient operation of your HANMATEK HM305T Programmable DC Power Supply. The HM305T is a high-precision, adjustable DC power supply designed for laboratory, research, and repair applications, offering stable and reliable power output.

Figure 1: HANMATEK HM305T Programmable DC Power Supply overview, highlighting key features such as overvoltage protection, overcurrent protection, and intelligent temperature control.
2. Belangrijkste kenmerken
The HANMATEK HM305T is equipped with advanced features to ensure precision, safety, and versatility:
- Uitvoer met hoge precisie: Provides adjustable voltage from 0-30V and current from 0-5A, with a resolution of 10mV and 1mA.
- Four-Digit Display: Simultaneously displays output voltage, current, power, and time with high accuracy.
- Meerdere beschermingsfuncties: Inclusief meer dantage Protection (OVP), Over Current Protection (OCP), Over Power Protection (OPP), Over Temperature Protection (OTP), and Short-Circuit Protection.
- Programmeerbare besturing: Connects to a PC via USB for software control and programming functions.
- Dubbele USB-oplaadpoorten: Front-panel 5V 1.5A USB ports for convenient device charging.
- Geheugenopslag: Six groups of parameter shortcut keys (M1-M6) for quick recall of frequently used settings.
- Intelligente koelventilator: Past de ventilatorsnelheid automatisch aan op basis van de temperatuur om optimale bedrijfsomstandigheden te handhaven.
- Uitgang AAN/UIT-schakelaar: One-key control for output, allowing pre-setting of values before activation.
- Toetsenbordvergrendeling: Voorkomt onbedoelde wijzigingen in instellingen tijdens het gebruik.

Figure 2: The HM305T features a high-precision four-digit display for voltage, current, and power, shown alongside other measurement devices for comparison.
3. Inhoud van het pakket
Controleer bij het uitpakken of alle artikelen in de verpakking aanwezig zijn:
- HANMATEK HM305T Programmable DC Power Supply
- Stroomkabel
- USB-communicatiekabel
- Test Leads (Alligator clips)
- Gebruiksaanwijzing
- Software CD (for PC control)

Figure 3: All items included in the HANMATEK HM305T package, neatly arranged.
4. Product voorbijview en bedieningselementen
Familiarize yourself with the front and rear panels of the power supply.

Figure 4: Detailed diagram of the HM305T's front and rear panels, indicating the location and function of all controls and ports.
Bedieningselementen op het voorpaneel:
- Deeltage Weergave: Toont het uitgangsvolumetage.
- Huidige weergave: Shows the output current.
- Power/Menu/Status Display: Shows output power, menu options, or status.
- Time/Status Display: Shows output time or status.
- Deeltage Setting Key (UCV): Press to adjust voltage.
- Current Setting Key (ICC): Press to adjust current.
- Rotating Jog Wheel: Used to adjust values when setting voltage of stroom.
- meer dan voltage Setting Key (OVP): Stelt de overspanning intagDe beschermingslimiet.
- Over Current Setting Key (OCP): Stelt de overstroombeveiligingslimiet in.
- Output On/Off Switch: Schakelt het uitgangsvermogen in of uit.
- Memory Shortcut Keys (M1-M6): Store and recall up to six sets of voltage en huidige parameters.
- List Next/Mode Key: Navigates through lists or changes modes.
- ESC/Keyboard Lock Key: Exits menu or locks/unlocks the keyboard.
- Dual USB Output Charging Key (5V/1.5A): Activates the front USB charging ports.
- Uitgangsklemmen: Positive (+), Negative (-), and Ground (GND) connections for load.
Onderdelen op het achterpaneel:
- Koelventilator: Voert warmte af van het apparaat.
- USB-communicatie-interface: Connects to a PC for software control.
- Wisselstroom ingang: Connects the power supply to the mains electricity.
- Zekeringhouder: Bevat de beveiligingszekering.
5. Instellen
- Plaatsing: Place the power supply on a stable, level surface with adequate ventilation. Ensure the cooling fan at the rear is not obstructed.
- Stroomaansluiting: Connect the provided AC power cable to the AC Power Input on the rear panel and then to a suitable mains power outlet.
- USB-verbinding (optioneel): For PC control, connect the provided USB communication cable from the USB Communication Interface on the rear panel to your computer. Install the software from the included CD or download the latest version from the HANMATEK webplaats.
- Eerste keer inschakelen: Press the Power Button on the front panel to turn on the unit. The display will illuminate.
6. Gebruiksaanwijzing
6.1 Vol. instellentage en stroom
- Ensure the output is OFF (Output button LED is off).
- Druk op de UCV (Voltage Setting) key. The voltage display will start blinking.
- Draai de Rotating Jog Wheel to adjust the desired voltage. Press the jog wheel to move between digits for fine adjustment.
- Druk op de ICC (Current Setting) key. The current display will start blinking.
- Draai de Rotating Jog Wheel to adjust the desired current limit. Press the jog wheel to move between digits.
- Zodra de instellingen voltooid zijn, drukt u op de Uitvoer button to enable the power output. The Output button LED will illuminate.
6.2 Using Memory Functions (M1-M6)

Figure 5: The memory buttons (M1-M6) allow for quick storage and recall of frequently used voltage en huidige instellingen.
- To Save Settings: Stel het gewenste volume intage and current. Press and hold one of the memory keys (M1-M6) for approximately 3 seconds until a confirmation beep or display change indicates the settings are saved.
- To Recall Settings: Briefly press the desired memory key (M1-M6). The stored voltage and current values will be loaded.
6.3 meer dan voltage Beveiliging (OVP) en Overstroombeveiliging (OCP)
These functions protect your connected load from excessive voltage of stroom.
- Setting OVP: Druk op de OVP key. The OVP value will blink. Use the Rotating Jog Wheel to set the maximum allowable output voltage. druk op OVP nogmaals ter bevestiging.
- Setting OCP: Druk op de OCP key. The OCP value will blink. Use the Rotating Jog Wheel to set the maximum allowable output current. Press OCP nogmaals ter bevestiging.
6.4 Toetsenbordvergrendeling
Om onbedoelde wijzigingen in de instellingen te voorkomen, houdt u de knop ingedrukt ESC/Lock key for 3 seconds to lock the keyboard. Repeat to unlock.
6.5 Dubbele USB-oplaadpoorten gebruiken

Figure 6: The front panel features two 5V 1.5A USB ports for convenient charging of external devices.
Connect your USB-powered devices to the 5V/1.5A USB ports on the front panel. These ports provide a fixed 5V output at up to 1.5A for charging or powering compatible devices.
6.6 PC-softwarebesturing
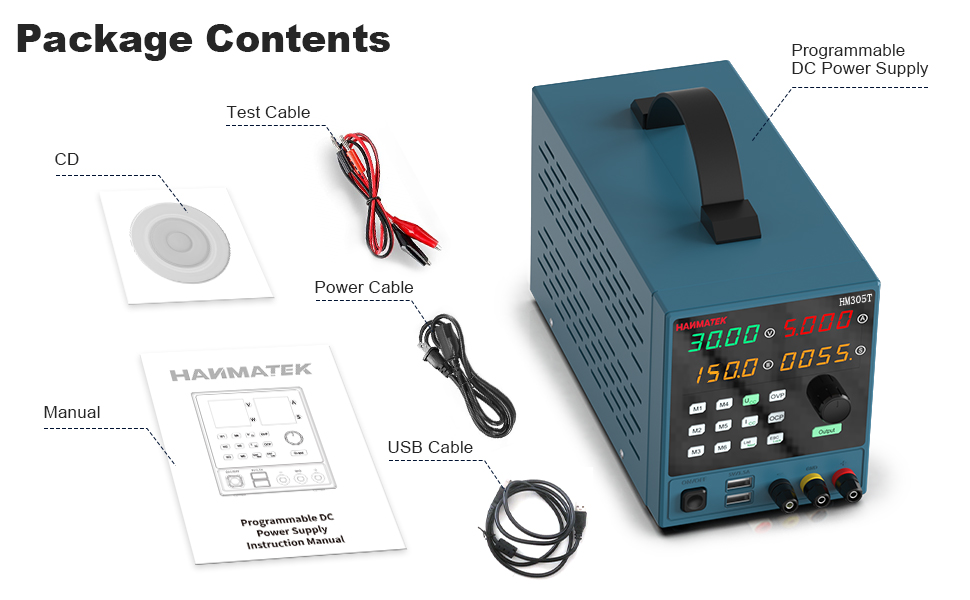
Figure 7: The PC software interface allows for remote control, data logging, and advanced programming of the HM305T power supply.
Install the provided software on your computer. Connect the power supply to your PC using the USB communication cable. The software allows for remote control of voltage and current, data logging, and advanced programming functions. Refer to the software's dedicated help documentation for detailed usage instructions.
7. Onderhoud
7.1 Reinigen
Regularly clean the exterior of the power supply with a soft, dry cloth. Do not use abrasive cleaners or solvents. Ensure the unit is powered off and disconnected from the mains before cleaning.
7.2 Koelventilator

Figure 8: The rear cooling fan ensures proper heat dissipation for stable operation.
Periodically check the cooling fan and its vents for dust accumulation. Use compressed air to gently clear any dust to ensure proper airflow and prevent overheating. Do not attempt to disassemble the unit to clean the fan.
7.3 Zekering vervangen

Figure 9: The fuse holder is located on the rear panel, integrated with the AC power input.
If the unit fails to power on, the fuse may need replacement. Ensure the power supply is disconnected from the mains. Carefully remove the fuse holder from the AC power input socket using a small flat-head screwdriver. Replace the fuse with one of the same type and rating (refer to specifications for details). Reinsert the fuse holder securely.
8. Probleemoplossing
- Geen stroom:
- Check if the power cable is securely connected to both the unit and the mains outlet.
- Controleer of het stopcontact werkt.
- Check and replace the fuse if necessary (refer to Section 7.3).
- Geen uitvoervolumetage/Huidig:
- Zorg ervoor dat de Uitvoer button is pressed and its LED is illuminated.
- Check if OVP or OCP limits have been triggered. Adjust limits or reset the unit if protection is active.
- Verify that the load is correctly connected to the output terminals.
- Zorg ervoor dat de ingestelde volumetage and current values are not zero.
- Onjuiste metingen:
- Ensure proper connection of test leads to the load.
- Compare readings with a calibrated multimeter to verify accuracy. If significant discrepancies exist, contact support.
- Memory Settings Not Saving (M1-M6):
- Ensure you are pressing and holding the memory key for approximately 3 seconds to save. A brief press will recall.
- If issues persist, try a factory reset (refer to manual for specific procedure, if available, or contact support).
- Problemen met de pc-softwareverbinding:
- Controleer of de USB-kabel goed is aangesloten.
- Zorg ervoor dat de juiste stuurprogramma's op uw pc zijn geïnstalleerd.
- Check the software settings for the correct COM port selection.
9. Veiligheidsinformatie
Observe the following safety precautions to prevent electric shock, injury, or damage to the unit:
- Always connect the power supply to a grounded outlet.
- Gebruik het apparaat niet in natte of droge omstandigheden.amp voorwaarden.
- Open de c nietasing of the power supply. There are no user-serviceable parts inside, and doing so voids the warranty and poses a risk of electric shock.
- Zorg voor goede ventilatie rondom het apparaat om oververhitting te voorkomen.
- Overschrijd het maximale volume niettage and current ratings of the power supply or the connected load.
- Utilize the Over Voltage Protection (OVP) and Over Current Protection (OCP) features to safeguard your circuits.
- Disconnect the power supply from the mains before performing any maintenance or connecting/disconnecting loads.
- Houd kinderen uit de buurt van het apparaat.

Figure 10: The internal components of the HM305T are designed with multiple protection features including overvoltage, overcurrent, overpower, overtemperature, and short-circuit protection.
10. Specificaties
| Parameter | Waarde |
|---|---|
| Model | HM305T |
| Uitgangsvolumetage Bereik | 0-30V |
| Uitgangsstroombereik | 0-5A |
| Uitgangsvermogen | 150 Watt |
| Deeltage Resolutie | 10mV |
| Huidige resolutie | 1mA |
| Weergave | 4-cijferige LED (Voltage, Current, Power, Time) |
| Beschermingsfuncties | OVP, OCP, OPP, OTP, Short-Circuit |
| USB-oplaadpoorten | 2x 5V/1.5A |
| Communicatie-interface | USB |
| Materiaal | PC (Polycarbonaat) |
| Afmetingen (L x B x H) | 35.61 x 21.49 x 17.81 cm (ongeveer 14 x 8.5 x 7 inch) |
| Gewicht | 2.42 kg (ongeveer 5.34 lbs) |

Figure 11: Approximate dimensions of the HM305T power supply.
11. Garantie en ondersteuning
The HANMATEK HM305T Programmable DC Power Supply comes with a standard manufacturer's warranty. For specific warranty terms, please refer to the warranty card included in your package or visit the official HANMATEK webplaats.
For technical support, troubleshooting assistance beyond this manual, or warranty claims, please contact HANMATEK customer service through their official channels. Provide your model number (HM305T) and purchase details when contacting support.


