1. Inleiding
Thank you for choosing an Indesit appliance. This user manual provides essential information for the safe and efficient operation, installation, and maintenance of your Indesit TWE 71252 S EU front-loading washing machine. Please read these instructions carefully before using the appliance and keep them for future reference. Proper use and maintenance will ensure optimal performance and extend the lifespan of your washing machine.
2. Veiligheidsinformatie
Algemene veiligheid:
- Dit apparaat is uitsluitend bedoeld voor huishoudelijk gebruik.
- Do not allow children to play with the appliance. Supervise children to ensure they do not climb into the drum.
- Haal altijd de stekker van het apparaat uit het stopcontact voordat u het reinigt of onderhoudt.
- Do not operate the washing machine if the power cord or plug is damaged, or if the appliance itself is faulty. Contact qualified service personnel.
- Zorg ervoor dat het apparaat goed geaard is.
Veiligheid bij installatie:
- Remove all transit bolts and packaging materials before use. Failure to do so can cause severe damage.
- Install the appliance on a firm, level floor. Adjust the feet to ensure stability.
- Zorg voor voldoende ventilatie rond het apparaat.
- Sluit de watertoevoerslang aan op een koudwaterkraan. Zorg ervoor dat alle aansluitingen goed vastzitten om lekkage te voorkomen.
- The drain hose must be securely fixed to prevent displacement during operation.
3. Product voorbijview
Your Indesit TWE 71252 S EU washing machine features a user-friendly design with essential components for efficient laundry care.

Figuur 3.1: Voorkant view of the Indesit TWE 71252 S EU washing machine. This image shows the overall design, including the control panel at the top, the detergent dispenser on the left, and the main loading door in the center.
Belangrijkste componenten:
- Configuratiescherm: Located at the top, featuring digital touch controls, push buttons, and a rotary knob for program selection.
- Wasmiddeldispenser: A pull-out drawer for adding detergent and fabric softener.
- Laaddeur: Voorlader voor het toevoegen en verwijderen van wasgoed.
- Trommel: Roestvrijstalen binnenkant waar wasgoed wordt gewassen.
- Afvoerfilter: Aan de onderkant, aan de voorkant, gemakkelijk te reinigen.

Figuur 3.2: Close-up of the detergent dispenser and control panel. This view highlights the various compartments within the dispenser for pre-wash, main wash, and softener, along with the program selection knob and digital display.

Figuur 3.3: Interieur view of the stainless steel drum. This image shows the perforated surface of the drum, designed for effective washing and rinsing, and the agitator paddles.
4. Installatie en instellingen
Een goede installatie is cruciaal voor de prestaties en levensduur van uw wasmachine.
4.1 Uitpakken:
- Verwijder voorzichtig alle verpakkingsmaterialen, inclusief de piepschuimbasis en eventuele beschermfolie.
- Remove the transit bolts located at the rear of the machine. These bolts secure the drum during transport and must be removed before operation. Keep them for future transport if needed.
4.2 Positionering:
- Place the washing machine on a flat, stable surface, away from direct sunlight or heat sources.
- Adjust the adjustable feet at the bottom of the machine to ensure it is perfectly level. Use a spirit level to verify.
- Ensure there is sufficient space around the machine for ventilation and ease of access.
4.3 Wateraansluiting:
- Connect the supplied water inlet hose to the cold water tap. Hand-tighten the connection, then use a wrench for a quarter turn.
- Connect the other end of the inlet hose to the water inlet valve at the back of the washing machine.
- Position the drain hose into a standpipe or over the edge of a sink, ensuring it is securely fixed to prevent it from falling out during draining. The height of the drain point should be between 65 cm and 100 cm from the floor.
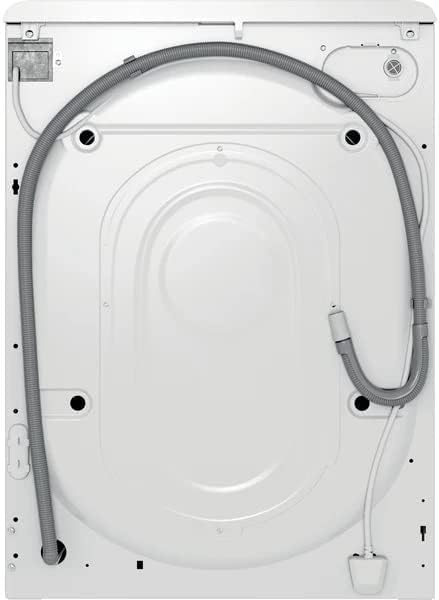
Figuur 4.1: Achterkant view of the washing machine. This image illustrates the connections for the water inlet hose (typically blue or white) and the drain hose, along with the power cable.
4.4 Elektrische aansluiting:
- Plug the power cord into a properly earthed electrical socket.
- Gebruik geen verlengsnoeren of verdeelstekkers.
4.5 First Wash Cycle:
- Before washing clothes, run an empty wash cycle to clean the drum and remove any manufacturing residues.
- Voeg een kleine hoeveelheid wasmiddel toe aan het hoofdwascompartiment.
- Select a short, hot wash program (e.g., 60°C cotton cycle) and start the machine.
5. Gebruiksaanwijzing
Volg deze stappen voor een effectieve en veilige werking van uw wasmachine.
5.1 Wasgoed inladen:
- Open de laaddeur.
- Sorteer uw wasgoed op soort stof, kleur en mate van vervuiling.
- Load laundry loosely into the drum, ensuring not to overload. The 7kg capacity refers to dry laundry weight.
- Doe de deur goed dicht totdat deze vastklikt.
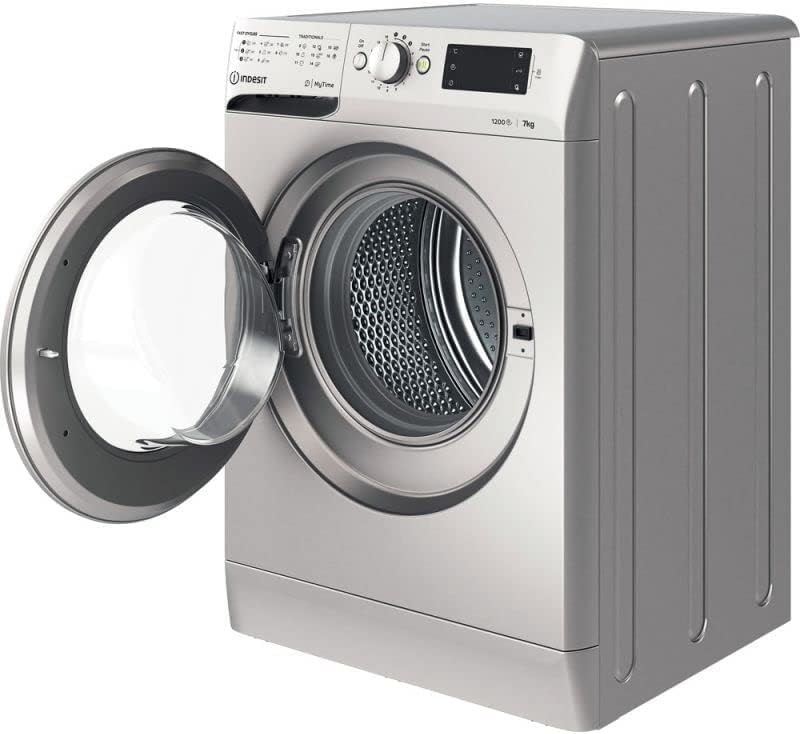
Figuur 5.1: Voorkant view of the washing machine with the door open. This image shows the wide opening for easy loading and unloading of laundry into the drum.
5.2 Toevoeging van wasmiddel en additieven:
- Trek de wasmiddellade eruit.
- Add the appropriate amount of detergent to the main wash compartment (usually marked 'II' or 'Main Wash').
- If using fabric softener, pour it into the designated compartment (usually marked with a flower symbol or 'Softener'). Do not exceed the 'MAX' level.
- Sluit de dispenserlade voorzichtig.
5.3 Een programma kiezen:
- Turn the rotary knob on the control panel to select the desired wash program. The machine offers various programs for different fabric types and soil levels, including a 'Quick Wash' option.
- Use the digital touch controls and push buttons to adjust additional settings such as temperature, spin speed (up to 1200 RPM), or delay start, if available for the selected program.
5.4 Starting a Cycle:
- Druk op de 'Start/Pauze'-knop om de wascyclus te starten. Het indicatielampje gaat branden.
5.5 Pausing/Canceling a Cycle:
- To pause a cycle, press the 'Start/Pause' button. The indicator light will flash.
- To cancel a cycle, press and hold the 'Start/Pause' button for a few seconds, or turn the program selector knob to 'Off' and then back to a new program.
5.6 End of Cycle:
- The machine will signal the end of the cycle (e.g., with an audible alert or a specific display message).
- Open de deur en haal de was er meteen uit om te voorkomen dat er iets kreukt.asing and odors.
- Laat de deur een klein beetje openstaan zodat de trommel kan drogen.
6. Onderhoud en reiniging
Regelmatig onderhoud zorgt voor optimale prestaties en hygiëne.
6.1 Het reinigen van de wasmiddeldispenser:
- Trek de dispenserlade er volledig uit.
- Verwijder alle verwijderbare onderdelen en spoel ze af onder stromend water.
- Reinig de ladebehuizing met een borstel.
- Zet de lade weer in elkaar en plaats hem terug.
6.2 Cleaning the Drum:
- Run a maintenance wash cycle (e.g., a hot cycle with a drum cleaning agent or white vinegar) every few months to prevent odor and residue buildup.
6.3 De deurafdichting reinigen:
- Veeg de rubberen deurafdichting na elke wasbeurt schoon om pluisjes, vuil en vocht te verwijderen. Dit voorkomt schimmelvorming en nare geurtjes.
6.4 Cleaning the Drain Filter:
- Periodically clean the drain filter to prevent blockages and ensure proper drainage.
- Open het klepje aan de onderkant van de machine.
- Zet er een ondiepe bak onder om eventueel restwater op te vangen.
- Draai het filter voorzichtig los, zodat het water eruit kan lopen.
- Verwijder eventuele pluisjes, muntjes of andere vreemde voorwerpen uit het filter en de filterbehuizing.
- Rinse the filter under running water and screw it back in firmly. Close the cover.

Figuur 6.1: Close-up of the drain filter access. This image shows the removable cap that covers the drain filter, which needs to be regularly cleaned to prevent blockages.
6.5 External Cleaning:
- Veeg de buitenkant van de machine af met een zachte, damp doek. Gebruik geen schurende reinigingsmiddelen of oplosmiddelen.
7. Probleemoplossing
Before contacting customer service, try these simple solutions for common issues.
| Probleem | Mogelijke oorzaak | Oplossing |
|---|---|---|
| Machine start niet | Geen stroom; Deur niet gesloten; Programma niet geselecteerd; Start-/pauzeknop niet ingedrukt. | Controleer de stroomvoorziening; zorg ervoor dat de deur goed gesloten is; selecteer een programma; druk op Start/Pauze. |
| Water vult niet | Waterkraan dicht; Toevoerslang geknikt; Waterdruk te laag. | Draai de waterkraan open. Draai de slang recht. Controleer de waterdruk in huis. |
| Water loopt niet weg | Afvoerslang geknikt of verstopt; afvoerfilter verstopt. | Straighten or clear drain hose; Clean the drain filter (see Section 6.4). |
| Overmatige trillingen/geluid | Transportbouten niet verwijderd; Machine niet waterpas; Ongelijke lading. | Remove transit bolts (if not already); Adjust feet to level machine; Redistribute laundry evenly. |
| Wasmiddelresten op kleding | Too much detergent; Detergent dispenser blocked; Insufficient rinse. | Reduce detergent amount; Clean dispenser; Select an extra rinse option if available. |
8. Specificaties
Detailed technical specifications for the Indesit TWE 71252 S EU washing machine.
| Functie | Specificatie |
|---|---|
| Model | TWE 71252 S EU |
| Merk | Onbewoond |
| Capaciteit | 7 kg |
| Maximale centrifugeersnelheid | 1200 toeren per minuut |
| Afmetingen (H x B x D) | 85 cm x 59.5 cm x 54 cm |
| Gewicht | 66.5 kg |
| Energie-efficiëntie | A+++ 90% |
| Trommelmateriaal | Roestvrij staal |
| Controletype | Digital Touch, Push Button, Rotary Knob |
| Installatietype | Vrijstaand |
| Kleur | Zilver |
| Speciale kenmerken | Durable, Quick Wash Option |
| Meegeleverde componenten | Wasmachine |
9. Garantie en ondersteuning
For warranty information, please refer to the warranty card provided with your appliance or contact your retailer. Keep your proof of purchase (receipt or invoice) as it will be required for any warranty claims.
If you encounter issues that cannot be resolved using the troubleshooting guide, please contact Indesit customer service or an authorized service center. Do not attempt to repair the appliance yourself, as this may void your warranty and pose safety risks.


