1. Inleiding
This manual provides comprehensive instructions for the safe and effective use of the C-LOGIC 580 Smart Digital Multimeter. Please read this manual thoroughly before operation and retain it for future reference.
The C-LOGIC 580 is a smart digital multimeter designed for accurate and efficient electrical measurements. Its smart technology allows for automatic recognition of measurement parameters, reducing potential errors for amateur users and saving time for professionals.
2. Veiligheidsinformatie
Neem bij het gebruik van elektrische testapparatuur altijd de veiligheidsvoorschriften in acht. Het niet naleven hiervan kan leiden tot letsel of schade aan het apparaat.
- Overschrijd de voor elke functie opgegeven maximale invoerwaarden niet.
- Ensure the test leads are properly connected and the function switch is in the correct position before making any measurements.
- Wees uiterst voorzichtig wanneer u met spanningvoerende circuits werkt.
- Gebruik de multimeter niet als deze beschadigd lijkt of als de meetsnoeren niet meer werken.
- Refer to the CAT III 600V and MAX 600V markings on the device for voltagde limieten.
3. Producteigenschappen
- Slimme technologie: Automatic recognition of measurement parameters.
- Error Reduction: Designed to minimize errors for amateur users.
- Tijdsbesparing: Streamlines measurement processes for professional users.
- Digitaal beeld: Clear and easy-to-read digital readout.
- Meerdere functies: Capable of measuring various electrical parameters.
4. Inhoud van het pakket
Controleer bij het openen van het pakket of alle artikelen aanwezig en onbeschadigd zijn.
- C-LOGIC 580 Smart Digital Multimeter
- Testkabels (rood en zwart)
- Gebruiksaanwijzing
5. Instellen
5.1 Batterij installatie
The C-LOGIC 580 is battery powered. Ensure batteries are correctly installed before first use.
- Zoek het klepje van het batterijcompartiment aan de achterkant van de multimeter.
- Gebruik een schroevendraaier om het batterijvak te openen.
- Insert the required batteries, observing the correct polarity (+ and -).
- Plaats het deksel van het batterijcompartiment terug en zet het vast.
5.2 Testkabels aansluiten
Een correcte aansluiting van de meetsnoeren is cruciaal voor nauwkeurige en veilige metingen.
- Steek de zwarte testkabel in de "COM" (Common) ingang.
- Insert the red test lead into the "VHz%" input jack for voltage, frequency, and duty cycle measurements.
- Zorg ervoor dat de verbindingen stevig en veilig zijn.
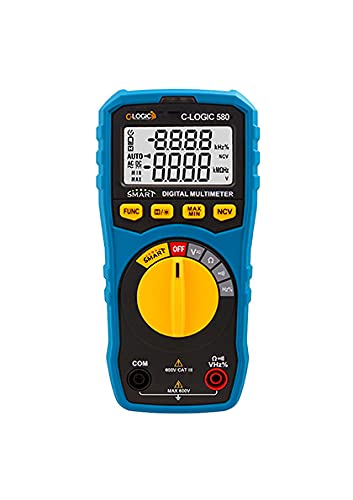
Figuur 1: Voorzijde view of the C-LOGIC 580 Smart Digital Multimeter, showing the display, rotary switch, function buttons, and input jacks (COM and VHz%). The display shows "-8.8.8.8" and "0.0.0.0" with indicators for AUTO, AC/DC, kHz%, NCV, MAX, MIN, and V. The rotary switch is set to OFF. The input jacks are labeled "COM" and "VHz%".
6. Gebruiksaanwijzing
6.1 In-/uitschakelen
To power on the multimeter, rotate the central yellow dial from the "OFF" position to any desired measurement function. To power off, rotate the dial back to "OFF".
6.2 Slimme meetmodus
The C-LOGIC 580 features a smart mode that automatically identifies the type of measurement (e.g., AC voltage, DC voltage, resistance) when the leads are connected to a circuit. This simplifies operation by eliminating the need to manually select the measurement type.
6.3 functieknoppen
The multimeter includes several function buttons below the display:
- FUNC: Used to cycle through different measurement modes within a single rotary switch setting (e.g., AC/DC voltage, resistance/continuity).
- (Diode/Continuity): Activates diode test or continuity check.
- MAXIMUM MINIMUM: Toggles between maximum and minimum value hold during a measurement.
- NCV: Activeert contactloze volumeregelingtage detectie.
6.4 Basisafmetingen
Deeltage Meting (AC/DC):
- Zet de draaischakelaar in de 'V'-stand.
- Sluit de zwarte testkabel aan op de 'COM'-aansluiting en de rode testkabel op de 'VHz%'-aansluiting.
- Sluit de meetsnoeren parallel aan op het circuit of het onderdeel dat u wilt meten.
- The multimeter will automatically detect AC or DC voltage. Use the FUNC button if manual selection is needed.
Weerstandsmeting:
- Zet de draaischakelaar in de 'Ω'-stand.
- Sluit de zwarte testkabel aan op de 'COM'-aansluiting en de rode testkabel op de 'VHz%'-aansluiting.
- Zorg ervoor dat het circuit spanningsloos is voordat u de weerstand meet.
- Sluit de testkabels aan op het te meten onderdeel.
Continuïteitstest:
- Zet de draaischakelaar in de 'Ω'-stand.
- Druk op de (Diode/Continuity) button to select continuity mode.
- Connect the test leads across the circuit or component. A beep indicates continuity.
Contactloos voltage (NCV) Detectie:
- Set the rotary switch to the 'NCV' position.
- Move the top part of the multimeter near a live conductor. The device will indicate the presence of AC voltage zonder direct contact.
7. Onderhoud
7.1 Reinigen
Veeg de multimeter schoon.asing met advertentieamp Reinig het apparaat met een doek en een mild reinigingsmiddel. Gebruik geen schuurmiddelen of oplosmiddelen. Zorg ervoor dat het apparaat droog is voordat u het opbergt of gebruikt.
7.2 Batterij vervangen
Wanneer de batterij-indicator op het display verschijnt, vervang dan onmiddellijk de batterijen om nauwkeurige metingen te garanderen. Volg de instructies voor het plaatsen van de batterijen in paragraaf 5.1.
7.3 Opslag
Bewaar de multimeter op een koele, droge plaats, uit de buurt van direct zonlicht en extreme temperaturen. Verwijder de batterijen bij langdurige opslag om lekkage te voorkomen.
8. Probleemoplossing
| Probleem | Mogelijke oorzaak | Oplossing |
|---|---|---|
| De multimeter gaat niet aan. | Batterijen zijn leeg of verkeerd geplaatst. | Controleer de polariteit van de batterijen of vervang ze. |
| Onnauwkeurige metingen. | Incorrect function selected; poor test lead connection; low battery. | Ensure correct function is selected (if not in smart mode); check test lead connections; replace batteries. |
| Geen continuïteitssignaal. | Circuit is open; continuity mode not selected. | Verify circuit integrity; press FUNC button to select continuity mode. |
9. Specificaties
| Parameter | Detail |
|---|---|
| Merk | C-LOGICA |
| Model | 580 |
| Energiebron | Op batterijen |
| Meettype | Multimeter |
| Fabrikant | C-LOGICA |
| ASIN | B0967VMK1W |
| UPC | 810053671603 |
| Datum eerste beschikbaarheid | 31 mei 2021 |
10. Garantie en ondersteuning
For warranty information or technical support regarding your C-LOGIC 580 Smart Digital Multimeter, please contact C-LOGIC customer service. Refer to the product packaging or the official C-LOGIC webwebsite voor contactgegevens.
Let op: De specifieke garantievoorwaarden kunnen per regio en winkel verschillen. Bewaar uw aankoopbewijs.


