1. Inleiding
This manual provides essential information for the safe and efficient installation, operation, and maintenance of your Onforu 100W 14000lm LED Shop Lights. Please read this manual thoroughly before use and retain it for future reference.
2. Veiligheidsinformatie
Volg altijd de basisveiligheidsmaatregelen om het risico op brand, elektrische schokken en persoonlijk letsel te verminderen.
- Ensure the power is disconnected before installation or maintenance.
- Do not look directly into the LED light when it is on, as it may cause eye damage.
- Houd het product uit de buurt van brandbare materialen.
- Dit product heeft een IP66 waterdichtheidsnorm en is geschikt voor gebruik buitenshuis, maar vermijd onderdompeling in water.
- Als u het niet zeker weet, laat de installatie dan door een gekwalificeerde elektricien uitvoeren.
- Zorg ervoor dat het montageoppervlak het gewicht van het armatuur kan dragen.
3. Inhoud van het pakket
Controleer bij het openen van de verpakking of alle onderdelen aanwezig en onbeschadigd zijn:
- LED Shop Light (2 units)
- Lamp Brackets (2 pairs)
- M6 Hex Screw Key (1 unit)
- M6 Screws (2 units)
- Plastic Expansion Nails (2 units)
- Screws for Mounting (2 units)
- Additional connectors for linking (as shown in assembly video)

4. Installatie en installatie
The Onforu LED Shop Lights are designed for easy installation and can be mounted in various configurations (wall, ground, or ceiling) and can also be linked horizontally or vertically.
4.1 Single Unit Installation
- Bevestig beugels: Beveilig de lamp brackets to the sides of the LED light fixture using the provided M6 screws and hex key. Do not overtighten initially to allow for angle adjustment.
- Bevestig het armatuur: Choose your desired mounting location (wall, ground, or ceiling). Use the plastic expansion nails and mounting screws to firmly attach the brackets to the surface.
- Hoek aanpassen: Once mounted, adjust the angle of the light fixture to direct illumination as needed. The fixture allows for 180° adjustment. Tighten the M6 screws on the brackets to secure the angle.
- Sluit stroom aan: Plug the power cord into a standard 120V AC outlet. The light features an in-line switch for convenient power control.

Video 1: Een korte voorbeschouwingview demonstrating the installation process and adjustable features of the Onforu LED Flood Light.
4.2 Linking Multiple Units
The lights can be connected horizontally or vertically to create a longer or wider lighting solution. Use the provided connectors and hex key to secure the units together.
- Horizontal Connection: Align two light units side-by-side. Use the small connecting brackets and screws to join them securely. Ensure the power cables are routed appropriately.
- Vertical Connection: Align two light units one above the other. Use the small connecting brackets and screws to join them securely.
Video 2: An official product video from Onforu demonstrating the various installation methods, including linking multiple units horizontally and vertically, and showcasing the included hardware.
5. Gebruiksaanwijzing
Operating your Onforu LED Shop Light is straightforward:
- Once installed and plugged into a power outlet, locate the in-line switch on the power cord.
- Druk op de schakelaar om het licht AAN te doen.
- Druk nogmaals op de schakelaar om het licht UIT te schakelen.

6. Onderhoud
To ensure optimal performance and longevity of your LED Shop Lights:
- Schoonmaak: Periodically clean the glass cover with a soft, damp doek. Vermijd schurende reinigingsmiddelen of oplosmiddelen die het oppervlak kunnen beschadigen.
- Inspectie: Regularly check the power cord and plug for any signs of damage. Ensure all mounting screws remain tight.
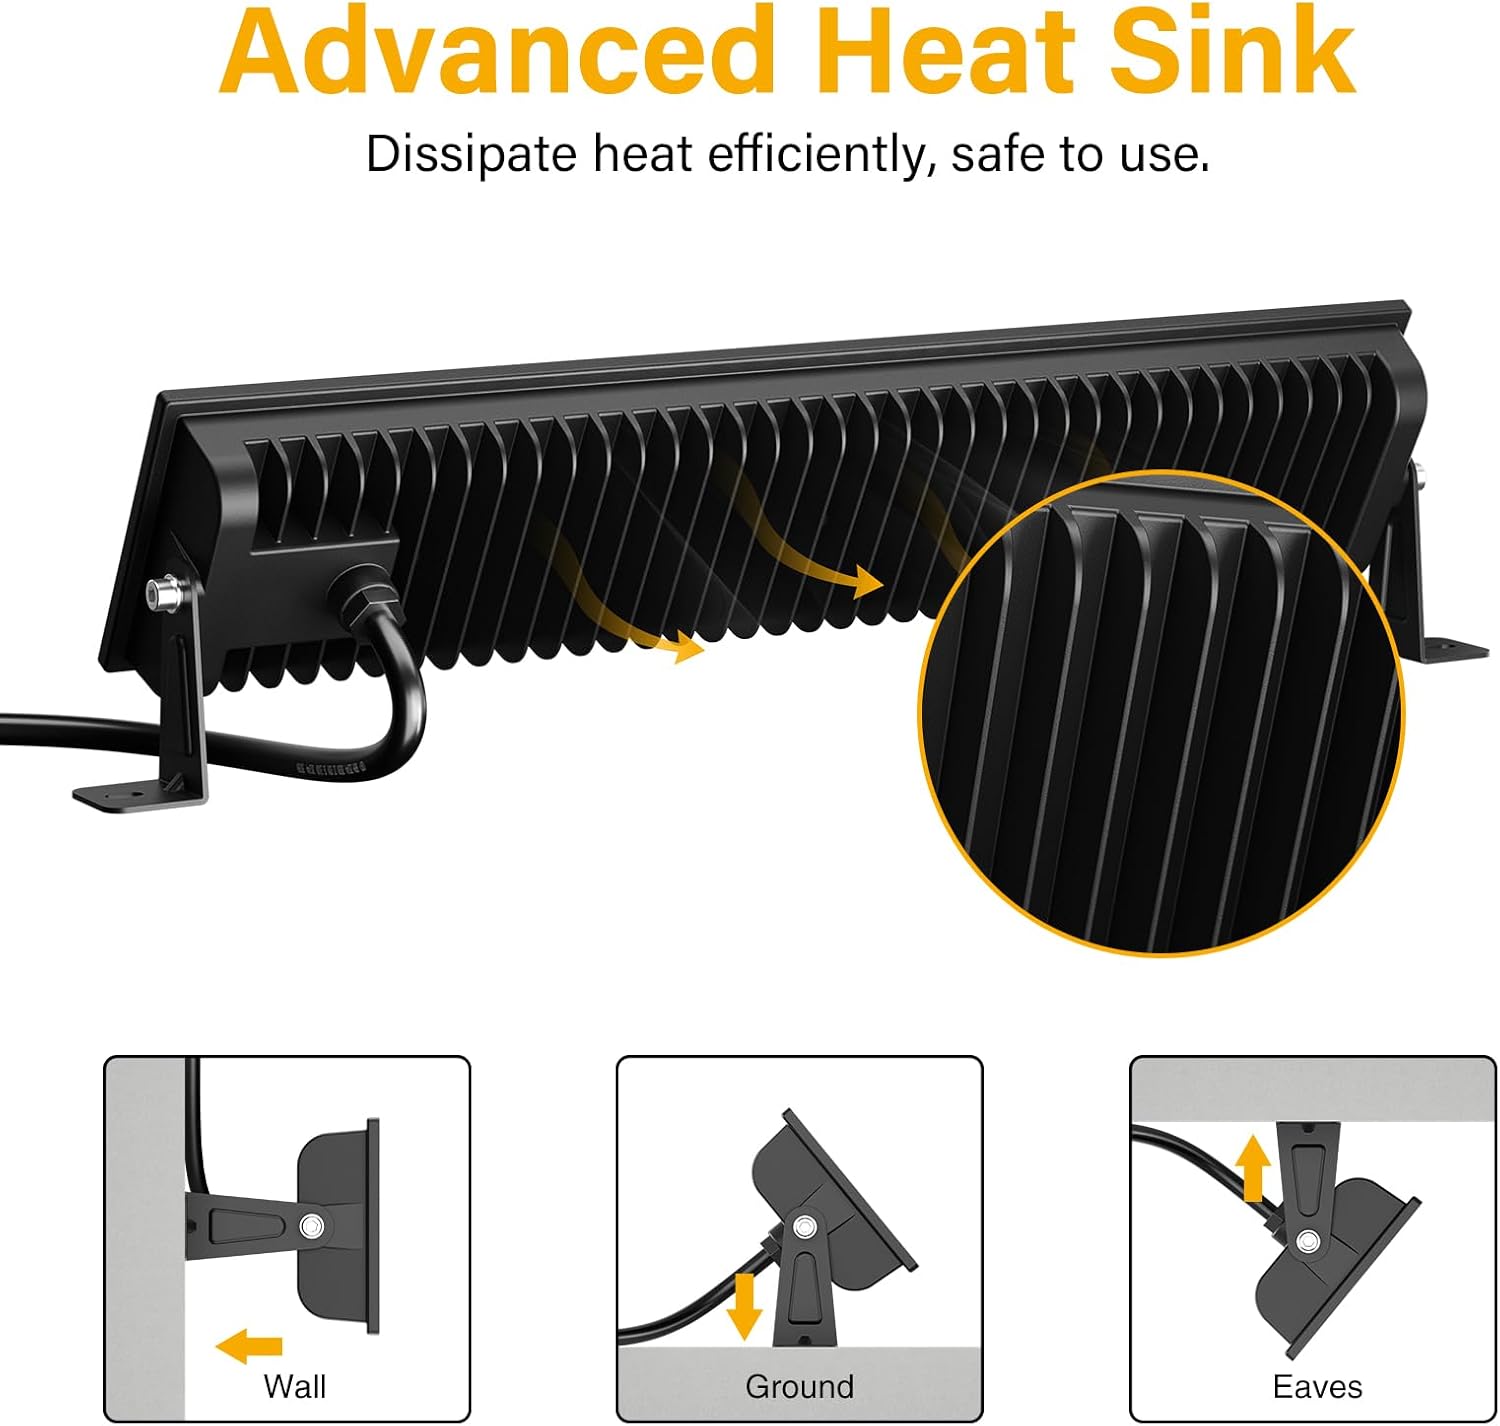
- Warmteafvoer: The fixture is designed with a fin-type heat sink. Ensure it is not obstructed to allow for efficient heat dissipation.
7. Probleemoplossing
If you encounter issues with your LED Shop Light, refer to the following common solutions:
| Probleem | Mogelijke oorzaak | Oplossing |
|---|---|---|
| Licht gaat niet aan. | Geen stroomtoevoer; defecte schakelaar; losse verbinding. | Check if the plug is securely inserted and the power outlet is functional. Ensure the in-line switch is ON. Inspect the power cord for damage. |
| Licht flikkert. | Instabiele stroomvoorziening; losse verbinding. | Ensure the power supply is stable. Check all connections for tightness. |
| Verminderde helderheid. | Dirt or debris on the glass cover. | Clean the glass cover with a soft, damp lap. |
8. Specificaties
| Functie | Detail |
|---|---|
| Merk | Onforu |
| Modelnummer | CT08 |
| Wattage | 100 watt |
| Helderheid | 14000 Lumen |
| Kleurtemperatuur | 6500 Kelvin (daglichtwit) |
| Materiaal | Aluminium, gehard glas |
| Waterbestendigheidsniveau | IP66 waterdicht |
| Productafmetingen | 15.27"L x 3.46"B x 1.37"H |
| Stralingshoek | 120° |
| Speciale functie | With Plug, Thick die-cast aluminum, Waterproof, Not Dimmable |
9. Garantie en ondersteuning
Onforu products come with a limited warranty. For specific warranty details or technical support, please refer to the official Onforu webwebsite of neem contact op met de klantenservice.
Optionele beschermingsplannen zijn afzonderlijk verkrijgbaar:
- 3-jarig beschermingsplan
- 4-jarig beschermingsplan
- Complete Protect (maandabonnement)
Voor verdere hulp kunt u terecht op de Onforu Store on Amazon.


