1. Inleiding
Thank you for choosing the SHARDOR 10-Cup Programmable Drip Coffee Maker. This appliance is designed to provide a convenient and efficient way to brew delicious coffee. Featuring a touch-screen control panel, brew strength selection, and a 24-hour programmable timer, this coffee maker simplifies your daily routine. Please read this manual thoroughly before use to ensure proper operation and maintenance.
2. Belangrijke veiligheidsmaatregelen
Bij het gebruik van elektrische apparaten dienen altijd elementaire veiligheidsmaatregelen in acht te worden genomen om het risico op brand, elektrische schokken en/of letsel aan personen te verkleinen, waaronder de volgende:
- Lees alle instructies.
- Raak geen hete oppervlakken aan. Gebruik handgrepen of knoppen.
- Ter bescherming tegen brand, elektrische schokken en persoonlijk letsel, dompel het snoer, de stekkers of het apparaat niet onder in water of een andere vloeistof.
- Wanneer een apparaat door of in de buurt van kinderen wordt gebruikt, is nauwlettend toezicht noodzakelijk.
- Haal de stekker uit het stopcontact wanneer u het apparaat niet gebruikt en voordat u het schoonmaakt. Laat het apparaat afkoelen voordat u onderdelen aanbrengt of verwijdert en voordat u het schoonmaakt.
- Gebruik geen enkel apparaat waarvan het snoer of de stekker beschadigd is, of nadat het apparaat defect is geraakt of op enigerlei wijze beschadigd is geraakt.
- Het gebruik van accessoires die niet door de fabrikant van het apparaat worden aanbevolen, kan leiden tot brand, elektrische schokken of persoonlijk letsel.
- Niet buitenshuis gebruiken.
- Laat het snoer niet over de rand van een tafel of aanrecht hangen en laat het niet in aanraking komen met hete oppervlakken.
- Niet op of in de buurt van een hete gas- of elektrische kookplaat of in een hete oven plaatsen.
- Sluit altijd eerst de stekker aan op het apparaat en steek daarna de stekker in het stopcontact. Om het apparaat uit te schakelen, zet u een willekeurige bedieningsknop op 'uit' en haalt u vervolgens de stekker uit het stopcontact.
- Gebruik het apparaat niet voor andere doeleinden dan waarvoor het bedoeld is.
3. Productcomponenten
Familiarize yourself with the various parts of your SHARDOR Drip Coffee Maker:

Afbeelding: Ontploft view of the coffee maker, labeling key components such as the removable funnel, water tank lid, smart drip tank, water tank, touch-screen control panel, warming plate, carafe lid, and coffee pot.
- Removable Funnel: Hierin passen het koffiefilter en de koffieprut.
- Deksel van het waterreservoir: Bedekt de watertank.
- Smart Drip Tank: Internal component for water distribution.
- Waterreservoir: Reservoir for water, with a visible window for level indication.
- Touch-screen Control Panel: Digitaal display en bedieningsknoppen.
- Warmhoudplaat: Houdt de gezette koffie warm.
- Carafe Lid: Covers the glass coffee pot.
- Coffee Pot (Carafe): Glass carafe with measurement markings for up to 10 cups.
4. Instellen
- Uitpakken: Verwijder voorzichtig alle verpakkingsmaterialen en onderdelen uit de doos.
- Eerste reiniging: Before first use, wash the carafe, carafe lid, and reusable filter in warm, soapy water. Rinse thoroughly and dry. Wipe the exterior of the coffee maker with a soft, damp lap.
- Positionering: Place the coffee maker on a flat, stable surface away from the edge of the counter. Ensure it is near an electrical outlet.
- Eerste zetcyclus (reiniging): For the first use, run a brew cycle with only water to clean the internal components. Fill the water tank to the MAX level, place the empty reusable filter in the funnel, and run a full brew cycle without coffee grounds. Discard the water.
5. Gebruiksaanwijzing
5.1. De klok instellen
Om de huidige tijd in te stellen:
- Plug the coffee maker into a power outlet. The display will show '12:00 AM'.
- Press the 'Hour' button repeatedly to set the hour. The time will cycle through AM and PM.
- Press the 'Min' button repeatedly to set the minutes.
- De klok wordt automatisch ingesteld na een paar seconden van inactiviteit.

Image: Close-up of the touch-screen control panel with 'Min', 'Prog', 'On/Off', 'Strength', and 'Hour' buttons.
5.2. Koffie zetten
- Watertank vullen: Open the top lid and pour fresh, cold water into the water tank. Use the water level indicator on the side of the machine to measure the desired number of cups (up to 10 cups).
- Koffiedik toevoegen: Place the reusable filter into the removable funnel. Add the desired amount of ground coffee into the filter. A general guideline is one tablespoon of coffee grounds per cup of water, but adjust to your preference.
- Selecteer de sterkte van de koffie: Press the 'Strength' button on the touch-screen control panel to toggle between 'Regular' and 'Bold' brew strengths.
- Beginnen met brouwen: Place the empty carafe with its lid on the warming plate. Press the 'On/Off' button to start the brewing process immediately. The indicator light will illuminate.
- Anti-druppelfunctie: The coffee maker features an anti-drip system that temporarily stops the flow of coffee if the carafe is removed during brewing, allowing you to pour a cup before the cycle is complete. Return the carafe within 20 seconds to prevent overflow.
- Warmhoudfunctie: After brewing, the warming plate will automatically keep the coffee warm for up to 2 hours before automatically shutting off.

Afbeelding: Zijkant view of the coffee maker showing the water level indicator.

Image: A hand adding coffee grounds into the reusable filter basket.

Image: Visual representation of selecting between 'Regular' and 'Bold' flavor options.

Image: A finger pointing to the anti-drip mechanism, showing how it prevents drips when the carafe is removed.

Image: The coffee maker with a cup of coffee, highlighting the 'Keep Warm for 2 Hours' feature and auto shut-off.
5.3. Programmeerbaar zetten (24-uurs timer)
Om een uitgestelde brouwtijd in te stellen:
- Prepare the coffee maker with water and coffee grounds as described in steps 1-2 of 'Brewing Coffee'.
- Press the 'Prog' button. The display will flash.
- Use the 'Hour' and 'Min' buttons to set your desired start time for brewing.
- Press the 'Prog' button again to confirm the setting. The 'Prog' indicator light will illuminate, indicating the timer is set.
- Het koffiezetapparaat begint automatisch met zetten op het ingestelde tijdstip.
6. Onderhoud en reiniging
Regelmatig reinigen zorgt voor optimale prestaties en verlengt de levensduur van uw koffiezetapparaat.
- Stekker uit het stopcontact: Haal de stekker van het koffiezetapparaat altijd uit het stopcontact voordat u het schoonmaakt.
- Schoon herbruikbaar filter: After each use, remove the reusable filter from the funnel. Discard used coffee grounds and rinse the filter thoroughly under running water. It is recommended to wash it with warm, soapy water periodically.
- Clean Carafe and Lid: Wash the glass carafe and its lid in warm, soapy water after each use. They are also dishwasher-safe (top rack recommended).
- Schone buitenkant: Veeg de buitenkant van het koffiezetapparaat af met een zachte, droge doek.amp cloth. Do not use abrasive cleaners or scouring pads. Never immerse the coffee maker in water or any other liquid.
- Ontkalken: Mineral deposits from water can build up over time and affect performance. Decalcify your coffee maker every 2-3 months, or more frequently if you have hard water. Use a commercial descaling solution or a mixture of white vinegar and water (1:2 ratio). Run a brew cycle with the solution, then run 2-3 cycles with fresh water to rinse thoroughly.

Image: A hand rinsing the removable coffee filter under a kitchen faucet.
7. Probleemoplossing
Als u problemen ondervindt met uw koffiezetapparaat, raadpleeg dan de volgende veelvoorkomende problemen en oplossingen:
| Probleem | Mogelijke oorzaak | Oplossing |
|---|---|---|
| Koffie zet niet. | No water in tank, not plugged in, power outage, or 'On/Off' button not pressed. | Fill water tank, check power connection, press 'On/Off' button. |
| De koffie is te slap. | Not enough coffee grounds, 'Regular' strength selected, or grounds too coarse. | Add more coffee, select 'Bold' strength, or use finer grounds. |
| Koffie stroomt over uit het filter. | Too many coffee grounds, filter clogged, or carafe not properly placed. | Reduce coffee amount, clean filter, ensure carafe is centered on warming plate. |
| Koffie smaakt vies. | Old coffee grounds, dirty machine, or poor water quality. | Use fresh coffee, clean machine (including decalcifying), use filtered water. |
Als het probleem blijft bestaan nadat u deze oplossingen hebt geprobeerd, neem dan contact op met de klantenservice.
8. Specificaties
- Merk: SCHARDER
- Modelnummer: CM1429TE-UL666
- Capaciteit: 10 kopjes
- Productafmetingen: 6.89"D x 10.87"B x 14.88"H
- Artikelgewicht: 5.48 pond
- Buitenafwerking: Roestvrij staal
- Werkingsmodus: Volledig automatisch
- Menselijke interface-invoer: Aanraakscherm
- Koffie invoertype: Gemalen koffie
- Speciale kenmerken: Programmable, Brew Strength Control, 2-Hour Warming Plate, Automatic Shut-Off
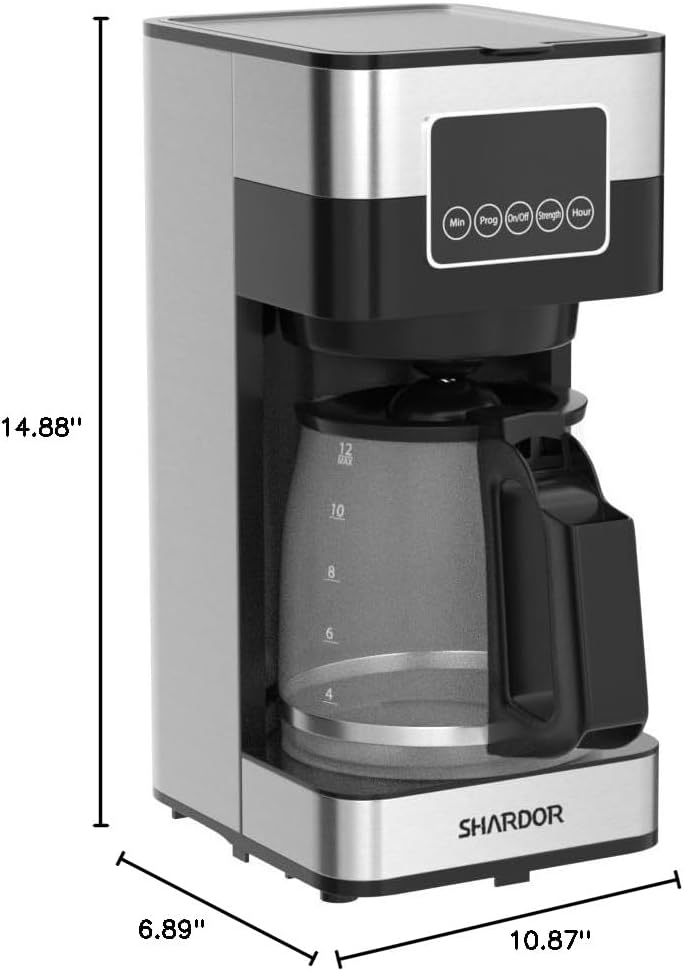
Image: Diagram showing the dimensions of the SHARDOR Drip Coffee Maker: 6.89 inches deep, 10.87 inches wide, and 14.88 inches high.
9. Officiële productvideo
Watch this official video from SHARDOR for a quick overview of the Drip Coffee Maker:
Video: Een officiële productvideo die het product laat zienasing the SHARDOR Drip Coffee Maker, demonstrating its features and ease of use.
10. Garantie en ondersteuning
The SHARDOR Drip Coffee Maker comes with a 2-year warranty. To activate your warranty, please register your product within 7 days of receiving it. For warranty claims, technical assistance, or any product-related inquiries, please contact SHARDOR customer support through their official website or the contact information provided with your purchase. Please retain your proof of purchase for warranty validation.


