Invoering
This manual provides detailed instructions for the installation, setup, and operation of your JVC KD-X260BT Digital Media Receiver. This unit is designed to provide high-quality audio playback and hands-free communication in your vehicle, featuring Bluetooth connectivity, USB input, and a 13-band equalizer. Please note, this unit does not play CDs. Read this manual thoroughly before use to ensure proper operation and to prevent damage.

Afbeelding: Voorzijde view of the JVC KD-X260BT Digital Media Receiver, showing the display and control buttons.
Veiligheidsinformatie
- Do not operate the unit in a way that distracts you from driving. Always keep your attention on the road.
- Ensure proper wiring connections to prevent short circuits or damage to the vehicle's electrical system.
- Zorg ervoor dat het apparaat niet wordt blootgesteld aan vocht of extreme temperaturen.
- Probeer het apparaat niet te demonteren of aan te passen. Laat alle onderhoudswerkzaamheden over aan gekwalificeerd personeel.
- Use only accessories specified by JVC.
Inhoud van het pakket
Controleer of alle artikelen in het pakket aanwezig zijn:
- JVC KD-X260BT digitale media-ontvanger
- kabelboom
- Externe bedrade microfoon
- Montagemateriaal
- Gebruiksaanwijzing (dit document)
Installatie
Professional installation is recommended for this product. Incorrect installation can lead to damage to the unit or vehicle. The KD-X260BT features a short body design, which facilitates easier installation in various vehicle dashboards.
Bedradingsverbindingen:
- Connect the wiring harness according to your vehicle's wiring diagram.
- Zorg ervoor dat alle aansluitingen goed vastzitten en geïsoleerd zijn om kortsluiting te voorkomen.
- Connect the external microphone to the designated input for hands-free calling. Position the microphone in a location that provides clear voice pickup.
- Sluit de antennekabel aan.
- Bij gebruik van externe amplifiers, connect the 2.5V preamp outputs (rear/subwoofer selectable).
Montage:
- Plaats de montagehuls in de opening in het dashboard.
- Schuif de ontvanger in de montagehuls totdat deze vastklikt.
- Bevestig de sierring.
Instellen
Eerste keer inschakelen:
After installation, turn on your vehicle's ignition. The unit should power on. Follow any on-screen prompts for initial setup, such as language selection.
Bluetooth koppelen:
The KD-X260BT supports Bluetooth 3.0+EDR and allows for two phones to be connected full-time. This enables receiving calls from either phone with a push of a key.
- Ga op de ontvanger naar het Bluetooth-menu.
- Selecteer 'Koppelen' of 'Apparaat zoeken'.
- Schakel Bluetooth in op je smartphone en zoek naar beschikbare apparaten.
- Select "KD-X260BT" from the list on your phone.
- Bevestig de koppelingscode op beide apparaten als daarom wordt gevraagd.
- Once paired, the unit will display a confirmation.
The unit supports Bluetooth profiles HFP (Hands-Free Profile 1.6 for wideband speech), HSP (Headset Profile), PBAP (Phone Book Access Profile), A2DP (Advanced Audio Distribution Profile) en AVRCP (Audio/Video Remote Control Profile 1.5).
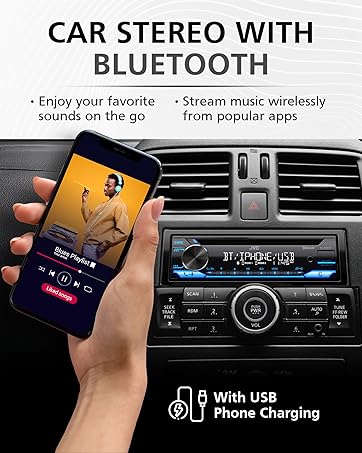
Image: JVC KD-X260BT display indicating Bluetooth connection, with a smartphone showing music playback, illustrating wireless audio streaming.
JVC Remote App:
Download the "JVC Remote" app (available for iOS and Android) to control the receiver's source directly from your smartphone using simple finger gestures.
Gebruiksaanwijzing
Basisbediening:
- Aan/uit-knop: Druk hierop om het apparaat aan/uit te zetten.
- Volumeknop: Draai om het volume aan te passen. Druk erop om de menu-opties te openen.
- Bronknop: Press to cycle through available audio sources (Tuner, USB, Bluetooth Audio, AUX).
- Weergaveknop: Changes display information (e.g., clock, track title).
Radiotuner:
- Press the Source button to select "Tuner" (AM/FM).
- Gebruik de zoekknoppen om radiostations te vinden.
- Press and hold a preset button (1-6) to store a station.
USB-weergave:
Connect a USB device to the front USB port. The unit supports MP3/WMA/WAV/FLAC playback. The USB port also provides high current 1.5A charging for smartphones.
- Insert the USB device. The unit will automatically switch to USB source and begin playback.
- Use the track buttons to skip tracks.
- Use the folder buttons to navigate through folders.
- MP3ID3 Tag Display (title/artist/album) is supported.
- Android music playback (AOA 2.0) is supported for Android phones (version 4.1 or later).
Bluetooth-audiostreaming:
Once a Bluetooth device is paired, select "Bluetooth Audio" as the source to stream music wirelessly. Use the receiver's controls or the paired device to manage playback (play, pause, skip, search via AVRCP 1.5).
Handsfree bellen:
When a call comes in on a paired phone, the unit will display the caller ID. Press the call button to answer, and the end call button to hang up. The external microphone ensures clear communication.
Audio-instellingen (equalizer):
The unit features a 13-Band Graphic Equalizer with 10 preset EQ settings and 1 user-customizable setting. Access the audio menu to adjust:
- Equalizer: Select from preset curves or customize your own.
- Basversterking: Versterkt de lage frequenties.
- Loudness: Compensates for perceived loss of bass and treble at low volumes.
- Balans/Fader: Adjusts sound distribution between left/right and front/rear speakers.
- Subwooferregeling: Adjust subwoofer output level and frequency if connected.
Internet Radio/Digital Radio Control:
Control Pandora, iHeartRadio, and Spotify directly from the receiver when connected to a compatible Android device via Bluetooth.
Steering Wheel Remote Control:
Factory steering wheel control functions can be retained with a third-party adapter (sold separately).
Onderhoud
- Het apparaat schoonmaken: Veeg het voorpaneel af met een zachte, droge doek. Gebruik geen schurende reinigingsmiddelen of oplosmiddelen.
- USB-poort: Houd de USB-poort vrij van stof en vuil.
- Firmware-updates: Check the JVC website periodically for any available firmware updates for improved performance and features.
Probleemoplossing
| Probleem | Oplossing |
|---|---|
| Geen stroom | Check vehicle's fuse. Ensure wiring harness is correctly connected. |
| Geen geluid | Check speaker connections. Verify volume level. Ensure correct source is selected. |
| Bluetooth maakt geen verbinding | Ensure Bluetooth is enabled on both devices. Delete previous pairing and re-pair. Move devices closer. |
| USB-apparaat niet herkend | Ensure USB device is formatted correctly (FAT16/32). Check for compatible file typen. Probeer een ander USB-apparaat. |
| Slechte radio-ontvangst | Controleer de antenneverbinding. Zorg ervoor dat de antenne volledig is uitgeschoven (indien van toepassing). |
Specificaties
| Functie | Detail |
|---|---|
| Modelnummer | KD-X260BT |
| Vermogen (piek) | 50 watt x 4 kanalen |
| Uitgangsvermogen (RMS) | 22 watt x 4 kanalen |
| Weergave | VA LCD Display, Spanish Text Display |
| USB-invoer | Front USB, 1.5A Charging, MP3/WMA/WAV/FLAC Playback, Android AOA 2.0 |
| Hulpingang | 3.5mm Front Audio Auxiliary Input |
| Bluetooth-versie | 3.0+EDR Certified |
| Bluetooth Profiles | HFP 1.6, HSP, PBAP, A2DP, AVRCP 1.5 |
| Equalizer | 13-Band Graphic Equalizer (10 Preset x 1 User) |
| Preamp Uitgangen | 1 Set of 2.5V (Rear/Subwoofer Selectable) |
| Internet Radio Control | Pandora, Spotify, iHeartRadio (for Android) |
| Afmetingen (Product) | 4 x 9 x 8 inch |
| Artikelgewicht | 1.79 pond |
Garantie en ondersteuning
This JVC KD-X260BT Digital Media Receiver comes with a 1-Year Manufacturer's Warranty. For warranty claims, technical support, or service inquiries, please contact JVC customer support or visit the official JVC webwebsite. Bewaar uw aankoopbewijs voor de garantievalidatie.
JVC-klantenservice: Refer to the contact information provided with your product packaging or on the official JVC webplaats.


