1. Inleiding
The POWERTECH MP3752 is an intelligent and lightweight solar charge controller designed to manage the power flow from your solar panels to your battery bank. Utilizing Pulse Width Modulation (PWM) technology, it ensures efficient and safe battery charging. This controller offers a set-and-forget operation, providing maximum charge into your batteries without constant monitoring. It integrates essential safety features such as overload, short-circuit, over-discharge, and reverse-polarity protection. Additionally, a convenient USB port on the front panel allows for up to 1.2A charging, useful for mobile devices during power outages. The unit supports various battery types including sealed lead-acid, Gel, and flooded cells, and automatically selects the optimal charging mode (bulk, equalise, float).
2. Veiligheidsinformatie
Please read all instructions carefully before installation and operation. Failure to follow these instructions may result in damage to the unit, battery, or personal injury.
- Controleer of alle aansluitingen correct en stevig zijn voordat u de stroom inschakelt.
- Do not connect the solar controller to an AC power source.
- Installeer de controller op een goed geventileerde plaats, uit de buurt van brandbare materialen en direct zonlicht.
- Voorkom kortsluiting tussen de accupolen of de aansluitingen van de zonnepanelen.
- Sluit altijd eerst de accu aan, dan het zonnepaneel en als laatste de belasting. Ontkoppel in omgekeerde volgorde.
- This device is not waterproof; protect it from moisture and water.
- Alleen gekwalificeerd personeel mag installatie en onderhoud uitvoeren.
3. Producteigenschappen
- Automatic charge mode selection (Bulk, Equalise, Float).
- Suitable for both 12V and 24V battery banks.
- Integrated USB charging port (5V, 1.2A max) on the front panel.
- Supports sealed lead-acid, Gel, and flooded battery types.
- Comprehensive protection features: overload, short-circuit, over-discharge, reverse-polarity.
- Pulse Width Modulation (PWM) charging technology.
4. Inhoud van het pakket
Controleer bij ontvangst de inhoud van het pakket:
- 1 x POWERTECH MP3752 Solar Controller
- 1 x Gebruikershandleiding (dit document)
5. Product voorbijview en verbindingen
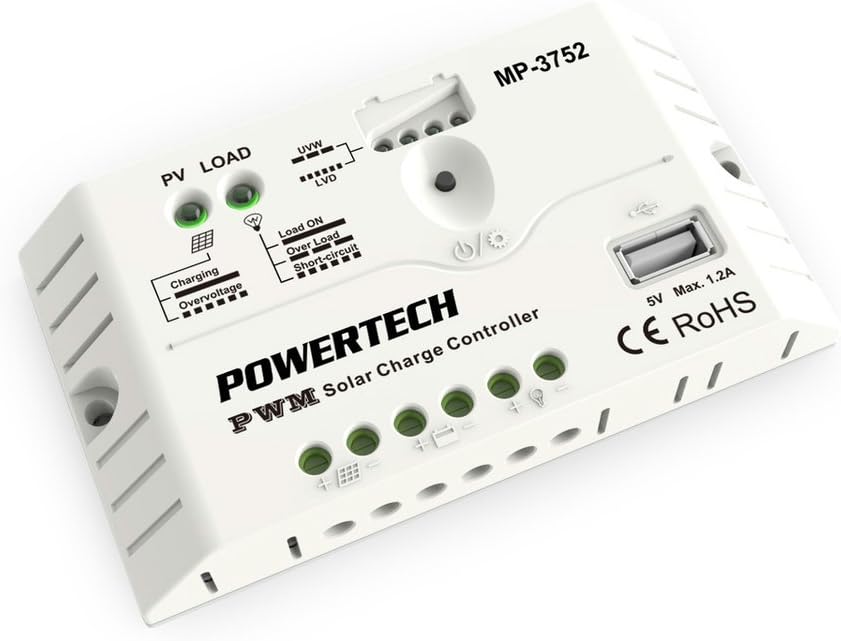
Figuur 1: Voorzijde view of the POWERTECH MP3752 Solar Controller. This image displays the PV LOAD, UVW, LVD, Load ON, Over Load, Short-Circuit indicators, the USB port, and the connection terminals for solar panels, battery, and load.
The MP3752 controller features clearly marked terminals for easy connection. Refer to Figure 1 for a visual guide to the controller's layout and indicators.
Aansluitklemmen:
- Solar Panel Input (PV): Connect your solar panel array here. Ensure correct polarity (+ and -).
- Batterijverbinding: Connect your 12V or 24V battery bank here. Observe correct polarity (+ and -).
- Laaduitvoer: Connect your DC loads (e.g., lights, fans) here. Observe correct polarity (+ and -).
- USB-poort: 5V, 1.2A max output for charging small electronic devices.
6. Installatie en installatie
Volg deze stappen voor een correcte installatie van uw zonne-laadregelaar:
- Montage: Choose a dry, well-ventilated indoor location, away from direct sunlight, high temperatures, and moisture. Ensure sufficient air circulation around the controller.
- Batterijverbinding:
- Connect the positive (+) terminal of the battery to the battery positive (+) terminal on the controller.
- Connect the negative (-) terminal of the battery to the battery negative (-) terminal on the controller.
- The controller will automatically detect if it's a 12V or 24V system.
- Aansluiting zonnepaneel:
- Connect the positive (+) terminal of the solar panel to the solar panel positive (+) terminal on the controller.
- Connect the negative (-) terminal of the solar panel to the solar panel negative (-) terminal on the controller.
- Ensure the open-circuit voltage of the solar panel does not exceed the maximum input voltage of the controller (typically 50V for 12/24V systems).
- Belastingsaansluiting:
- Connect the positive (+) terminal of your DC load to the load positive (+) terminal on the controller.
- Connect the negative (-) terminal of your DC load to the load negative (-) terminal on the controller.
- Do not exceed the maximum rated current for the load output (20A).
- Controleer verbindingen: Double-check all connections for correct polarity and tightness before proceeding.

Figure 2: The POWERTECH MP3752 Solar Controller shown in its packaging, illustrating its application with solar panels. This image provides a contextual view of the product's intended use.
7. Gebruiksaanwijzing
7.1. Automatic System Voltage Erkenning
The controller automatically detects whether the connected battery bank is 12V or 24V upon initial connection. Ensure the battery is connected first for proper voltage detectie.
7.2. Oplaadmodi
The MP3752 employs intelligent PWM charging, automatically cycling through different stages to optimize battery health and lifespan:
- Bulklading: Delivers maximum current to rapidly bring the battery to approximately 80% charge.
- Equalise Charge: Periodically applies a higher voltage to equalize the charge among battery cells, preventing sulfation and extending battery life (for flooded batteries).
- Drijvende lading: Houdt de batterij volledig opgeladen door een kleine, constante spanning te leveren.tage, ter compensatie van zelfontlading.
7.3. Belastingcontrole
The load output is controlled by the controller to prevent over-discharge of the battery. When the battery voltage zakt onder de Low Voltage Disconnect (LVD) threshold, the load output will be automatically disconnected. It will reconnect once the battery has recharged to the Low Voltage Reconnect (LVR) threshold.
Press the power button on the controller to manually turn the load output ON or OFF.
7.4. USB-oplaadpoort
The 5V, 1.2A USB port can be used to charge small electronic devices like smartphones or tablets. This port is active as long as the battery has sufficient charge.
8. Indicatoren
The POWERTECH MP3752 features several LED indicators to provide real-time status information:
- PV LOAD (Solar Panel Indicator):
- Groente: Solar panel is connected and generating power.
- Uit: No solar input or insufficient light.
- Laadindicator:
- Groente: Batterij wordt opgeladen.
- Uit: Battery is fully charged or not charging.
- overvoltage-indicator:
- Rood: Ingangsvolumetage from solar panel is too high, or battery voltage is overcharge protection level.
- UVW (Battery Voltage Indicator): Multiple LEDs indicating battery charge level.
- LVD (Laag Voltage Disconnect Indicator):
- Rood: Batterij voltage is low, load output has been disconnected.
- Belasting AAN-indicator:
- Groente: Load output is active.
- Over Load Indicator:
- Rood: Load current exceeds the maximum rated current. Load output may be temporarily disconnected.
- Short-Circuit Indicator:
- Rood: Short-circuit detected on the load output. Load output will be disconnected.
9. Onderhoud
To ensure optimal performance and longevity of your solar charge controller, regular maintenance is recommended:
- Schoonmaak: Periodically clean the exterior of the controller with a dry, soft cloth. Do not use solvents or abrasive cleaners.
- Verbindingen: Annually check all wiring connections for tightness and corrosion. Loose connections can cause overheating and poor performance.
- Ventilatie: Ensure that the ventilation openings are not blocked and that there is adequate airflow around the unit.
- Inspectie: Inspect the controller for any signs of physical damage, discoloration, or unusual odors.
10. Probleemoplossing
| Probleem | Mogelijke oorzaak | Oplossing |
|---|---|---|
| No charging from solar panel. |
|
|
| Load output not working. |
|
|
| overvoltagHet lampje is aan. |
|
|
11. Specificaties
| Parameter | Waarde |
|---|---|
| Modelnummer | MP3752 (03617080) |
| Systeem Voltage | 12V/24V Auto-sensing |
| Maximale laadstroom | 20A |
| Max. Hoogte Belastingsstroom | 20A |
| USB-uitgang | 5V, 1.2A maximaal |
| Oplaadtype | PWM (Bulk, Equalise, Float) |
| Ondersteunde batterijtypen | Sealed Lead-Acid, Gel, Flooded |
| Productafmetingen | 5.83 x 3.39 x 1.38 inch |
| Artikelgewicht | 5.6 ons |
| Fabrikant | ENERGIETECHNOLOGIE |
| Merk | jaycar |
12. Garantie en ondersteuning
This product is covered by a standard manufacturer's warranty against defects in materials and workmanship. Please refer to your purchase documentation for specific warranty terms and duration. For technical support, troubleshooting assistance, or warranty claims, please contact your retailer or the manufacturer directly.
Note: Unauthorized disassembly or modification of the product will void the warranty.


