1. Inleiding
Thank you for choosing the Electriq 6 Place Freestanding or Integrated Table Top Dishwasher. This manual provides essential information for the safe and efficient operation, installation, and maintenance of your appliance. Please read it thoroughly before first use and keep it for future reference.
This compact dishwasher is designed for small kitchens or households, offering convenience and efficiency for up to 6 place settings.
2. Veiligheidsinformatie
Neem altijd de volgende veiligheidsmaatregelen in acht om het risico op brand, elektrische schokken, persoonlijk letsel of schade aan het apparaat te beperken.
- Ensure the dishwasher is properly earthed.
- Gebruik de vaatwasser niet als het netsnoer of de stekker beschadigd is.
- Houd kinderen uit de buurt van de vaatwasser, vooral wanneer deze in werking is of wanneer de deur openstaat.
- Gebruik alleen afwasmiddelen en glansspoelmiddelen die speciaal voor vaatwassers zijn bedoeld.
- Open de deur niet terwijl het apparaat in werking is, omdat er dan heet water uit kan spuiten.
- Scherpe voorwerpen moeten met de punt naar beneden worden geladen om verwondingen te voorkomen.
- Koppel het apparaat los van de stroomvoorziening voordat u het reinigt of onderhoudt.
3. Product voorbijview
The Electriq 6 Place Table Top Dishwasher is a compact and efficient appliance designed to fit conveniently on your countertop or integrate into your kitchen space.

Figuur 3.1: Voorzijde view of the Electriq 6 Place Table Top Dishwasher.

Figure 3.2: The compact dishwasher integrated into a kitchen countertop, next to a microwave.
Belangrijkste kenmerken:
- Capaciteit voor 6 couverts: Ideal for small households, accommodating up to 66 pieces of crockery and cutlery.
- Compact ontwerp: Freestanding or integrated, perfect for countertops or limited spaces.
- 6 wasprogramma's: Including Normal, Intensive, Eco, Glass, 90 Min, and Rapid cycles.
- Vertragingstimer: Allows you to set the wash to start 2, 4, 6, or 8 hours later.
- Energiezuinig: Rated F for energy efficiency.
- Anti-flood and Anti-leak Protection: Enhanced safety features for your kitchen.
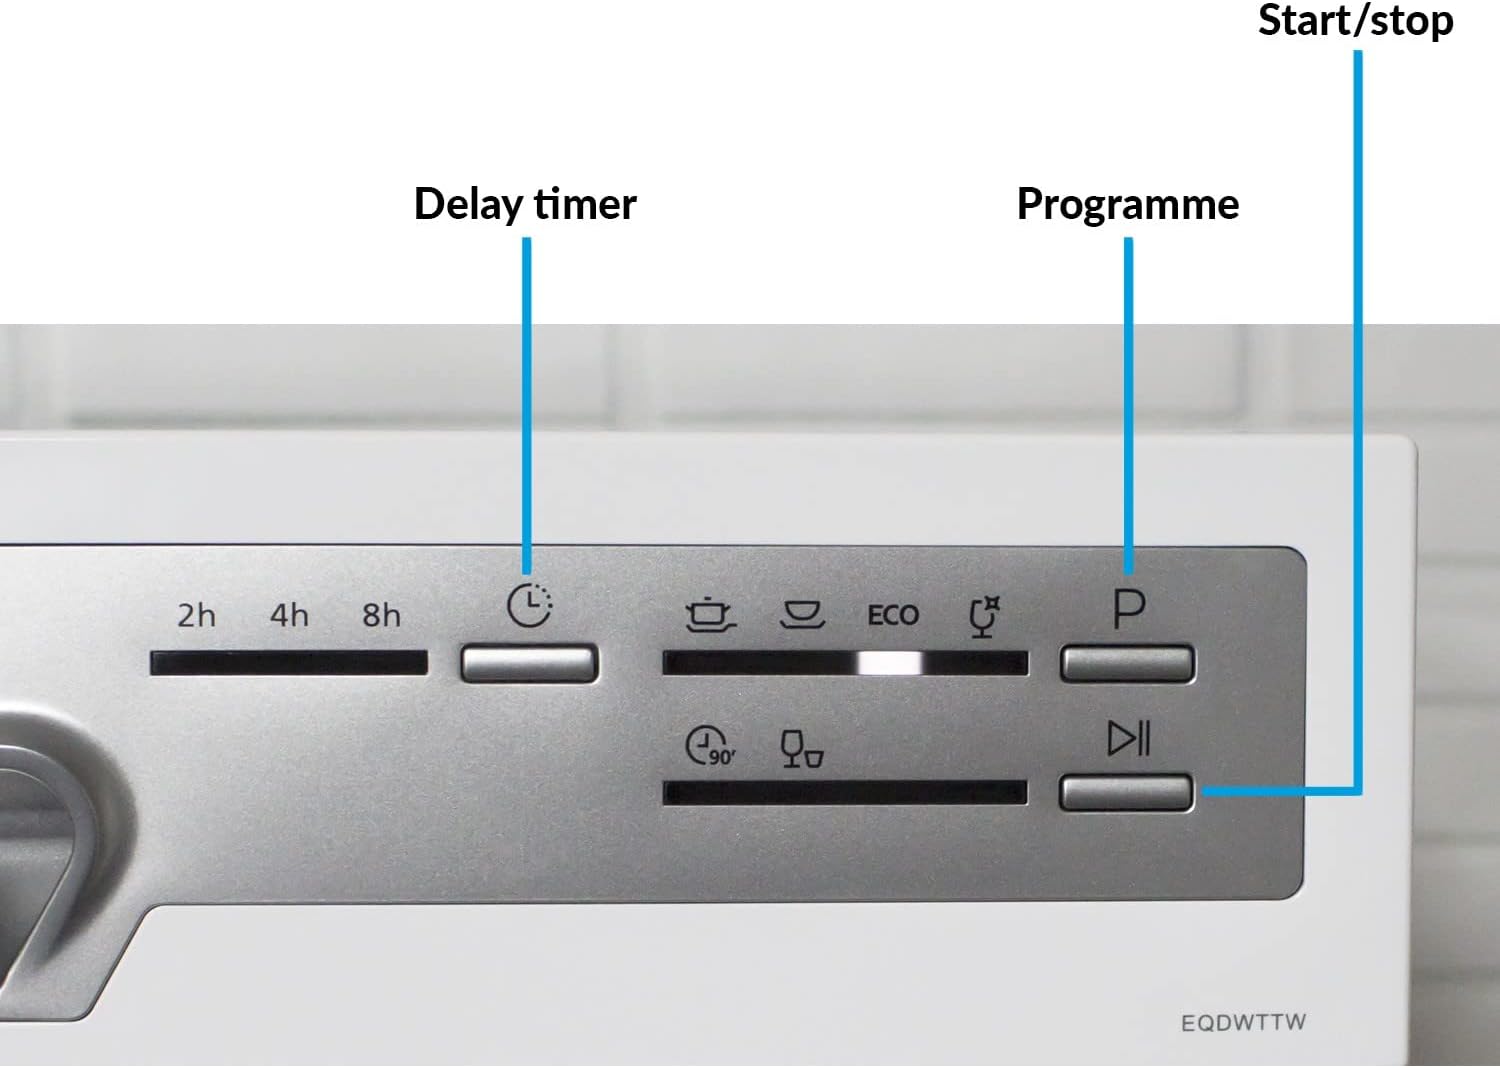
Afbeelding 3.3: Gedetailleerd view of the control panel, showing buttons for Delay Timer, Programme selection, and Start/Stop.
4. Installatie en instellingen
4.1 Uitpakken
Carefully remove all packaging materials. Inspect the dishwasher for any damage. Report any damage to your retailer immediately.
4.2 Positionering
The dishwasher can be placed freestanding on a stable, level surface or integrated into a suitable cabinet. Ensure there is adequate space for ventilation and door opening.

Figure 4.1: Dimensions of the dishwasher: Height 43.8cm, Width 55cm, Depth 50cm.
4.3 Wateraansluiting
Connect the water inlet hose to a cold water supply tap. Ensure all connections are tight to prevent leaks. The dishwasher features a cold water fill system.
4.4 Afvoeraansluiting
Connect the drain hose to a suitable drain pipe or sink. Ensure the hose is not kinked or blocked.
4.5 Elektrische aansluiting
Sluit de vaatwasser aan op een geaard stopcontact. Zorg ervoor dat het volumetage and frequency match the appliance's requirements (230 Volts).
4.6 Initial Setup (Salt and Rinse Aid)
Before first use, fill the salt dispenser with dishwasher salt and the rinse aid dispenser with rinse aid. Refer to the specific sections in this manual for detailed instructions on filling these compartments. The dishwasher has salt and rinse aid warning indicators.
5. Gebruiksaanwijzing
5.1 De vaatwasser inladen
Load dishes carefully to ensure proper water circulation and cleaning. The dishwasher includes a cutlery basket for organized washing.

Figuur 5.1: Interieur view demonstrating the capacity for larger items like pots and pans.

Figure 5.2: The dishwasher can accommodate plates up to 10.15 inches (25.8cm) in diameter.

Figure 5.3: The glass stand provides stable support for delicate glassware during the wash cycle.
5.2 Wasmiddel toevoegen
Voeg de juiste hoeveelheid afwasmiddel toe aan het doseerbakje. Raadpleeg de gebruiksaanwijzing van de fabrikant voor de juiste dosering.
5.3 Een programma selecteren
Press the 'Programme' button to cycle through the available wash programmes. Indicator lights will show the selected programme.
- Normaal: Standaard dagelijkse afwas voor normaal vervuilde vaat.
- Intensief: For heavily soiled dishes with tough, baked-on food.
- Eco: Energy-saving programme for normally soiled dishes.
- Glas: Voorzichtig afwassen voor delicate glazen.
- 90 minuten: Voor licht vervuilde vaat die snel afgewassen moet worden.
- snel: A quick 30-minute wash for lightly soiled items without drying.
Figure 5.4: The Quick Wash feature provides fast and efficient cleaning.
5.4 Setting the Delay Timer
Press the 'Delay Timer' button to set a delayed start time of 2, 4, 6, or 8 hours. This allows you to run the dishwasher at a time that suits you, such as during off-peak energy hours.
5.5 Een cyclus starten
Close the dishwasher door firmly. Press the 'Start/Stop' button to begin the selected wash cycle. The indicator light will illuminate.
6. Onderhoud en verzorging
6.1 Het filtersysteem reinigen
Regularly clean the filter system to ensure optimal washing performance. The dishwasher features an easy-clean filter system. Remove the filter, rinse it under running water, and remove any food debris. Reassemble correctly.
6.2 Zout en glansspoelmiddel bijvullen
Monitor the salt and rinse aid warning indicators. Refill these compartments as needed to ensure effective cleaning and drying results.
6.3 Reiniging van exterieur en interieur
Veeg de buitenkant van de vaatwasser schoon met adamp cloth. Clean the interior periodically with a dishwasher cleaner or a mixture of vinegar and water to prevent odors and build-up.
7. Probleemoplossing
If your dishwasher is not functioning correctly, please consult the following table before contacting customer service.
| Probleem | Mogelijke oorzaak | Oplossing |
|---|---|---|
| Vaatwasser start niet | Stroomkabel niet aangesloten; Deur niet goed gesloten; Zekering doorgebrand. | Controleer de stroomaansluiting; zorg ervoor dat de deur goed gesloten is; controleer de zekering/stroomonderbreker in huis. |
| Serviesgoed niet schoon | Improper loading; Insufficient detergent; Clogged spray arms/filter; Incorrect program. | Reload dishes correctly; Add more detergent; Clean spray arms and filter; Select appropriate program. |
| Water loopt niet weg | Afvoerslang geknikt of verstopt; Filter verstopt. | Controleer en reinig de afvoerslang; maak het filtersysteem schoon. |
| Overmatig lawaai | Rammelende vaat; Vreemd voorwerp in de pomp; Apparaat staat niet waterpas. | Rearrange dishes; Check for foreign objects; Level the appliance. |
| Witte vlekken op serviesgoed | Lack of rinse aid; Hard water. | Refill rinse aid dispenser; Adjust water softener setting if applicable. |
8. Specificaties
| Functie | Specificatie |
|---|---|
| Modelnaam | EQDWTTW |
| Capaciteit | 6 Plaatsinstellingen |
| Afmetingen (H x B x D) | 43.8x55x50cm |
| Gewicht | 21 kg |
| Programma's | Normal, Intensive, Eco, Glass, 90 Min, Rapid |
| Temperaturen | 40, 45, 60, 65, 70°C |
| Vertragingstimer | 2, 4, 6 of 8 uur |
| Energieklasse | F |
| Waterverbruik (per cyclus) | 6.5 liter |
| Geluidsniveau | 49dB |
| Installatietype | Vrijstaand |
| Deeltage | 230 Volt |
| Meegeleverde componenten | Bestekmand |
9. Garantie en ondersteuning
This Electriq dishwasher comes with a 1 jaar garantie Vanaf de aankoopdatum. Bewaar uw aankoopbewijs voor garantieclaims.
For technical support, spare parts, or warranty inquiries, please contact Electriq customer service. Contact details can typically be found on the manufacturer's webwebsite of uw aankoopdocumentatie.
Please have your model number (EQDWTTW) and serial number ready when contacting support.


