1. Inleiding
This manual provides detailed instructions for the installation, operation, and maintenance of your Hiseeu A1004NS-US and A1008NS-US 5-in-1 Digital Video Recorders (DVRs). These DVRs are designed for comprehensive security surveillance systems, supporting multiple video input formats including TVI, CVI, AHD, Analog, and IP cameras. Please read this manual thoroughly before using the product to ensure proper setup and functionality.
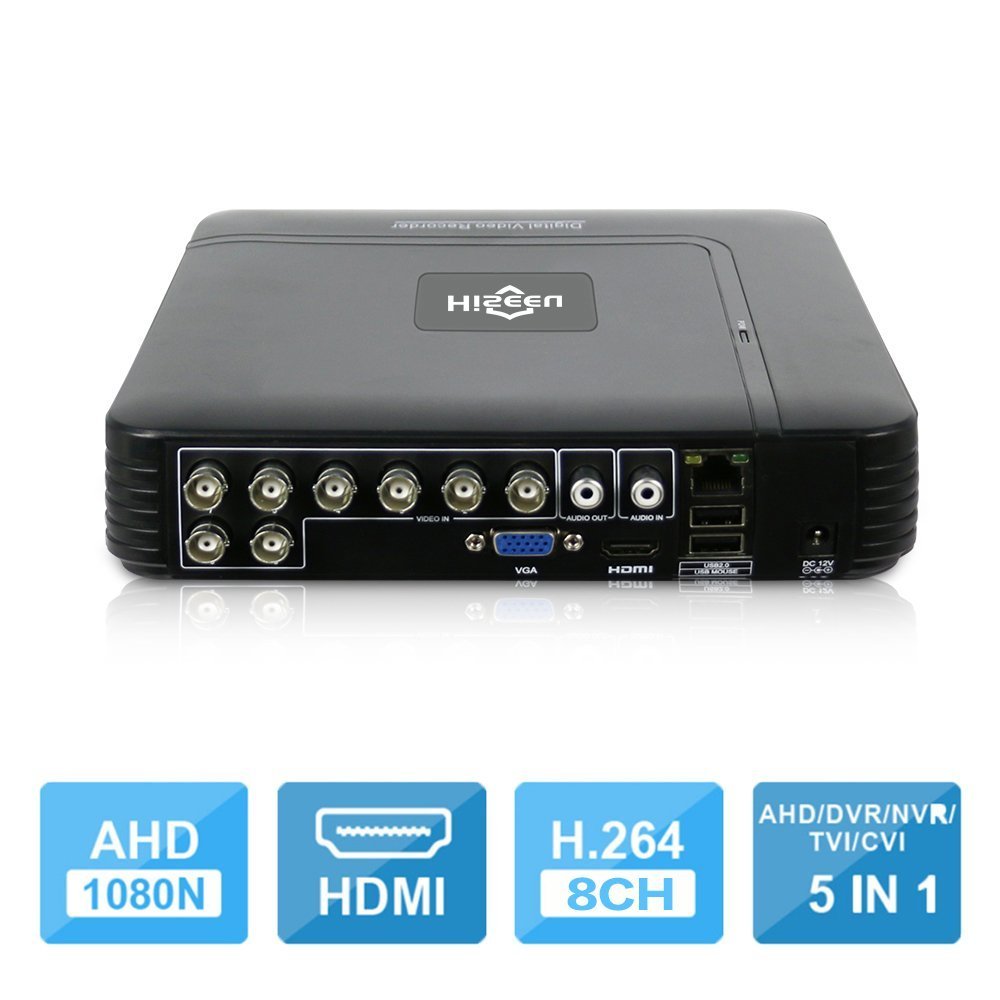
Image 1.1: The Hiseeu 5-in-1 DVR unit, showcasing its compact design and connectivity ports.
2. Veiligheidsinformatie
Om letsel aan uzelf of anderen te voorkomen en schade aan uw apparaat te vermijden, dient u alle veiligheidsinformatie te lezen voordat u het product gebruikt. Bewaar deze handleiding voor toekomstig gebruik.
- Energiebron: Use only the provided power adapter. Using unauthorized adapters may cause fire, electric shock, or damage to the device.
- Ventilatie: Ensure the DVR is placed in a well-ventilated area. Do not block ventilation openings.
- Vocht: Do not expose the device to rain, moisture, or any liquids.
- Temperatuur: Operate the device within the specified temperature range. Avoid extreme heat or cold.
- Schoonmaak: Schakel de stroom uit voordat u gaat schoonmaken. Gebruik een droge, zachte doek. Gebruik geen vloeibare of spuitbusreinigers.
- Onderhoud: Probeer dit product niet zelf te onderhouden. Laat al het onderhoud over aan gekwalificeerd onderhoudspersoneel.
3. Inhoud van het pakket
Verify that all items are present in your package. If any item is missing or damaged, contact your retailer.
- 1 x Mini 4-channel or 8-channel DVR (Model A1004NS-US or A1008NS-US)
- 1 x USB-muis
- 1 x DC12V-voedingsadapter
- 1 x Gebruikershandleiding (dit document)

Image 3.1: Included accessories: USB mouse and DC12V power adapter.
4. Instellen
Follow these steps to set up your Hiseeu DVR system.
4.1 Hard Drive Installation (HDD not included)
The DVR requires a 3.5-inch SATA hard drive for video recording. A hard drive is not included in the package. Please select an appropriate HDD (up to 6TB) based on your camera count and desired recording duration.
- Draai de bovenklep van de DVR los.
- Sluit de SATA-datakabel en de voedingskabel van de DVR aan op de harde schijf.
- Bevestig de harde schijf aan de DVR-behuizing met behulp van de meegeleverde schroeven.
- Plaats het bovendeksel terug en bevestig het met schroeven.

Image 4.1: Illustration of connecting the SATA data and power cables to the hard drive.
4.2 Camera's aansluiten
Connect your security cameras to the BNC video input ports on the back of the DVR. This DVR supports 5-in-1 camera types: TVI, CVI, AHD, Analog, and IP cameras. For IP cameras, ensure they support ONVIF 2.0 for compatibility.
4.3 Connecting a Monitor
Connect a monitor to the DVR using either the HDMI or VGA port. The DVR supports 1080P resolution output.
4.4 Netwerkverbinding
Connect an Ethernet cable from the DVR's LAN port to your router or network switch for remote access and online features.
4.5 Inschakelen
Sluit de 12V DC-voedingsadapter aan op de voedingsingang van de DVR en steek de stekker vervolgens in een stopcontact. De DVR zal automatisch inschakelen.
5. Gebruiksaanwijzing
This section covers the basic operation of your Hiseeu DVR.
5.1 Initial Setup and Main Menu
Upon first power-on, the DVR will guide you through an initial setup wizard. Use the connected USB mouse to navigate the on-screen menus. The main menu provides access to live view, playback, recording settings, network configuration, and system settings.
5.2 Remote Monitoring (P2P Cloud)
The DVR supports P2P (Cloud) functionality, eliminating the need for port forwarding for remote access. You can monitor your system remotely using a smartphone or PC.
- Smartphone-app: Download the "XMEye" app from your device's app store.
- Apparaat toevoegen: Open the app, register an account, and add your DVR by scanning the QR code displayed on the DVR's monitor (usually found in the network settings) or by manually entering the device ID.
- Live View: Eenmaal toegevoegd, kunt u view live feeds from your cameras and access recorded footage.

Afbeelding 5.1: Example screenshot of the XMEye mobile application for remote viewind.
5.3 Motion Detection and Email Alerts
Configure motion detection settings for each camera to trigger recording and send email notifications or mobile push alerts when motion is detected.
- Navigeer naar Hoofdmenu > Alarm > Bewegingsdetectie.
- Schakel bewegingsdetectie in voor de gewenste kanalen.
- Adjust sensitivity and detection areas.
- Configure email settings under Main Menu > Network > Email to receive alerts.
5.4 Video afspelen
The DVR supports synchronous 8-channel playback. You can review opgenomen footage van meerdere camera's tegelijk.
- Van het leven view, klik met de rechtermuisknop en selecteer Afspelen.
- Selecteer het datum- en tijdsbereik voor de footage u wenst opnieuwview.
- Choose the cameras for playback.
- Use the playback controls (play, pause, fast forward, rewind) to navigate through the recording.
5.5 Tweerichtingsaudio
If your cameras and audio setup support it, the DVR allows for two-way audio communication. Connect a microphone to the audio input and a speaker to the audio output port on the DVR.
6. Onderhoud
Regelmatig onderhoud zorgt voor een lange levensduur en optimale prestaties van uw DVR-systeem.
- Schoonmaak: Periodically clean the DVR's exterior with a soft, dry cloth. Ensure ventilation openings are free from dust and debris.
- Firmware-updates: Controleer de officiële Hiseeu website for any available firmware updates. Updating firmware can improve performance and add new features. Follow the instructions provided with the update carefully.
- Gegevensback-up: Maak regelmatig een back-up van belangrijke videobestandentage to an external USB drive. This can be done via the DVR's menu system.
- Gezondheid van de harde schijf: Monitor the health of your hard drive through the DVR's system information. Replace the HDD if any errors or warnings are reported.
7. Probleemoplossing
This section addresses common issues you might encounter with your DVR.
- Geen video-uitvoer op monitor:
- Controleer de HDMI/VGA-kabelverbindingen.
- Zorg ervoor dat de monitor is ingeschakeld en is ingesteld op de juiste invoerbron.
- Probeer een andere monitor of kabel.
- Geen camerabeeld:
- Verify camera power supply and video cable connections.
- For IP cameras, ensure they support ONVIF 2.0 and are correctly configured on the network.
- Check camera settings within the DVR interface.
- Geen opname:
- Ensure a hard drive is installed and properly formatted. (Note: Hard drive unit is not included.)
- Controleer de opnameschema's en de instellingen voor bewegingsdetectie.
- Verify the hard drive status in system settings.
- Toegang op afstand werkt niet:
- Zorg ervoor dat de DVR is verbonden met internet.
- Verify the P2P status in network settings.
- Controleer de internetverbinding van uw smartphone.
- Ensure the correct device ID or QR code was used to add the DVR to the XMEye app.
8. Specificaties
| Functie | Beschrijving |
|---|---|
| Fabrikant | HisEEu |
| Modelnummer | DVR17823 |
| Afmetingen | 28.6 x 25.6 x 7.9 cm; 767 g |
| Connectiviteitstechnologie | HDMI, VGA, BNC, Ethernet, USB |
| Compatibele apparaten | Desktop Computer, Smartphone, CCTV Cameras (TVI/CVI/AHD/Analog/IP ONVIF) |
| Aantal kanalen | 4 of 8 (afhankelijk van het model) |
| Videocompressie | H.264, H.265 |
| Video-ingangsmodi | 5-in-1 (AHD, TVI, CVI, Analog, IP) |
| Video-uitgang | HDMI, VGA (1080P) |
| Audio-ingang/-uitgang | 1 CH Audio In / 1 CH Audio Out |
| Opslag | 1 SATA Port (Max 6TB HDD, HDD not included) |
| App voor toegang op afstand | XMEye |
9. Garantie en ondersteuning
Your Hiseeu DVR comes with a standard manufacturer's warranty. Please refer to the warranty card included in your package or visit the official Hiseeu website voor gedetailleerde garantievoorwaarden.
Voor technische ondersteuning, hulp bij het oplossen van problemen of garantieclaims kunt u contact opnemen met de klantenservice van Hiseeu via hun officiële website or the contact information provided with your purchase. When contacting support, please have your model number (DVR17823) and purchase details ready.


