1. Inleiding
This manual provides detailed instructions for the installation, operation, maintenance, and troubleshooting of your Gateway SX2865 SFF Desktop Motherboard H61 (Model DB.U7411.001). This motherboard is designed for Small Form Factor (SFF) desktop systems, featuring the Intel H61 Express chipset and supporting LGA 1155/1156 CPUs and DDR3 RAM. Please read this manual thoroughly before proceeding with any installation or configuration to ensure proper functionality and safety.
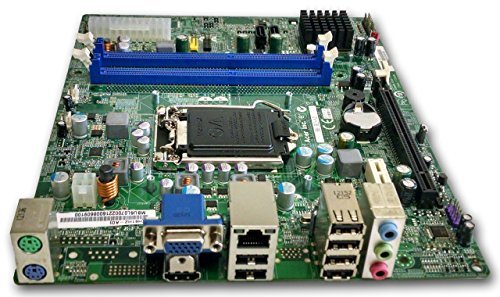
Figuur 1: Overview of the Gateway SX2865 SFF Desktop Motherboard H61. This image displays the main components and layout of the motherboard, including the CPU socket, RAM slots, and various connectors.
2. Veiligheidsinformatie
Always observe the following safety precautions when handling and installing computer components:
- Haal de stekker van het netsnoer uit het stopcontact voordat u componenten installeert of verwijdert.
- Draag een antistatische polsband om schade door elektrostatische ontlading (ESD) aan gevoelige componenten te voorkomen.
- Handle the motherboard by its edges to avoid touching sensitive components or circuits.
- Zorg voor voldoende ventilatie in de computerbehuizing om oververhitting te voorkomen.
- Stel het moederbord niet bloot aan vocht of extreme temperaturen.
- Raadpleeg een gekwalificeerde technicus als u twijfelt over een van de installatiestappen.
3. Installatie en installatie
Follow these steps to properly install the Gateway SX2865 SFF Desktop Motherboard into your system:
3.1. Het chassis voorbereiden
- Open your computer chassis and ensure it is clean and free of dust.
- Install the I/O shield provided with your chassis or motherboard into the rear panel opening.
- Verify that the standoffs in the chassis align with the mounting holes on the motherboard. Adjust if necessary.
3.2. CPU-installatie
- Locate the CPU socket (LGA 1155/1156) on the motherboard.
- Til de laadhendel voorzichtig op en open het klepje van de CPU-socket.
- Carefully align the CPU with the socket, matching the golden triangle on the CPU with the triangle mark on the socket. Do not force the CPU into the socket.
- Close the socket cover and press down the load lever until it locks into place.
- Apply a thin layer of thermal paste to the CPU surface (if not pre-applied on the cooler).
- Install the CPU cooler according to its manufacturer's instructions, ensuring it is securely fastened.
3.3. RAM-installatie
- Zoek de DDR3 DIMM-sleuven op het moederbord.
- Open de clips aan beide uiteinden van de DIMM-sleuf.
- Lijn de inkeping op de RAM-module uit met de sleutel in het DIMM-slot.
- Druk stevig op beide uiteinden van de RAM-module totdat de klemmen vastklikken.
3.4. Montage van het moederbord
- Carefully place the motherboard into the chassis, aligning the mounting holes with the standoffs.
- Bevestig het moederbord met schroeven, maar draai ze niet te vast aan.
3.5. Randapparatuur en stroom aansluiten
- Sluit de 24-pins ATX-voedingsconnector en de 4-pins CPU-voedingsconnector van uw voeding aan op het moederbord.
- Connect SATA data cables from your storage devices (HDD/SSD) to the SATA ports on the motherboard.
- Connect front panel connectors (power button, reset button, USB, audio) to their respective headers on the motherboard. Refer to the motherboard's silkscreen labels for correct orientation.
- Install any expansion cards (e.g., graphics card) into the appropriate PCIe slots and secure them.
- Connect all necessary cables to your power supply.
4. Bediening en configuratie
4.1. Eerste opstart
- After all components are installed and connected, close the chassis.
- Sluit uw monitor, toetsenbord en muis aan.
- Connect the power cord to the power supply and a wall outlet.
- Druk op de aan/uit-knop op uw computer.
4.2. BIOS/UEFI-instellingen
The BIOS (Basic Input/Output System) or UEFI (Unified Extensible Firmware Interface) is firmware that initializes hardware during the booting process. To enter the BIOS/UEFI setup utility:
- During the initial boot-up sequence, repeatedly press the designated key (commonly Verdelen, F2, of F10). The exact key may vary; check the on-screen prompts.
- Within the BIOS/UEFI, you can configure settings such as:
- Systeemdatum en tijd
- Boot Order (to install an operating system from a USB drive or DVD)
- SATA Mode (AHCI, IDE)
- CPU and Memory settings (advanced users)
- Sla de wijzigingen op en sluit de BIOS/UEFI af om verder te gaan met opstarten.
4.3. Installatie van besturingssysteem en stuurprogramma
After configuring the BIOS/UEFI, proceed with installing your preferred operating system (e.g., Windows, Linux). Once the OS is installed, install the necessary drivers for the motherboard's components (chipset, audio, LAN, etc.). These drivers are typically available on the manufacturer's website (Acer/Gateway) or can be found through the operating system's update features.
5. Onderhoud
Regular maintenance helps ensure the longevity and stable performance of your motherboard:
- Stofverwijdering: Periodically clean the inside of your computer case, including the motherboard, CPU cooler, and fan vents, using compressed air. Ensure the system is powered off and unplugged before cleaning.
- BIOS-updates: Controleer die van de fabrikant website (Acer/Gateway) for BIOS/UEFI updates. Updates can improve stability, add support for new hardware, or fix bugs. Follow the update instructions carefully to avoid damaging the motherboard.
- Stuurprogramma-updates: Keep your system drivers updated to ensure optimal performance and compatibility.
- fysieke inspectie: Controleer het moederbord regelmatig op beschadigingen, losse verbindingen of bolle condensatoren.
6. Probleemoplossing
Als u problemen ondervindt met uw moederbord, raadpleeg dan de volgende veelvoorkomende stappen voor probleemoplossing:
- Geen stroom:
- Ensure the power supply is connected correctly to the motherboard (24-pin ATX and 4-pin CPU).
- Check that the power supply switch is in the 'ON' position.
- Verify the power cord is securely plugged into both the power supply and the wall outlet.
- Confirm the front panel power button connector is correctly attached to the motherboard.
- Geen scherm:
- Ensure the monitor is powered on and connected to the correct video output (either integrated graphics or a dedicated graphics card).
- Reseat the RAM modules. Try booting with only one RAM module installed.
- Plaats de grafische kaart opnieuw (indien van toepassing).
- Check if the CPU cooler is properly installed and the CPU power connector is secure.
- System Fails to Boot / POST Errors:
- Listen for beep codes from the motherboard's speaker (if installed). Consult the motherboard's documentation for beep code meanings.
- Clear the CMOS (Complementary Metal-Oxide-Semiconductor) by removing the CMOS battery for a few minutes or using the clear CMOS jumper (refer to motherboard layout).
- Ensure all essential components (CPU, RAM, GPU) are correctly installed.
- Problemen met het besturingssysteem:
- Verify that all necessary drivers are installed and up to date.
- Check SATA cable connections for storage devices.
- Run diagnostic tools for hard drives/SSDs and RAM.
7. Specificaties
Key technical specifications for the Gateway SX2865 SFF Desktop Motherboard H61 (Model DB.U7411.001):
| Functie | Detail |
|---|---|
| Merk | Poort |
| Modelnaam | SX2865 |
| Artikelmodelnummer | DB.U7411.001 |
| Fabrikant | Aas |
| Chipsettype | Intel H61 Express |
| CPU-socket | LGA 1155 or LGA 1156 |
| Compatibele processoren | Intel Xeon (and other compatible LGA 1155/1156 CPUs) |
| RAM-geheugentechnologie | DDR3 |
| Geheugenkloksnelheid | 2133 MHz (Max supported, actual speed depends on CPU and RAM) |
| Geheugenopslagcapaciteit | 16 GB (Maximum supported) |
| Compatibele apparaten | Persoonlijke computer |
| Platform | Linux (and other compatible operating systems) |
| Vormfactor | uATX (Micro-ATX) |
8. Garantie en ondersteuning
For warranty information and technical support regarding your Gateway SX2865 SFF Desktop Motherboard H61 (Model DB.U7411.001), please refer to the documentation provided with your original system or contact the manufacturer directly.
- Fabrikant: Acer (as per product specifications)
- Merk: Poort
- Bezoek de officiële Gateway-ondersteuning webplaats or Acer-ondersteuning webplaats for drivers, FAQs, and contact information.
- Bewaar uw aankoopbewijs voor garantieclaims.


