1. Inleiding
This manual provides detailed instructions for the safe and efficient operation of your Vivitek Qumi Q5 Pocket DLP Projector. Please read this manual thoroughly before using the projector and retain it for future reference. The Vivitek Qumi Q5 is a compact, high-definition LED projector designed for portability and versatility, featuring 500 lumens brightness, WXGA resolution, and various connectivity options.
2. Belangrijke veiligheidsinformatie
Neem de volgende veiligheidsmaatregelen in acht om schade aan de projector te voorkomen en de veiligheid van de gebruiker te waarborgen:
- Blokkeer de ventilatieopeningen niet. Zorg voor voldoende luchtcirculatie rond de projector.
- Kijk niet rechtstreeks in de projectorlens als de lamp is ingeschakeld. Het felle licht kan oogbeschadiging veroorzaken.
- Gebruik uitsluitend de stroomadapter die bij de projector is geleverd.
- Stel de projector niet bloot aan regen of vocht om het risico op brand of elektrische schokken te verminderen.
- Plaats de projector op een stabiele, vlakke ondergrond.
- Haal de stekker van de projector uit het stopcontact voordat u hem schoonmaakt of wanneer u hem gedurende langere tijd niet gebruikt.
- Laat alle onderhoudswerkzaamheden over aan gekwalificeerd onderhoudspersoneel.
3. Inhoud van het pakket
Controleer of alle hieronder vermelde artikelen in uw pakket zitten:
- Vivitek Qumi Q5 Projector
- Stroomadapter
- Universal I/O to VGA Cable
- HDMI-kabel
- 3.5mm AV-in Cable
- Draagtas
- Afstandsbediening
- Snelstartgids
- Garantiekaart
4. Product voorbijview
Familiarize yourself with the various components and features of your Vivitek Qumi Q5 projector.
4.1 voorzijde View

Afbeelding 4.1: Voorkant view of the Vivitek Qumi Q5 projector, showing the lens and ventilation grilles.
The front of the projector features the projection lens and air vents for cooling. Ensure these vents are not obstructed during operation.
4.2 Boven View

Afbeelding 4.2: Bovenkant view of the Vivitek Qumi Q5 projector, highlighting the touch-sensitive control panel.
The top panel includes touch-sensitive controls for navigation and menu selection. The "Qumi" logo is also visible.
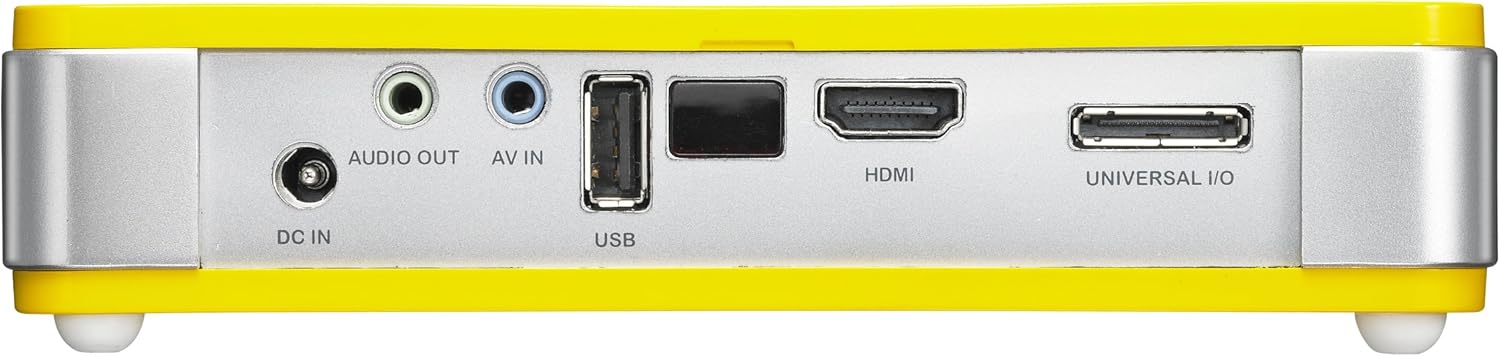
4.3 Achterkant View (Connectivity Ports)

Afbeelding 4.3: Achterkant view of the Vivitek Qumi Q5 projector, displaying all input and output ports.
The rear panel houses all essential connectivity ports:
- DC IN: Voor het aansluiten van de stroomadapter.
- GELUID UIT: 3.5 mm jack-aansluiting voor externe luidsprekers of hoofdtelefoon.
- AV-IN: 3.5mm jack for composite video and stereo audio input.
- USB-poort: Voor het aansluiten van USB-opslagapparaten.
- HDMI: High-Definition Multimedia Interface for digital video and audio input.
- UNIVERSAL I/O: Multi-purpose port for VGA and other analog inputs via adapter.
5. Instellen
Follow these steps to set up your Vivitek Qumi Q5 projector.
5.1 De projector inschakelen
- Sluit de voedingsadapter aan op de DC IN poort op de projector.
- Sluit de stroomadapter aan op een stopcontact.
- Press the power button on the projector or remote control to turn on the device. The power indicator light will illuminate.
5.2 Invoerbronnen aansluiten
The Qumi Q5 supports various input sources:
- HDMI: Connect an HDMI cable from your source device (e.g., laptop, Blu-ray player) to the HDMI poort op de projector.
- VGA: Use the supplied Universal I/O to VGA cable to connect your computer's VGA output to the UNIVERSAL I/O haven.
- AV (samengesteld): Use the supplied 3.5mm AV-in cable to connect composite video and stereo audio devices to the AV IN haven.
- USB-poort: Plaats een USB-flashstation in de USB port to play media files direct.
- Draadloos (optioneel): If using an optional WiFi USB dongle, insert it into the USB port for wireless connectivity. Refer to the dongle's instructions for setup.
5.3 Focus aanpassen
Locate the focus wheel on the side of the projector. Rotate the wheel until the projected image appears sharp and clear on your screen or wall.
Afbeelding 5.3: Kant view of the Vivitek Qumi Q5, indicating the location of the focus adjustment wheel.
6. De projector bedienen
6.1 Navigeren door het menu
Use the touch-sensitive buttons on the top panel or the remote control to navigate the projector's on-screen display (OSD) menu. The menu allows you to adjust image settings, input sources, and other system configurations.
6.2 Invoerbron selecteren
Press the "Source" button on the remote control or navigate through the OSD menu to select the desired input source (HDMI, VGA, AV, USB, or Wireless).
6.3 Beeldaanpassingen
Within the OSD menu, you can adjust various image parameters:
- Helderheid/contrast: Adjust for optimal image visibility.
- Kleur/tint: Verfijn de kleurweergave.
- Beeldverhouding: Select between 4:3, 16:9, or other available ratios to match your content.
- Keystone-correctie: Correct trapezoidal distortion if the projector is not perfectly perpendicular to the screen.
6.4 Playing Media from USB
When a USB drive is inserted, the projector's media player interface will typically launch automatically. You can browse and play supported video, audio, and image files rechtstreeks vanaf het USB-station.
6.5 3D-functionaliteit
The Qumi Q5 is 3D-ready via DLP Link technology. To view 3D content, you will need compatible 3D source material, a 3D-capable player, and active DLP Link 3D glasses (sold separately).
7. Onderhoud
Goed onderhoud garandeert de levensduur en optimale prestaties van uw projector.
7.1 De projector reinigen
- Buitenkant: Gebruik een zachte, pluisvrije doek die lichtjes is schoongemaakt.ampmet water of een milde reinigingsoplossing. Gebruik geen schurende schoonmaakmiddelen of oplosmiddelen.
- Lens: Gently wipe the lens with a lens cleaning cloth or lens paper. Avoid touching the lens surface with your fingers.
- Vents: Use a soft brush or compressed air to clear dust from the ventilation openings.
7.2 LED-lichtbron
The Qumi Q5 utilizes an LED light source with an estimated operational life of up to 30,000 hours, significantly reducing the need for lamp replacement compared to traditional projectors.
7.3 Opslag
When not in use for extended periods, store the projector in its carrying pouch in a cool, dry place, away from direct sunlight and extreme temperatures.
8. Probleemoplossing
Raadpleeg dit gedeelte voor oplossingen voor veelvoorkomende problemen die u kunt tegenkomen.
| Probleem | Mogelijke oorzaak | Oplossing |
|---|---|---|
| Er wordt geen afbeelding weergegeven. |
|
|
| Het beeld is wazig. |
|
|
| Geen geluid. |
|
|
| Projector overheats or shuts down. |
|
|
9. Specificaties
Key technical specifications for the Vivitek Qumi Q5 projector:
- Model: Qumi Q5
- Weergavetechnologie: DLP Pico chipset
- Oorspronkelijke resolutie: WXGA-formaat (1280 x 720)
- Helderheid: Tot 500-lumen
- Lichtbron: LED (Estimated 30,000 hours operation)
- Connectiviteit: HDMI, Universal I/O (VGA), AV mini-jack, USB, Audio-out mini-jack, Wireless (via optional USB dongle)
- Intern geheugen: 4GB
- 3D Klaar: Yes, via DLP Link
- Afmetingen: 4 x 6.3 x 1.3 cm (10.16 x 16.00 x 3.30 inch)
- Gewicht: 1.1 pond (0.5 kg)
- Voeding: Externe voedingsadapter
10. Garantie en ondersteuning
Your Vivitek Qumi Q5 projector is covered by a limited warranty. Please refer to the included Warranty Card for specific terms and conditions, including warranty period and coverage details. For technical support, service, or further inquiries, please visit the official Vivitek webwebsite of neem contact op met hun klantenservice. Bewaar uw aankoopbewijs als aankoopbewijs voor garantieclaims.


