1. Inleiding
This manual provides detailed instructions for the installation, operation, and maintenance of your Gewiss GW10701 Programmable Thermostat. This device is designed to control heating and air conditioning systems, allowing you to manage room temperature efficiently and comfortably. Please read this manual thoroughly before installation and use to ensure proper functionality and safety.
2. Veiligheidsinformatie
Neem altijd de volgende veiligheidsmaatregelen in acht om persoonlijk letsel of schade aan het apparaat te voorkomen:
- De installatie mag uitsluitend worden uitgevoerd door gekwalificeerd personeel en in overeenstemming met de plaatselijke elektrische codes en voorschriften.
- Disconnect power to the heating/cooling system at the main circuit breaker before installing or servicing the thermostat.
- Stel de thermostaat niet bloot aan water of overmatige vochtigheid.
- Gebruik uitsluitend het aangegeven batterijtype en zorg voor de juiste polariteit tijdens de installatie.
- Keep batteries out of reach of children. Do not dispose of batteries in fire.
- Do not attempt to open or repair the thermostat yourself. Contact qualified service personnel.
3. Product voorbijview
The Gewiss GW10701 is a wall-mounted programmable thermostat featuring an LCD display and intuitive controls for temperature management.
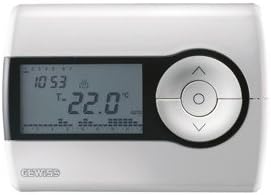
Figuur 1: Voorkant view of the Gewiss GW10701 Thermostat. It features a clear LCD screen displaying time and temperature, alongside a circular control panel with directional buttons and a central confirmation button for easy navigation and setting adjustments.
3.1. Components
- LCD-scherm: Shows current time, temperature, operating mode, and programming settings.
- Bedieningsknoppen: Typically include UP/DOWN arrows for temperature adjustment, MODE button for selecting operating modes (e.g., Heat, Cool, Auto, Off), and a SET/PROG button for accessing programming menus. (Note: Specific button functions may vary slightly; refer to on-screen prompts.)
- Batterijcompartiment: Located on the rear or side, houses the power supply batteries.
- Montageplaat: Voor een veilige wandmontage.
4. Installatie
4.1. Een locatie kiezen
Select a central location on an interior wall, approximately 1.5 meters (5 feet) above the floor. Avoid locations near heat sources (lamps, direct sunlight, fireplaces), drafts (windows, doors), or areas with poor air circulation.
4.2. De thermostaat monteren
- Stroom loskoppelen: Turn off the power to your heating/cooling system at the main circuit breaker.
- Losse bodemplaat: Carefully detach the front cover of the thermostat from its base plate.
- Markeren en oefenen: Hold the base plate against the wall at your chosen location. Mark the drilling points. Drill holes and insert wall anchors if necessary.
- Bevestigingsbodemplaat: Fasten the base plate to the wall using the provided screws.
- Bedrading (indien van toepassing): Connect the system wires to the appropriate terminals on the base plate. Refer to the wiring diagram provided with your heating/cooling system or consult a qualified electrician. Note: While the thermostat is battery-powered, it controls a 230V system. Ensure correct wiring.
- Batterijen installeren: Insert the required batteries into the battery compartment, observing correct polarity (+/-).
- Thermostaat bevestigen: Carefully reattach the thermostat front cover to the base plate, ensuring it clicks securely into place.
- Herstel de stroom: Turn on the power to your heating/cooling system at the main circuit breaker.
5. Bediening
5.1. Eerste installatie
Upon first power-up or after battery replacement, you may need to set the current time and date. Follow the on-screen prompts or refer to the programming section.
5.2. De temperatuur instellen
Gebruik de UP En OMLAAG arrow buttons to adjust the desired temperature. The display will show the set temperature temporarily, then revert to the current room temperature.
5.3. Bedrijfsmodi:
Druk op de MODUS button (or similar) to cycle through available operating modes:
- WARMTE: De thermostaat schakelt de verwarming in wanneer de kamertemperatuur onder de ingestelde temperatuur zakt.
- STOER: The thermostat will activate the air conditioning system when the room temperature rises above the set temperature.
- AUTO: De thermostaat schakelt automatisch tussen verwarmen en koelen om de ingestelde temperatuur te handhaven.
- OFF: De verwarming en koeling zijn uitgeschakeld.
6. Programmeren
The Gewiss GW10701 allows you to create custom heating/cooling schedules for different times of the day and days of the week. This feature helps optimize energy consumption and comfort.
6.1. Tijd en datum instellen
- Druk op de SET or PROG om het instellingenmenu te openen.
- Navigate using the arrow buttons to find "Time" or "Date" settings.
- Use the arrow buttons to adjust the values (hour, minute, day, month, year).
- Bevestig elke instelling met de SET or central button.
6.2. Creating a Program Schedule
The thermostat typically offers daily or weekly programming options. You can set different temperatures for various periods (e.g., Wake, Day, Evening, Sleep).
- Druk op de PROG knop om de programmeermodus te openen.
- Select the day or group of days you wish to program (e.g., Mon-Fri, Sat-Sun, or individual days).
- For each period (e.g., "Wake"), set the desired start time and temperature using the arrow buttons.
- Advance to the next period and repeat the process.
- Save your program and exit programming mode.
Consult the on-screen menu and specific button labels on your device for precise programming steps, as interfaces can vary.
7. Onderhoud
7.1. Batterij vervangen
The thermostat is powered by batteries. When the battery indicator appears on the display, replace the batteries promptly to ensure continuous operation. Typically, 2x AA or AAA alkaline batteries are required.
- Verwijder voorzichtig de voorkant van de thermostaat.
- Verwijder de oude batterijen en gooi ze op een verantwoorde manier weg.
- Plaats nieuwe batterijen en zorg voor de juiste polariteit.
- Breng de voorklep weer aan.
7.2. Schoonmaken
Clean the thermostat's exterior with a soft, dry cloth. Do not use abrasive cleaners, solvents, or spray cleaners directly onto the device, as this can damage the display or internal components.
8. Probleemoplossing
| Probleem | Mogelijke oorzaak | Oplossing |
|---|---|---|
| Het scherm is leeg of donker. | Batterijen zijn bijna leeg. | Vervang de batterijen door nieuwe. |
| Het verwarmings-/koelsysteem reageert niet. |
|
|
| Temperatuurmetingen lijken onnauwkeurig. | De locatie van de thermostaat wordt beïnvloed door tocht of warmtebronnen. | Zorg ervoor dat de thermostaat niet wordt blootgesteld aan direct zonlicht, tocht of warmteafgevende apparaten. |
9. Specificaties
- Fabrikant: Gewiss
- Modelnummer: GW10701 (Chorus)
- Afmetingen (L x B x H): 13x2.3x9.2cm
- Gewicht: 9.07 gram
- Kleur: Wit
- Materiaal: Plastic
- Voeding: Op batterijen
- Schakelvolumetage: 230 Volt (for controlled system)
- Weergavetype: LCD of LED
- Montagetype: Aan de muur bevestigd
- Bedieningsfuncties: Programmable, Button control
- Gebruik: Heating systems, Air conditioning systems
10. Garantie en ondersteuning
For warranty information, technical support, or service inquiries regarding your Gewiss GW10701 Thermostat, please refer to the warranty card included with your product or visit the official Gewiss website. You may also contact your local Gewiss distributor or retailer for assistance.
Gewiss Official Webwebsite: www.gewiss.com


