1. Belangrijke veiligheidsinformatie
Lees en begrijp alle instructies voordat u dit stapelbed in elkaar zet en gebruikt. Bewaar deze handleiding voor toekomstig gebruik.
- Draagvermogen: The upper bunk is designed to support a maximum weight of 175 lbs (79 kg). The lower bunk is designed to support a maximum weight of 250 lbs (113 kg).
- Aanbevolen leeftijd: Het bovenste bed is niet geschikt voor kinderen jonger dan 6 jaar.
- Gevaar voor vallen: Ensure guardrails are properly installed on the upper bunk. Do not allow horseplay on or under the bed. Always use the ladder for access to the upper bunk.
- Matrasvereisten: Use only mattresses that meet the specified dimensions for twin size beds. Ensure the mattress thickness does not exceed the maximum indicated by the guardrail height.
- Montage: Assembly should be performed by two adults. Ensure all fasteners are securely tightened before use. Periodically check and re-tighten fasteners.
- Ventilatie: Do not obstruct the ventilation openings of the light strip.
- Elektrische veiligheid: Ensure the light strip is connected to a suitable power source and handled according to electrical safety guidelines. Disconnect power before cleaning or maintenance.
2. Inhoud van het pakket
Controleer of alle onderdelen aanwezig zijn voordat u met de montage begint. Neem contact op met de klantenservice als er onderdelen ontbreken of beschadigd zijn.
- Bed frame components (headboards, footboards, side rails, slats)
- Wardrobe unit components (panels, hanging rod, shelves)
- Four storage drawers (drawer fronts, sides, bottoms, hardware)
- Ladder
- Light strip and power adapter
- Pegboard panels and mounting hardware
- Assembly hardware (screws, bolts, nuts, cam locks, dowels)
- Assembly tools (Allen wrench, screwdriver)
3. Opstelling en montage
Follow these steps carefully for proper assembly. It is recommended to assemble the bed in the room where it will be used.
- Bereid het gebied voor: Maak een ruime plek vrij voor de montage. Leg alle onderdelen op een zachte, schone ondergrond om krassen te voorkomen.
- Assemble the Wardrobe Unit: Begin by assembling the main panels of the wardrobe unit. Secure the hanging rod and internal shelves as instructed.
- Attach Pegboard Panels: Mount the pegboard panels to the sides of the wardrobe unit using the provided hardware.
- Lichtstrip installeren: Carefully attach the integrated light strip to the designated area within the wardrobe. Ensure the wiring is routed safely and securely.
- Het monteren van bedframes: Construct the upper and lower bed frames by attaching the side rails to the headboards and footboards.
- Connect Wardrobe to Bed Frame: Securely attach the assembled wardrobe unit to the bed frames using the connecting hardware.
- Lattenbodem installeren: Place and secure the wooden slats onto both the upper and lower bed frames. Ensure they are evenly spaced and firmly attached.
- Laden monteren: Construct the four storage drawers. Insert the drawer slides into the bed frame and attach the drawers.
- Ladder bevestigen: Securely attach the ladder to the upper bunk frame.
- Laatste controle: Verify that all bolts, screws, and fasteners are tightly secured. Do not overtighten.

Image: Fully assembled Polibi Twin Size Bunk Bed, showcasing the integrated wardrobe, four storage drawers, and ladder. The bed is shown in a room setting with bedding.

Afbeelding: Close-up view of the wooden bed slats installed on the bed frame, demonstrating their support structure.
4. Gebruiksaanwijzing
4.1 Gebruik van de kledingkast en opbergruimte
- Ophangstang: Utilize the integrated hanging rod for organizing clothes. Ensure items are distributed evenly to prevent excessive strain.
- Opbergplank: The top shelf within the wardrobe is suitable for hats, accessories, or folded garments.
- Opberglades: The four deep-set drawers beneath the bed frame are designed for storing blankets, pillows, clothing, or other items. Pull drawers gently to open and push firmly to close.
- Pegboard Panels: Use standard pegboard hooks (not included) to customize storage on the pegboard panels for headphones, bags, keys, or decorative items.
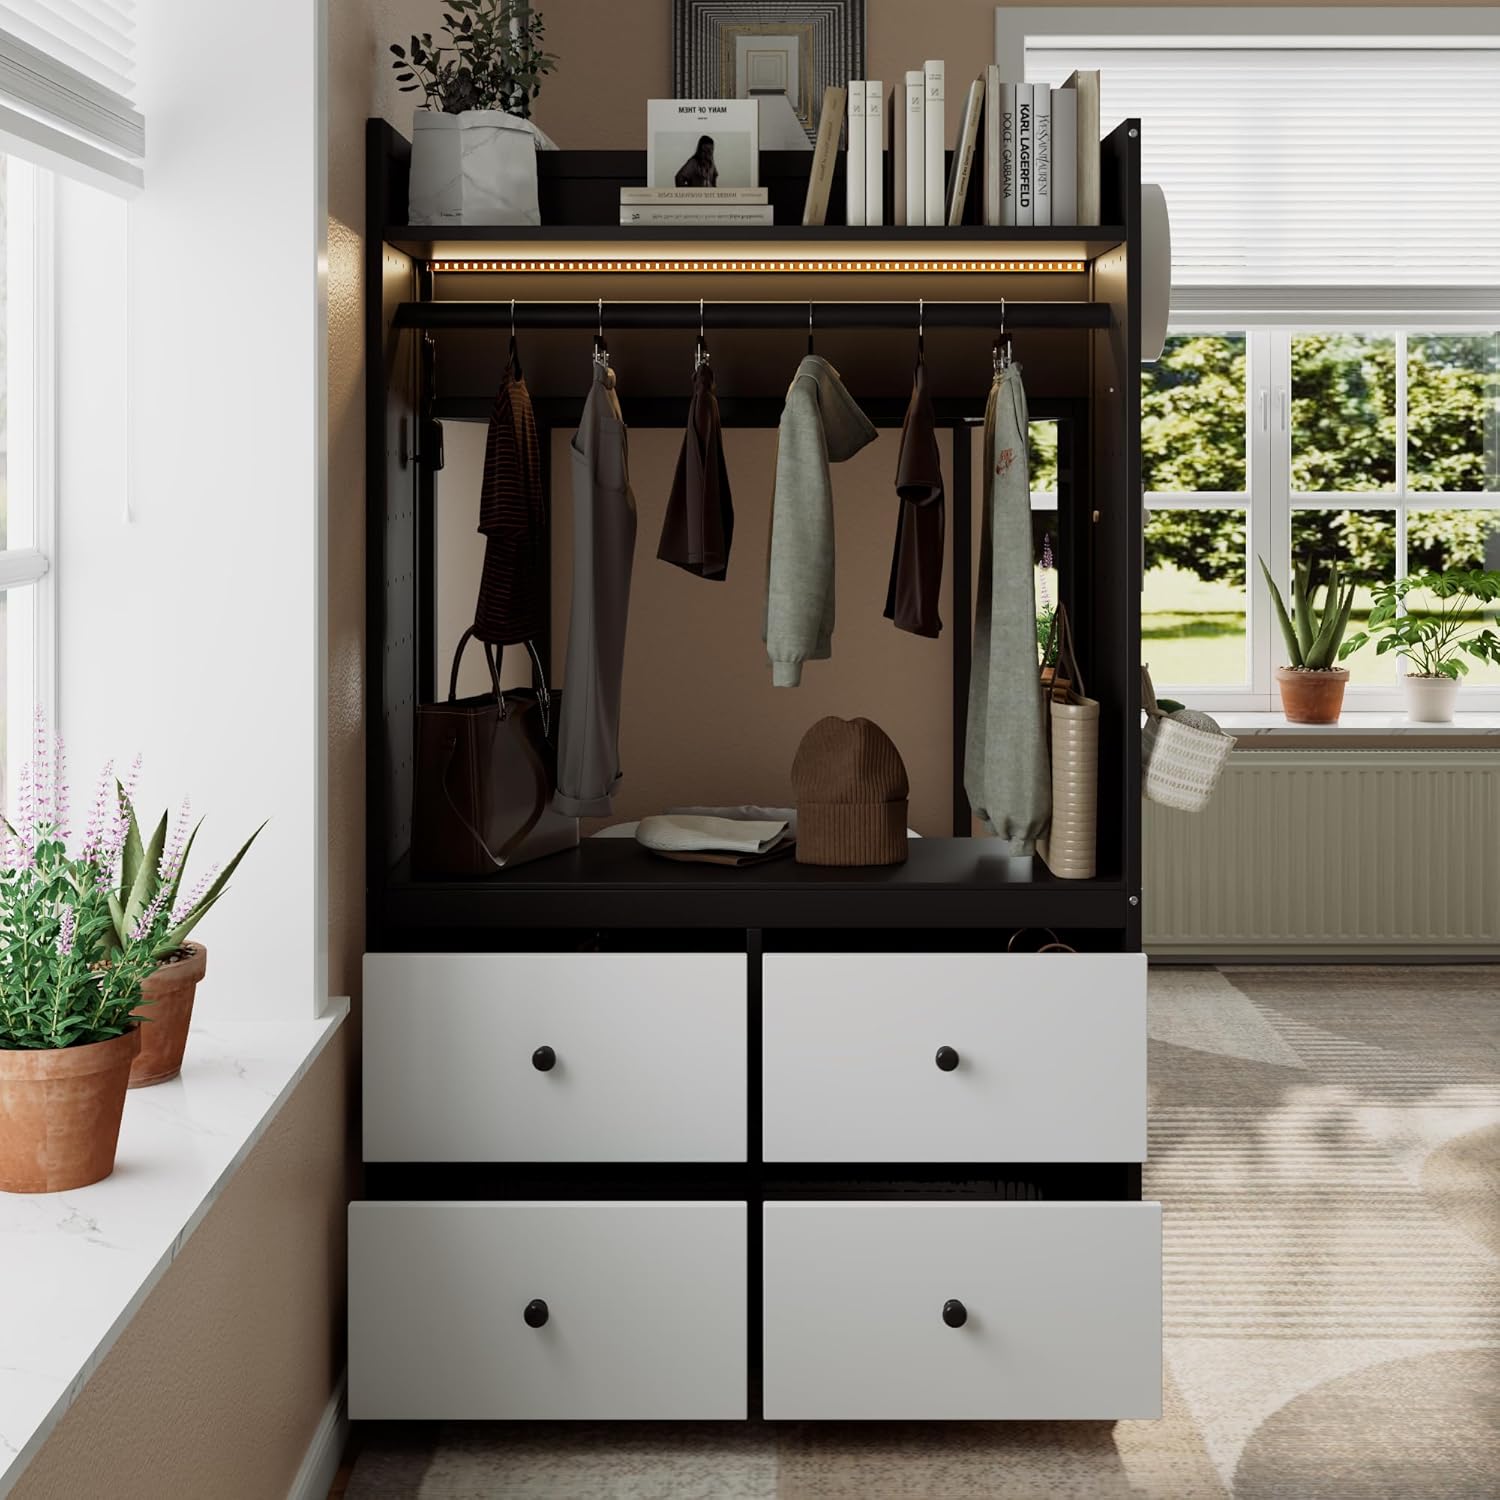
Afbeelding: Interieur view of the built-in wardrobe, showing clothes hanging on the rod, a top shelf, and the integrated light strip illuminating the space.

Afbeelding: Gedetailleerd view of one of the four storage drawers pulled open, revealing its interior and the drawer knob.
4.2 Integrated Light Strip
- Aan/uit: The light strip is typically controlled by an inline switch or a remote control (if included). Refer to the light strip's specific instructions for operation.
- Brightness/Color Adjustment: Some light strips offer adjustable brightness or color settings. Consult the light strip's manual for these features.

Image: Close-up of the light strip installed above the hanging rod inside the wardrobe, showing its connection cable.
5. Onderhoud
- Schoonmaak: Veeg oppervlakken af met een zachte, damp doek. Vermijd agressieve chemicaliën of schurende reinigingsmiddelen die de afwerking kunnen beschadigen.
- Controle van bevestigingsmiddelen: Periodically (every 3-6 months) inspect all bolts, screws, and fasteners to ensure they remain tight. Re-tighten as necessary to maintain structural integrity and prevent squeaking.
- Lichtstrip: Keep the light strip free from dust. If the light strip malfunctions, consult the manufacturer's instructions for troubleshooting or replacement.
- Ladegeleiders: Als lades stroef lopen, breng dan een kleine hoeveelheid siliconensmeermiddel aan op de ladegeleiders.
6. Probleemoplossing
- Bed Squeaks: Check all fasteners and tighten any loose connections. Ensure the bed is on a level surface.
- Drawers Stick/Don't Close Smoothly: Verify that the drawer slides are properly aligned and free of obstructions. Ensure drawers are not overloaded. Lubricate slides if necessary.
- Light Strip Not Working: Check the power connection and ensure the adapter is plugged into a working outlet. Verify the inline switch (if present) is in the 'on' position. If issues persist, the light strip may require replacement.
- Wiebelig frame: Ensure all structural bolts are fully tightened. Check for uneven flooring and use shims if needed to stabilize the bed.
7. Specificaties
| Modelnummer | B0GLP7X6FT |
| Merk | Polibi |
| Kleur | Zwart |
| Maat | Tweeling |
| Materiaal | Hout |
| Productafmetingen (L x B x H) | 92.7" x 40" x 65" |
| Speciale kenmerken | Built-in Wardrobe, 4 Storage Drawers, Integrated Light Strip, Pegboard Organizer |

Image: Diagram illustrating the key dimensions of the Polibi Twin Size Bunk Bed, including length (92.7"), width (40"), and height (65").
8. Garantie en ondersteuning
Polibi-producten worden met zorg en kwaliteit vervaardigd. Voor specifieke garantie-informatie verwijzen wij u naar de garantiekaart die bij uw aankoop is meegeleverd of naar de officiële Polibi-website. webplaats.
If you encounter any issues or require assistance with assembly, missing parts, or product operation, please contact Polibi customer support:
- Webwebsite: Bezoek de Polibi-winkel op Amazon.
- E-mail/Telefoon: Refer to your purchase documentation or the Polibi website voor de meest actuele contactinformatie.


