Invoering
This manual provides essential instructions for the setup, operation, and troubleshooting of your new Generic remote control, specifically designed for use with OKIN Control Unit Cu358-2-l JLDP 15.005.102 adjustable bed bases. Please read this manual carefully before attempting to use or pair the remote control.
Belangrijke opmerking: This remote control is a replacement unit and does not include batteries or a printed instruction manual. It is crucial to ensure that your existing control box and old remote control match the specifications listed in this document for proper functionality. This remote is not a universal remote and will only work with the specified OKIN control unit.
Compatibiliteitsverificatie
Before attempting to pair or use this remote, it is critical to verify its compatibility with your adjustable bed base's control unit. This remote is designed exclusively for the OKIN Control Unit Cu358-2-l JLDP 15.005.102.
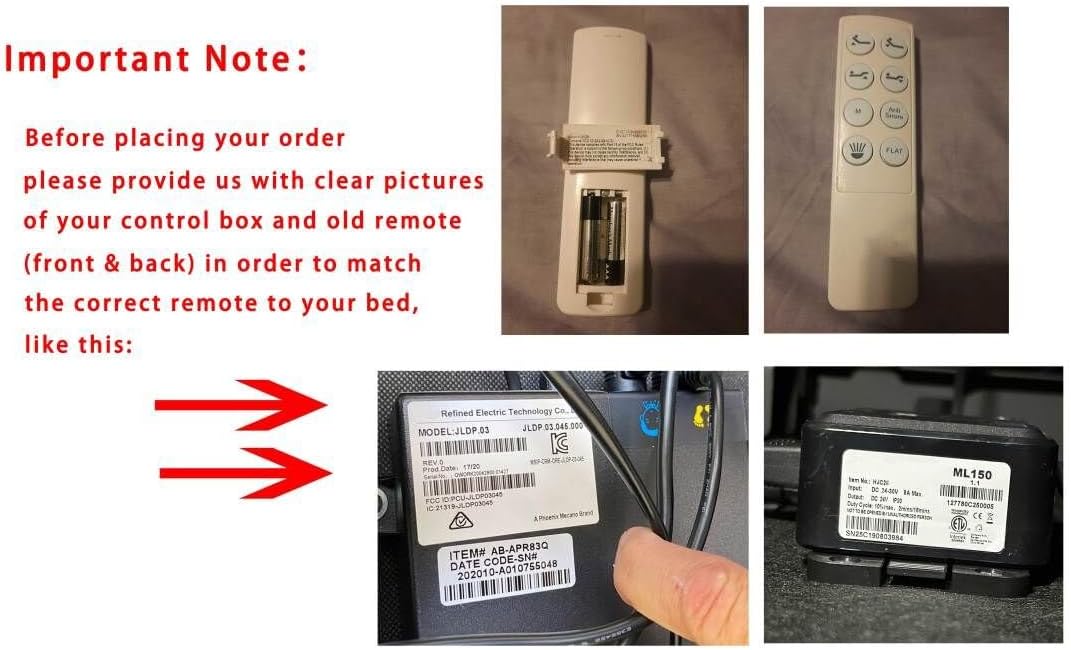
Afbeeldingbeschrijving: This image displays a crucial compatibility message: "Important Note: Before placing your order please provide us with clear pictures of your control box and old remote (front & back) in order to match the correct remote to your bed." It also shows examples of a remote control (front and back) and close-ups of control box labels with model numbers like "JLDP 15.005.102" and "MODEL: JLDP 03", indicating where to find identification information.
Please ensure your control box has the model number Cu358-2-l JLDP 15.005.102. You can usually find this information on a label attached to the control box or within the battery compartment of your old remote control. If you are uncertain, consult your bed base's original manual or contact the manufacturer with your control box details.
Instellen
1. Batterij installatie
The remote control requires 2 AAA batteries (not included). To install the batteries:
- Verwijder het batterijklepje van de achterkant van de afstandsbediening.
- Plaats 2 AAA-batterijen en let op de juiste polariteit (+/-).
- Plaats het batterijklepje stevig terug.


Afbeeldingbeschrijving: Two images displaying the rear of the remote control with the battery cover detached, illustrating the battery compartments where two AAA batteries are to be inserted. The internal circuitry and battery terminals are visible.
2. Koppelinstructies
The remote control must be paired with your adjustable bed base's control unit to function. Follow these steps carefully:
Method 1: Standard Pairing Procedure
- Stap 1: Unplug the power cord of your adjustable bed base from the electrical outlet.
- Stap 2: Wait approximately 5 seconds, then plug the power cord back into the outlet.
- Stap 3: Within 10 seconds of plugging in the power cord, locate the PAIR button on the back of the remote control (often inside the battery compartment). Press and hold this PAIR button.
- Stap 4: The PAIR button on the remote will illuminate blue and begin flashing. Continue holding the button.
- Stap 5: When the PAIR button stops flashing, the LED light on the control box will go out. Release the PAIR button.
- Stap 6: The remote is now paired to the adjustable base. Test all remote functions to confirm successful pairing.

Afbeeldingbeschrijving: This image provides a visual guide for pairing. It shows the back of a remote control with the battery cover removed, highlighting a "Pairing Button." Text steps instruct the user to "start the massage bed, then find the control box," "point the remote control at the control box (open the remote control battery cover and press the Pair/Paired button)," and "Press and hold the Pair/Paired button for 30 seconds to complete the pairing."
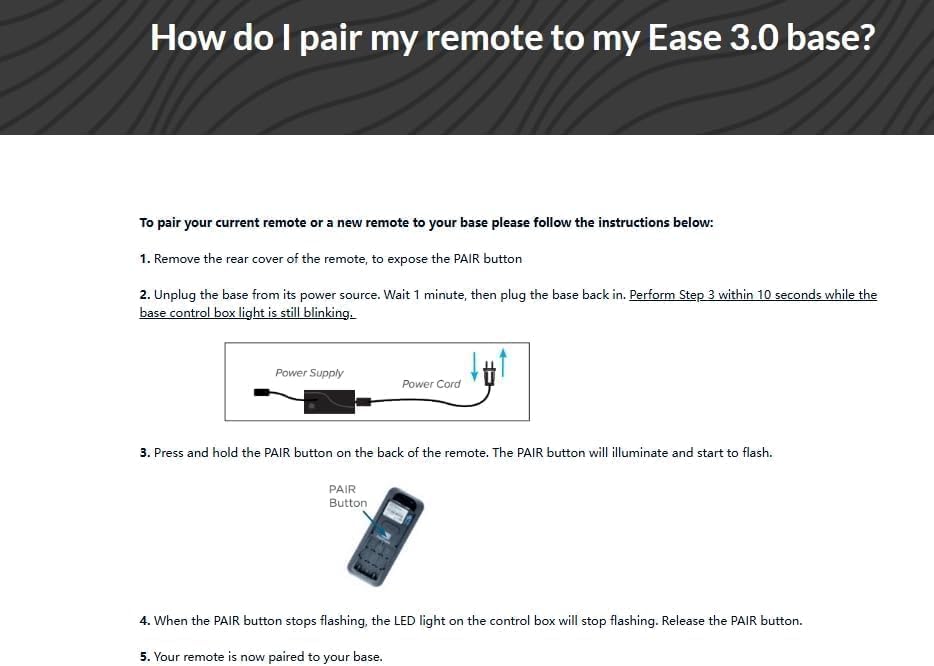
Afbeeldingbeschrijving: This image presents detailed pairing instructions titled "How do I pair my remote to my Ease 3.0 base?". It outlines five steps: removing the rear cover to expose the PAIR button, unplugging the base and plugging it back in within 10 seconds, pressing and holding the PAIR button until it illuminates and flashes, and releasing the button when it stops flashing and the control box LED goes out. A diagram of a power supply and an illustration of a remote with a PAIR button are included.
Method 2: Pairing with Reset Button (If applicable)
Some control boxes may require a reset. The distance between the remote and control box for pairing should be less than 2 meters.
- Stap 1: Remove the battery cover on the flipside of the remote.
- Stap 2: Insert/check existing 3x AAA batteries (Note: This remote uses 2 AAA batteries, please verify your specific model's requirement).
- Stap 3: Push the reset button on the control box twice with a small, pointed object. The green pairing LED adjoining will light up. You now have 10 seconds to pair the remote and receiver.
- Stap 4: On the flipside of the remote, locate the silicone push button positioned above the batteries. A blue LED starts blinking as the button is pressed. Keep it pressed until the blue LED is lit continuously, then pairing is completed, and the blue LED light fades away.

Afbeeldingbeschrijving: This image provides "Pairing instruction (in case of trouble)." It details steps including removing the battery cover, inserting batteries, pushing a reset button on the control box twice (which lights a green LED), and then pressing a silicone push button on the remote until a blue LED blinks and then stays lit, indicating successful pairing. Illustrations of the remote's battery compartment and a control box with an arrow pointing to the reset LED are included.
Gebruiksaanwijzing
Once successfully paired, your remote control is ready for use. The remote typically features buttons for adjusting the head and foot sections of your adjustable bed base, as well as flat position and potentially massage functions. Refer to your bed base's original manual for specific button layouts and advanced features.
- Hoofd omhoog/omlaag: Adjusts the head section of the bed.
- Voet omhoog/omlaag: Adjusts the foot section of the bed.
- Vlak: Returns the bed to a flat position.
- Massage (if applicable): Activates or adjusts massage functions.
Point the remote control towards the bed base when operating to ensure the signal is received.
Probleemoplossing
- Afstandsbediening reageert niet:
- Controleer of de batterijen correct geplaatst zijn en niet leeg zijn. Vervang ze indien nodig.
- Ensure the remote is pointed directly at the bed base's control unit.
- Verify that the bed base is plugged into a working electrical outlet.
- Re-attempt the pairing procedure as described in the "Setup" section.
- Koppelingsfout:
- Confirm that your control box model number is exactly Cu358-2-l JLDP 15.005.102. This remote is not universal.
- Ensure you are performing the pairing steps within the specified timeframes (e.g., 10 seconds after plugging in the power cord).
- Try both pairing methods if available for your specific control unit.
- Ensure the remote is within 2 meters of the control box during pairing.
- Intermitterende werking:
- Check for any obstructions between the remote and the bed base.
- Zorg ervoor dat er geen sterke storingsbronnen in de buurt zijn (bijvoorbeeld andere draadloze apparaten).
- Replace batteries even if they seem partially functional.
If issues persist after following these steps, please consult the original manual for your adjustable bed base or contact the manufacturer for further assistance.
Specificaties
| Merk | Algemeen |
| Modelnummer | for Cu358-2-l JLDP 15.005.102 |
| Compatible Control Unit | OKIN Control Unit Cu358-2-l JLDP 15.005.102 |
| Speciale functie | Not a universal remote |
| Kleur | Zwart |
| Max aantal ondersteunde apparaten | 1 |
| Compatibele apparaten | Verstelbare bedbodem |
| Connectiviteitstechnologie | Infrarood |
| Controller-type | Knopbediening |
| Maximaal bereik | 8 meter |
| Aantal batterijen | 2 AAA-batterijen vereist (niet inbegrepen) |
| Fabrikant | SZHKHXD |
Onderhoud
- Schoonmaak: Veeg de afstandsbediening af met een zachte, droge doek. Gebruik geen vloeibare reinigingsmiddelen of schuurmiddelen.
- Batterij vervangen: Vervang de batterijen direct wanneer de prestaties van de afstandsbediening afnemen. Verwijder de batterijen als de afstandsbediening gedurende langere tijd niet wordt gebruikt om lekkage te voorkomen.
- Opslag: Bewaar de afstandsbediening op een droge plaats, uit de buurt van extreme temperaturen en direct zonlicht.
Garantie-informatie
Dit product wordt geleverd met een 90 dagen garantie from the date of purchase. This warranty covers manufacturing defects under normal use. It does not cover damage caused by misuse, accidents, unauthorized modifications, or improper battery installation. Please retain your proof of purchase for warranty claims.
Steun
For further assistance or if you encounter issues not covered in this manual, please refer to the original instruction manual provided with your adjustable bed base. For product-specific inquiries regarding this remote control, please contact the seller or manufacturer (SZHKHXD) through your purchase platform.