Invoering
This manual provides detailed instructions for the installation, operation, and maintenance of the SOYO B450M ATX Gaming Motherboard. This motherboard is designed to support AMD Ryzen 1st to 5th generation CPUs, featuring DDR4 memory support and an M.2 NVMe slot for high-speed storage. Please read this manual thoroughly before proceeding with installation to ensure proper setup and optimal performance.
Functies
- High-performance SOYO B450M motherboard designed for gaming enthusiasts, supporting Ryzen 1st to 5th generation CPUs for optimal performance.
- Equipped with DDR4 memory slots, this ATX motherboard allows for faster data transfer and improved multitasking capabilities.
- M.2 NVMe support enables lightning-fast storage solutions, enhancing your gaming experience with reduced load times and increased responsiveness.
- Multiple connectivity options including USB 3.1, HDMI, and Ethernet ensure seamless integration with your gaming setup and peripherals.
- Compact ATX form factor fits easily into most cases, making it an ideal choice for building a powerful yet space-efficient gaming rig.
Installatiehandleiding
1. Uitpakken en inspecteren
Carefully remove the motherboard from its packaging. Inspect for any visible damage. Ensure all accessories, such as SATA cables and the I/O shield, are present.
2. CPU-installatie
Locate the AM4 CPU socket. Lift the retention arm. Align the triangular marker on your Ryzen CPU with the corresponding marker on the socket. Gently place the CPU into the socket without forcing it. Lower the retention arm to secure the CPU.
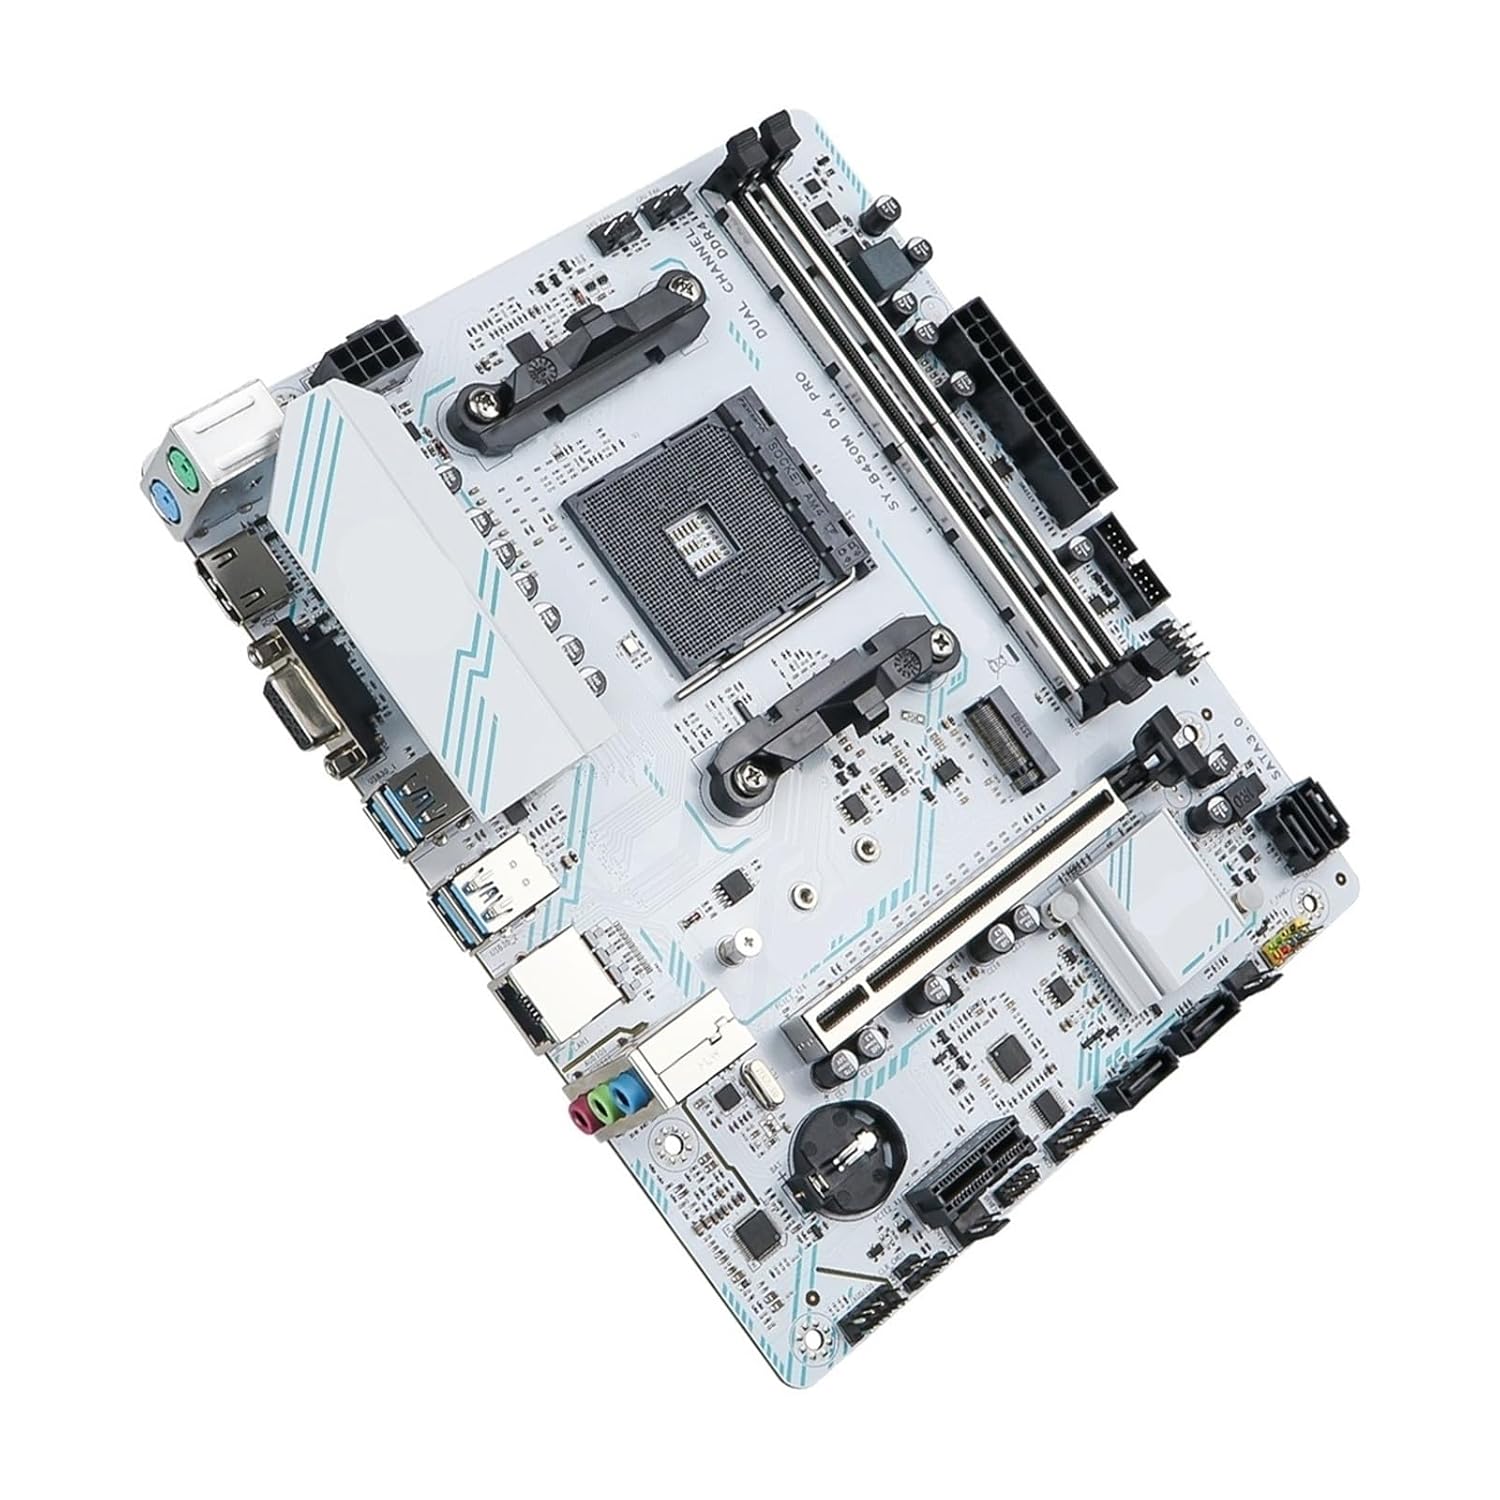
Figuur 1: Top-down view of the SOYO B450M motherboard. This image highlights the central AM4 CPU socket, surrounded by the four DDR4 RAM slots, and various other components including the M.2 slot and PCIe slots. The I/O panel connectors are visible on the left edge.
3. RAM (DDR4) installatie
Open the clips on both ends of the DDR4 memory slots. Align the notch on your DDR4 memory module with the key in the DIMM slot. Press down firmly on both ends of the memory module until the clips snap into place. Refer to your motherboard's manual for recommended dual-channel configurations.
4. M.2 NVMe SSD-installatie
Locate the M.2 slot on the motherboard. Remove the M.2 standoff screw. Insert your M.2 NVMe SSD into the slot at an angle. Gently push down the SSD and secure it with the standoff screw.
5. Stroomaansluitingen
- 24-pins ATX-voeding: Connect the main 24-pin power cable from your power supply unit (PSU) to the corresponding connector on the motherboard.
- 8-pin EPS/CPU Power: Sluit de 8-pins (of 4+4-pins) CPU-voedingskabel van uw voeding aan op de connector bij de CPU-socket.
6. Connectoren op het voorpaneel
Connect the power switch, reset switch, HDD LED, and power LED cables from your PC case to the front panel header pins on the motherboard. Consult the motherboard's silkscreen labels for correct polarity and placement.
7. Randapparatuurverbindingen
Connect your USB devices, HDMI display, Ethernet cable, and audio devices to the appropriate ports on the motherboard's I/O panel.

Figuur 2: Gehoekt view of the SOYO B450M motherboard. This perspective highlights the various I/O ports on the left, including USB, HDMI, and audio jacks, as well as the PCIe slots for graphics cards and other expansion cards.
8. Montage van het moederbord
Install the I/O shield into your PC case. Carefully align the motherboard with the standoffs in your case and secure it with screws. Ensure no components are touching the case directly without proper insulation.
Gebruiksaanwijzing
1. Initial Power On and BIOS/UEFI Access
After connecting all components and power, press the power button on your PC case. During the boot process, repeatedly press the VERDELEN or F2 Druk op de toets (veelgebruikte toetsen, kunnen variëren) om het BIOS/UEFI-instellingenmenu te openen. Hier kunt u de opstartvolgorde, de systeemtijd en andere geavanceerde instellingen configureren.
2. Stuurprogramma-installatie
Once your operating system is installed, install the necessary drivers for the motherboard chipset, audio, LAN, and any other integrated components. These drivers are typically available on the manufacturer's website or included on a driver CD/USB drive.
3. Installatie van het besturingssysteem
Plaats de installatiemedia van uw besturingssysteem (USB-stick of dvd) en volg de aanwijzingen op het scherm om uw gewenste besturingssysteem te installeren.
Onderhoud
1. Schoonmaken
Regularly clean dust from your computer case and motherboard components using compressed air. Ensure the system is powered off and unplugged before cleaning. Avoid using liquids directly on components.
2. BIOS/UEFI-updates
Controleer regelmatig de specificaties van de fabrikant website for BIOS/UEFI updates. Updates can improve stability, add support for new hardware, or fix bugs. Follow the manufacturer's instructions carefully when performing a BIOS update.
3. Stuurprogramma-updates
Keep your motherboard drivers updated to ensure optimal performance and compatibility with new software and hardware. Download drivers only from the official manufacturer's webplaats.
Probleemoplossing
1. Geen stroom / Geen POST (Power-On Self-Test)
- Check all power connections (24-pin ATX, 8-pin EPS) are securely seated.
- Zorg ervoor dat de stroomschakelaar in de 'AAN'-stand staat.
- Verify the front panel power switch connector is correctly installed.
- Probeer op te starten met alleen de essentiële componenten (CPU, één RAM-stick, GPU indien er geen geïntegreerde grafische kaart is).
- Wis het CMOS-geheugen door de CMOS-batterij 5-10 minuten te verwijderen of door de CMOS-wisjumper te gebruiken.
2. Geen weergave-uitvoer
- Ensure your monitor is connected to the correct display output (either integrated graphics or dedicated GPU).
- Check that the graphics card is properly seated in its PCIe slot and has adequate power.
- Test het indien mogelijk met een andere beeldschermkabel of monitor.
3. Operating System Not Booting
- Check the boot order in BIOS/UEFI to ensure your primary storage drive is selected.
- Verify that your storage drive (HDD/SSD) is correctly connected (SATA data and power, or M.2).
- If recently installed, ensure the operating system was installed correctly.
Specificaties
| Functie | Detail |
|---|---|
| Modelnummer | MPEEPPYPP-MOTHERBOARDS |
| Merk | Algemeen |
| CPU-ondersteuning | AMD Ryzen 1st to 5th Gen Processors (AM4 Socket) |
| Geheugenondersteuning | DDR4 (Specific speeds and capacities should be verified with manufacturer) |
| Opslaginterface | M.2 NVMe, SATA 3.0 |
| Vormfactor | ATX |
| Connectiviteit | USB 3.1, HDMI, Ethernet (Specific port count and types should be verified with manufacturer) |
| Pakket afmetingen | 1x1x1cm |
| Artikelgewicht | 386 gram |
Note: For the most accurate and up-to-date specifications, please refer to the official product page or manufacturer's documentation.
Garantie en ondersteuning
Specific warranty terms and conditions for the SOYO B450M ATX Gaming Motherboard are provided by the retailer or manufacturer at the time of purchase. Please retain your proof of purchase for warranty claims. For technical support, driver downloads, and further assistance, please visit the official website of the motherboard manufacturer or contact your retailer.