Invoering
This manual provides detailed instructions for the installation, maintenance, and troubleshooting of the Generic replacement carburetor designed for Badger WB26BCI 26cc 2-cycle 2-in-1 straight shaft grass trimmers. This carburetor is precision-matched for optimal performance with compatible engines.
Het pakket bevat de volgende onderdelen:
- 1 x Carburetor
- 1 x pakking
- 1 x Spark Plug
- 1 x Brandstoffilter
- 1 x Grommet
- 2 x Primer Bulbs
- 1 x Fuel Tank Vent
- 1 x Fuel Line Kit

Image: Complete carburetor replacement kit for Badger WB26BCI.
Key features of this replacement carburetor include aerospace-grade magnesium-aluminum alloy construction for durability and reduced weight, patented dual-vortex atomization technology for improved fuel efficiency, a smart temperature compensation system for stable performance, and a 3-minute quick-change design with leak-proof sealing components.
Veiligheidsinformatie
Always prioritize safety when working with power tools and fuel systems. Failure to follow these safety guidelines may result in injury or damage.
- Persoonlijke beschermingsmiddelen (PBM): Always wear safety glasses, gloves, and appropriate clothing to protect against fuel splashes and sharp edges.
- Motorconditie: Ensure the grass trimmer engine is completely off and cool before attempting any installation or maintenance.
- Prevent Accidental Starting: Disconnect the spark plug wire from the spark plug to prevent the engine from accidentally starting during work.
- Ventilatie: Werk in een goed geventileerde ruimte om inademing van brandstofdampen te voorkomen.
- Brandgevaar: Keep the work area free from open flames, sparks, or any ignition sources. Fuel is highly flammable.
- Brandstofbehandeling: Handle fuel with extreme care. Store fuel in approved, properly labeled containers away from heat and direct sunlight.
- Beschikbaarheid: Gooi oude brandstof, filters en andere onderdelen weg volgens de plaatselijke milieuvoorschriften.
Instellen en installeren
This section outlines the steps for replacing the carburetor on your Badger WB26BCI 26cc 2-cycle grass trimmer.
Benodigde gereedschappen:
- Schroevendraaierset (kruiskop en platkop)
- Steeksleutelset of doppenset
- Tang
- Fuel-resistant clamps (optional, for fuel lines)
Installatiestappen:
- Maak de trimmer klaar: Ensure the fuel tank is empty or nearly empty. Place the trimmer on a stable, flat surface. Disconnect the spark plug wire to prevent accidental starting.
- Verwijder de luchtfiltereenheid: Locate and remove the air filter cover and the air filter element. Disconnect any hoses or linkages attached to the air filter housing.
- Brandstofleidingen loskoppelen: Carefully disconnect the fuel lines from the old carburetor. Be prepared for minor fuel spills. Use fuel-resistant clamps on the fuel lines coming from the tank if necessary to prevent continuous fuel leakage.
- Oude carburateur verwijderen: Unscrew the mounting bolts that secure the carburetor to the engine's intake manifold. Carefully remove the old carburetor and its gasket. Inspect the intake manifold for any debris or damage.
- Install New Gasket and Carburetor: Place the new gasket (included in the kit) onto the intake manifold, ensuring it is properly aligned. Position the new carburetor, making sure all linkages and fuel lines align correctly with their respective ports. Secure the carburetor with the mounting bolts, tightening them evenly to ensure a proper seal.
- Connect Fuel Lines and Primer Bulb: Connect the new fuel lines, fuel filter, and primer bulbs as per the original configuration of your trimmer. Ensure all connections are secure and leak-free. If replacing, install the new fuel tank vent and grommet.
- Install Spark Plug: Replace the old spark plug with the new one provided in the kit. Ensure it is threaded correctly and tightened to the manufacturer's specifications (typically hand-tight plus a quarter turn with a wrench).
- Monteer het luchtfilter weer in elkaar: Reinstall the air filter element and the air filter cover.
- Initial Fueling and Priming: Fill the fuel tank with the correct fuel mixture for your 2-cycle engine. Press the primer bulb several times until fuel is visible in the bulb and no air bubbles are present.

Afbeelding: Zijkant view of the carburetor, highlighting mounting points.
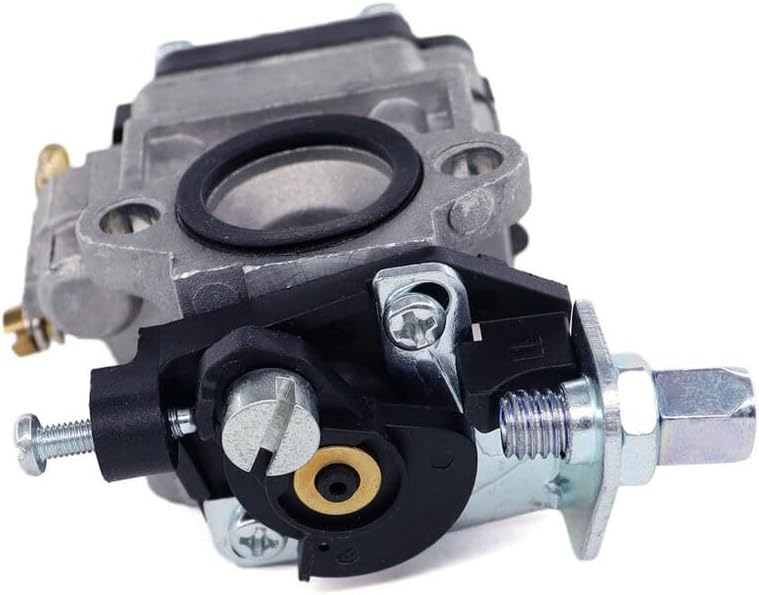
Image: Carburetor showing adjustment screws and throttle linkage.

Image: Carburetor with primer bulb visible.
Operating (Initial Start-up)
After successful installation, follow these steps for the initial start-up:
- Sluit de bougiekabel opnieuw aan: Firmly reattach the spark plug wire to the spark plug.
- Follow Trimmer Manufacturer Instructions: Refer to your grass trimmer's original instruction manual for specific starting procedures. This typically involves setting the choke to the 'START' or 'FULL CHOKE' position.
- Start motor: Pull the starter cord firmly until the engine attempts to start or fires once.
- Choke afstellen: Once the engine fires, move the choke lever to the 'HALF CHOKE' or 'RUN' position and pull the starter cord again until the engine starts and runs smoothly.
- Opwarmen: Allow the engine to run for a few minutes to warm up and ensure proper carburetor function. During this time, carefully check for any fuel leaks around the carburetor and fuel lines.
Onderhoud
Regular maintenance ensures the longevity and optimal performance of your carburetor and grass trimmer.
- Vervanging brandstoffilter: Periodically inspect the fuel filter (a new one is included in the kit). Replace it if it appears dirty or clogged to prevent contaminants from reaching the carburetor.
- Inspectie van de bougie: Inspect the spark plug every 25 hours of operation or annually. Clean or replace it if the electrode is fouled, worn, or damaged. A new spark plug is provided for initial replacement.
- Reinigen/vervangen van het luchtfilter: Ensure the air filter is clean and free of debris to allow proper airflow to the carburetor. A dirty air filter can lead to poor engine performance. Clean or replace as recommended by your trimmer's manufacturer.
- Fuel Line Inspection: Regularly check all fuel lines for cracks, hardening, or leaks. Replace any damaged fuel lines promptly to prevent fuel leaks and ensure proper fuel delivery.
- Carburateurreiniging: If the engine experiences persistent performance issues not resolved by other troubleshooting steps, the carburetor may require cleaning. This typically involves disassembling the carburetor, cleaning internal components with a specialized carburetor cleaner, and reassembling. It is recommended to consult a professional if you are unsure about this procedure.
Probleemoplossing
If your grass trimmer experiences issues after carburetor replacement, refer to the following troubleshooting guide:
Motor start niet:
- Brandstofcontrole: Ensure there is fresh, correctly mixed fuel in the tank. Stale fuel can cause starting problems.
- Bougie: Verify the spark plug wire is securely connected. Remove the spark plug and check for spark (if you have a spark tester) or inspect for fouling. Replace if necessary.
- Brandstofleidingen: Check that all fuel lines are correctly connected, not kinked, and free of clogs. Ensure the fuel filter is not blocked.
- Primerlamp: Confirm the primer bulb is functioning correctly and drawing fuel into the carburetor. Press it until it feels firm and fuel is visible.
- Wurgpositie: Ensure the choke lever is in the correct 'START' or 'FULL CHOKE' position for cold starts.
Motor loopt slecht/slaat af:
- Brandstoffilter: A partially clogged fuel filter can restrict fuel flow. Replace if dirty.
- Luchtfilter: A dirty air filter can restrict airflow, causing the engine to run rich. Clean or replace the air filter.
- Luchtlekken: Check that the carburetor mounting bolts are tight and the gasket is properly seated. Air leaks around the carburetor can cause erratic engine behavior.
- Carburateur afstellen: If the engine runs rough, the carburetor's idle or mixture screws may require fine-tuning. Refer to your trimmer's original manual for specific adjustment procedures.
Brandstoflekken:
- Verbindingen: Inspect all fuel line connections to the carburetor, fuel tank, and primer bulb. Ensure they are tight and secure.
- Primerlamp: Check the primer bulb for any cracks or damage. Replace if necessary.
- Pakking: Ensure the carburetor gasket is properly seated and not damaged. A damaged or improperly installed gasket can cause leaks.
Specificaties
| Producttype | Replacement Carburetor Kit |
| Verenigbaarheid | Badger WB26BCI 26cc 2-cycle 2-in-1 Straight Shaft Grass Trimmer |
| Materiaal | Aerospace-grade magnesium-aluminum alloy body |
| Belangrijkste kenmerken | Patented dual-vortex atomization technology, Smart temperature compensation system, 3-minute quick-change design with leak-proof sealing components |
| Meegeleverde componenten | Carburetor, gasket, spark plug, fuel filter, grommet, 2 primer bulbs, fuel tank vent, fuel line kit |
Garantie en ondersteuning
For specific warranty information or technical support regarding this replacement carburetor, please refer to the original product listing where you made your purchase. It is recommended to retain your purchase receipt as proof of purchase for any warranty claims or support inquiries.
If you encounter issues that cannot be resolved using this manual, please contact the seller or a qualified small engine technician for assistance.