Maxi-Cosi Nesta
Maxi-Cosi Nesta 3-In-1 Wooden High Chair User Manual
Model: Nesta | Brand: Maxi-Cosi
1. Inleiding
The Maxi-Cosi Nesta 3-In-1 Wooden High Chair is designed to adapt to your child's growth, transitioning from an infant highchair to a child chair and eventually a sleek adult seat. Crafted from durable Beechwood with minimal plastics and premium recycled fabrics, this chair offers ergonomic support and comfort through various stages of life. This manual provides essential information for the safe assembly, operation, and maintenance of your Nesta high chair.
Belangrijke veiligheidsinformatie
- Always read all instructions before assembly and use of the product.
- Bewaar deze gebruiksaanwijzing voor toekomstig gebruik.
- Laat uw kind nooit zonder toezicht in de kinderstoel achter.
- Gebruik altijd het beveiligingssysteem.
- Zorg ervoor dat de kinderstoel op een vlakke, stabiele ondergrond staat.
- Controleer regelmatig alle onderdelen op slijtage, beschadigingen of ontbrekende onderdelen. Stop het gebruik als een onderdeel beschadigd is.
2. Componentenlijst
Before beginning assembly, ensure all parts are present and undamaged. If any parts are missing or damaged, do not assemble the product and contact customer support.
- Wooden Chair Frame (Main structure)
- Seat Unit (with integrated harness)
- Verstelbare voetensteun
- Removable Snack Tray
- Machine-Washable Padded Seat Pad
- Montagemateriaal (schroeven, inbussleutel)
3. Montage-instructies
Assembly is straightforward and requires minimal tools. An Allen key is typically provided with the hardware.
- Componenten uitpakken: Haal alle onderdelen voorzichtig uit de verpakking en leg ze op een schone, zachte ondergrond om krassen te voorkomen.
- Monteer het frame: Connect the main wooden frame pieces using the provided screws and Allen key. Ensure all connections are secure but do not overtighten.
- Bevestig de stoeleenheid: Slide the seat unit into the designated slots on the chair frame. Ensure it clicks securely into place.
- Installeer de voetensteun: Insert the adjustable footrest into the desired height slots on the frame. It should slide in and be stable.
- Attach the Padded Seat Pad: Secure the padded seat pad to the seat unit, ensuring all straps and buckles are correctly threaded and fastened.
- Attach the Snack Tray: Align the snack tray with the attachment points on the seat unit and push until it locks into place.
- Laatste controle: Before first use, double-check all screws and connections to ensure they are tight and secure. Verify that the seat unit, footrest, and snack tray are properly installed and locked.
4. Operating the Nesta High Chair
4.1. 3-in-1 functionaliteit
The Nesta high chair is designed to grow with your family, offering three distinct modes:
- Infant Highchair Mode: For babies from 6 months (or when they can sit unassisted) up to approximately 3.5 years. Use with the full seat unit, padded seat pad, harness, and snack tray.
- Child Chair Mode: For children from approximately 3.5 years up to 14 years. The snack tray and infant insert can be removed, allowing the child to sit closer to the family table.
- Adult Seat Mode: For individuals from 14 years up to 99 years. The chair can be configured as a comfortable and stylish adult seat by removing the seat unit and adjusting the footrest/seat base.

Figure 4.1: The Nesta high chair in its three configurations: infant highchair, child chair, and adult seat, demonstrating its long-term adaptability.

Figure 4.2: Visual representation of the Nesta high chair's age suitability across its three modes, highlighting its lifetime usability.
4.2. Zitting en voetsteun verstellen
The Nesta high chair features an adjustable footrest and multiple seat positions to ensure ergonomic support as your child grows.
- To adjust the footrest, locate the adjustment mechanism on the side of the chair frame. Press the release buttons (if applicable) and slide the footrest to the desired height. Ensure it locks securely into place.
- The seat unit can also be adjusted or removed by pressing the release buttons located underneath or on the sides of the seat. Slide the seat to the appropriate position or remove it entirely for the adult chair configuration.

Figure 4.3: The adjustable footrest of the Nesta high chair, illustrating how it can be positioned to provide optimal support for different ages.
4.3. Using the Snack Tray
The removable snack tray offers added convenience and is easy to clean.
- To attach the tray, align it with the guides on the seat unit and push firmly until it clicks into place.
- To remove the tray, locate the release buttons or levers underneath the tray and press them while pulling the tray away from the seat.
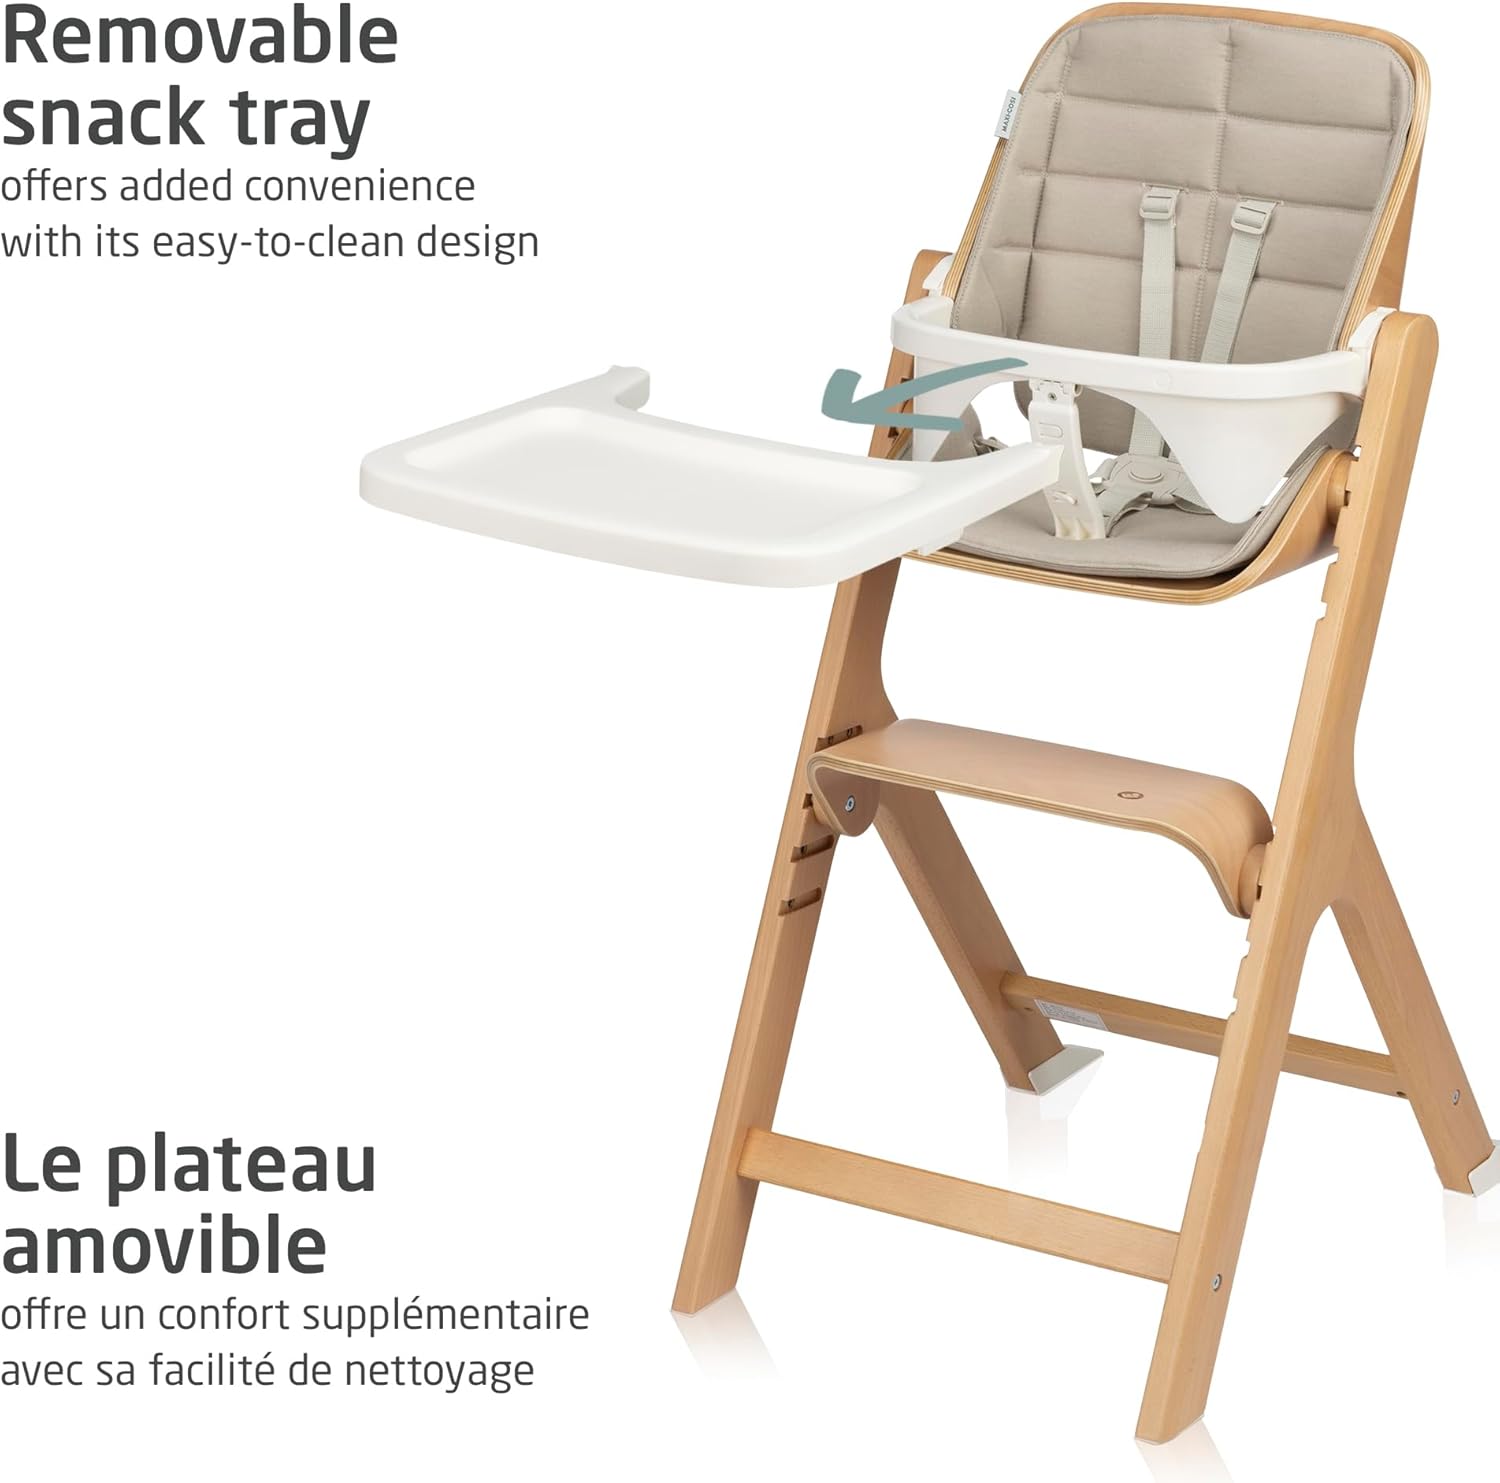
Figure 4.4: The Nesta high chair with its removable snack tray, designed for easy attachment and detachment for meal times and cleaning.
5. Verzorging en onderhoud
Proper care ensures the longevity and hygiene of your Nesta high chair.
- Het frame schoonmaken: Wipe the wooden frame and plastic components with a damp cloth and mild soap. Dry thoroughly. Avoid abrasive cleaners or harsh chemicals.
- Cleaning the Seat Pad: The padded seat pad is machine-washable. Refer to the care label on the pad for specific washing instructions (typically cold water, gentle cycle). Air dry only.
- Cleaning the Snack Tray: The snack tray can be easily removed and washed by hand with warm, soapy water or placed in the dishwasher (top rack recommended).
- Waterafstotende stoffen: The fabrics are water-repellent, making spills easy to wipe away.

Figure 5.1: The water-repellent fabric of the Nesta high chair, designed to resist spills and simplify cleaning.

Figure 5.2: The machine-washable seat pad of the Nesta high chair, allowing for thorough and convenient cleaning.
6. Probleemoplossing
If you encounter any issues with your Nesta high chair, please refer to the following common solutions:
| Probleem | Mogelijke oorzaak / oplossing |
|---|---|
| Seat unit or tray not locking securely. | Ensure the component is correctly aligned with the slots/guides. Apply firm, even pressure until you hear a click. Check for any obstructions. |
| De stoel voelt onstabiel of wiebelig aan. | Verify that all assembly screws are tightened. Ensure the chair is on a flat, level surface. Check that the footrest and seat unit are fully engaged in their respective positions. |
| Harness straps are difficult to adjust or buckle. | Ensure straps are not twisted. Refer to the assembly instructions for correct threading. Clean any food debris from the buckle mechanism. |
| Difficulty removing snack tray. | Ensure both release buttons/levers are pressed simultaneously and firmly. Pull the tray straight out. |
7. Specificaties
- Productafmetingen (D x B x H): 65.5 x 99 x 46 cm (25.8 x 39 x 18.1 inch)
- Productgewicht: 12.64 kg (27.87 lbs)
- Materiaal: Beech Wood, Recycled Fabrics, Minimal Plastics
- Kleur: Classic Oat
- Fabrikant: Dorel Juvenile Canada
- Land van herkomst: China
- UPC-nummer: 884392004279

Figure 7.1: Key dimensions of the Nesta high chair for reference.
8. Garantie en ondersteuning
Specific warranty information was not provided in the product data. For warranty details, product support, or to purchase replacement parts, please contact Maxi-Cosi customer service or visit the official Maxi-Cosi webplaats.
You can visit the Maxi-Cosi Store on Amazon: Maxi-Cosi winkel
Ask a question about this manual
Ask about setup, troubleshooting, compatibility, parts, safety, or missing instructions. Manuals+ will review the question and use this page’s manual context to help answer it.