1. Inleiding
This manual provides detailed instructions for the Waveshare ESP32-P4-NANO High-Performance Development Board. It is designed to assist users in understanding the board's features, setting it up, and utilizing its capabilities effectively. The ESP32-P4-NANO is based on the ESP32-P4 chip, featuring RISC-V dual-core and single-core processors, and is equipped with various human-machine interfaces.
This specific kit, ESP32-P4-NANO-KIT-A, includes the ESP32-P4-NANO board, an RPi Camera (B), an 8Ω 2W speaker, and an FFC 15PIN cable, providing a comprehensive platform for development projects.

Image 1.1: The Waveshare ESP32-P4-NANO Development Board bundled with an RPi Camera and speaker.
2. Inhoud van het pakket
Controleer of alle onderstaande artikelen in uw pakket aanwezig zijn. Als er onderdelen ontbreken of beschadigd zijn, neem dan contact op met de klantenservice.
- 1x ESP32-P4-NANO Development Board
- 1x RPi Camera (B)
- 1x 8Ω 2W Speaker
- 1x FFC 15PIN Cable

Image 2.1: Visual representation of the ESP32-P4-NANO-KIT-A package contents, including the development board, RPi Camera (B), 8Ω 2W speaker, and FFC 15PIN cable.
3. Belangrijkste kenmerken
The ESP32-P4-NANO Development Board offers a robust set of features for advanced embedded applications:
- Krachtige microcontroller: Beschikt over RISC-V 32-bits dual-core en single-core processoren.
- Geheugen: Includes 128 KB HP ROM, 16 KB LP ROM, 768 KB HP L2MEM, 32 KB LP SRAM, 8 KB TCM.
- Beeld- en spraakverwerking: Provides interfaces for JPEG Codec, Pixel Processing Accelerator, Image Signal Processor, and H264 encoder.
- Integrated PSRAM and Flash: 32MB PSRAM in the chip's package, with onboard 16MB Nor Flash.
- Extensive Peripherals: Supports MIPI-CSI, MIPI-DSI, USB 2.0 OTG, Ethernet, SDIO 3.0 TF card slot, microphone, speaker header, and RTC battery header.
- GPIO's: 2*2*13 GPIO headers with 28 x programmable GPIOs.
- Beveiligingsfuncties: Incorporates Secure Boot, Flash Encryption, cryptographic accelerators, and TRNG. Hardware access protection mechanisms enable Access Permission Management and Privilege Separation.
- Draadloze connectie: Onboard ESP32-C6-MINI module extends 2.4GHz Wi-Fi 6 and Bluetooth 5/BLE.

Afbeelding 3.1: voorbijview of the ESP32-P4-NANO's core features, including RISC-V MCU, memory, and connectivity options.
4. Hardware voorbijview
4.1 Board Components
The following diagram identifies the main components and interfaces on the ESP32-P4-NANO development board.

Afbeelding 4.1: Gedetailleerd view of the ESP32-P4-NANO board with numbered components and their descriptions.
- ESP32-P4NRW32
- ESP32-C6-MINI-1: SDIO interface protocol, extending Wi-Fi 6 and Bluetooth 5 for ESP32-P4-NANO
- Display interface: MIPI 2-lane
- Camera interface: MIPI 2-lane
- USB Type-C connector: for power supply, program burning and debugging
- USER-LED: power supply indicator
- BOOT button: Press it when powering on or resetting to enter download mode
- RESET-knop
- PoE module / external power supply header: for connecting external 5V power supply or PoE module power supply
- RTC battery header: for connecting rechargeable RTC battery (supports rechargeable RTC batteries only)
- Onboard microphone
- PoE module header
- Type-A Port: USB OTG 2.0 High Speed port
- RJ45 100M Ethernet port
- Speaker header: MX1.25 2P connector, supports 8Ω 2W speaker
- GPIO-header
- TF card slot: SDIO 3.0 interface protocol
4.2 Pindefinitie
The pinout diagram illustrates the functionality of each GPIO pin on the development board, crucial for connecting external components and sensors.

Image 4.2: Pin definition diagram showing power, GPIO, USB, UART, Touch Channel, ADC Channel, RTC Clock source, and ESP32-C6 GPIO assignments.
4.3 Overzichtsafmetingen
Refer to the following diagrams for the physical dimensions of the ESP32-P4-NANO board, measured in millimeters.

Afbeelding 4.3: Boven en onder view with precise measurements of the ESP32-P4-NANO development board.
5. Installatie-instructies
This section guides you through the initial setup of your ESP32-P4-NANO Development Board and its bundled accessories.
5.1 Connecting the RPi Camera (B)
- Locate the MIPI-CSI camera interface on the ESP32-P4-NANO board (refer to Image 4.1, component 4).
- Carefully insert one end of the FFC 15PIN cable into the camera module's connector, ensuring the contacts face the correct direction.
- Insert the other end of the FFC 15PIN cable into the MIPI-CSI connector on the development board. Ensure a secure connection.

Image 5.1: The RPi Camera (B) module, compatible with Raspberry Pi series boards, featuring a 5MP OV5647 sensor.
5.2 De luidspreker aansluiten
- Identify the speaker header (MX1.25 2P connector) on the development board (refer to Image 4.1, component 15).
- Connect the 8Ω 2W speaker to this header. Ensure the polarity is correct if indicated.
5.3 De printplaat van stroom voorzien
The board can be powered via the USB Type-C connector. Connect a compatible USB cable from your computer or a 5V power adapter to the USB Type-C port on the board (refer to Image 4.1, component 5).
5.4 Instellen van de ontwikkelomgeving
For programming and development, it is recommended to use the Espressif IoT Development Framework (ESP-IDF) or the Arduino IDE with ESP32 board support. Refer to the official Waveshare Wiki for detailed instructions on setting up your development environment and obtaining exampde code.
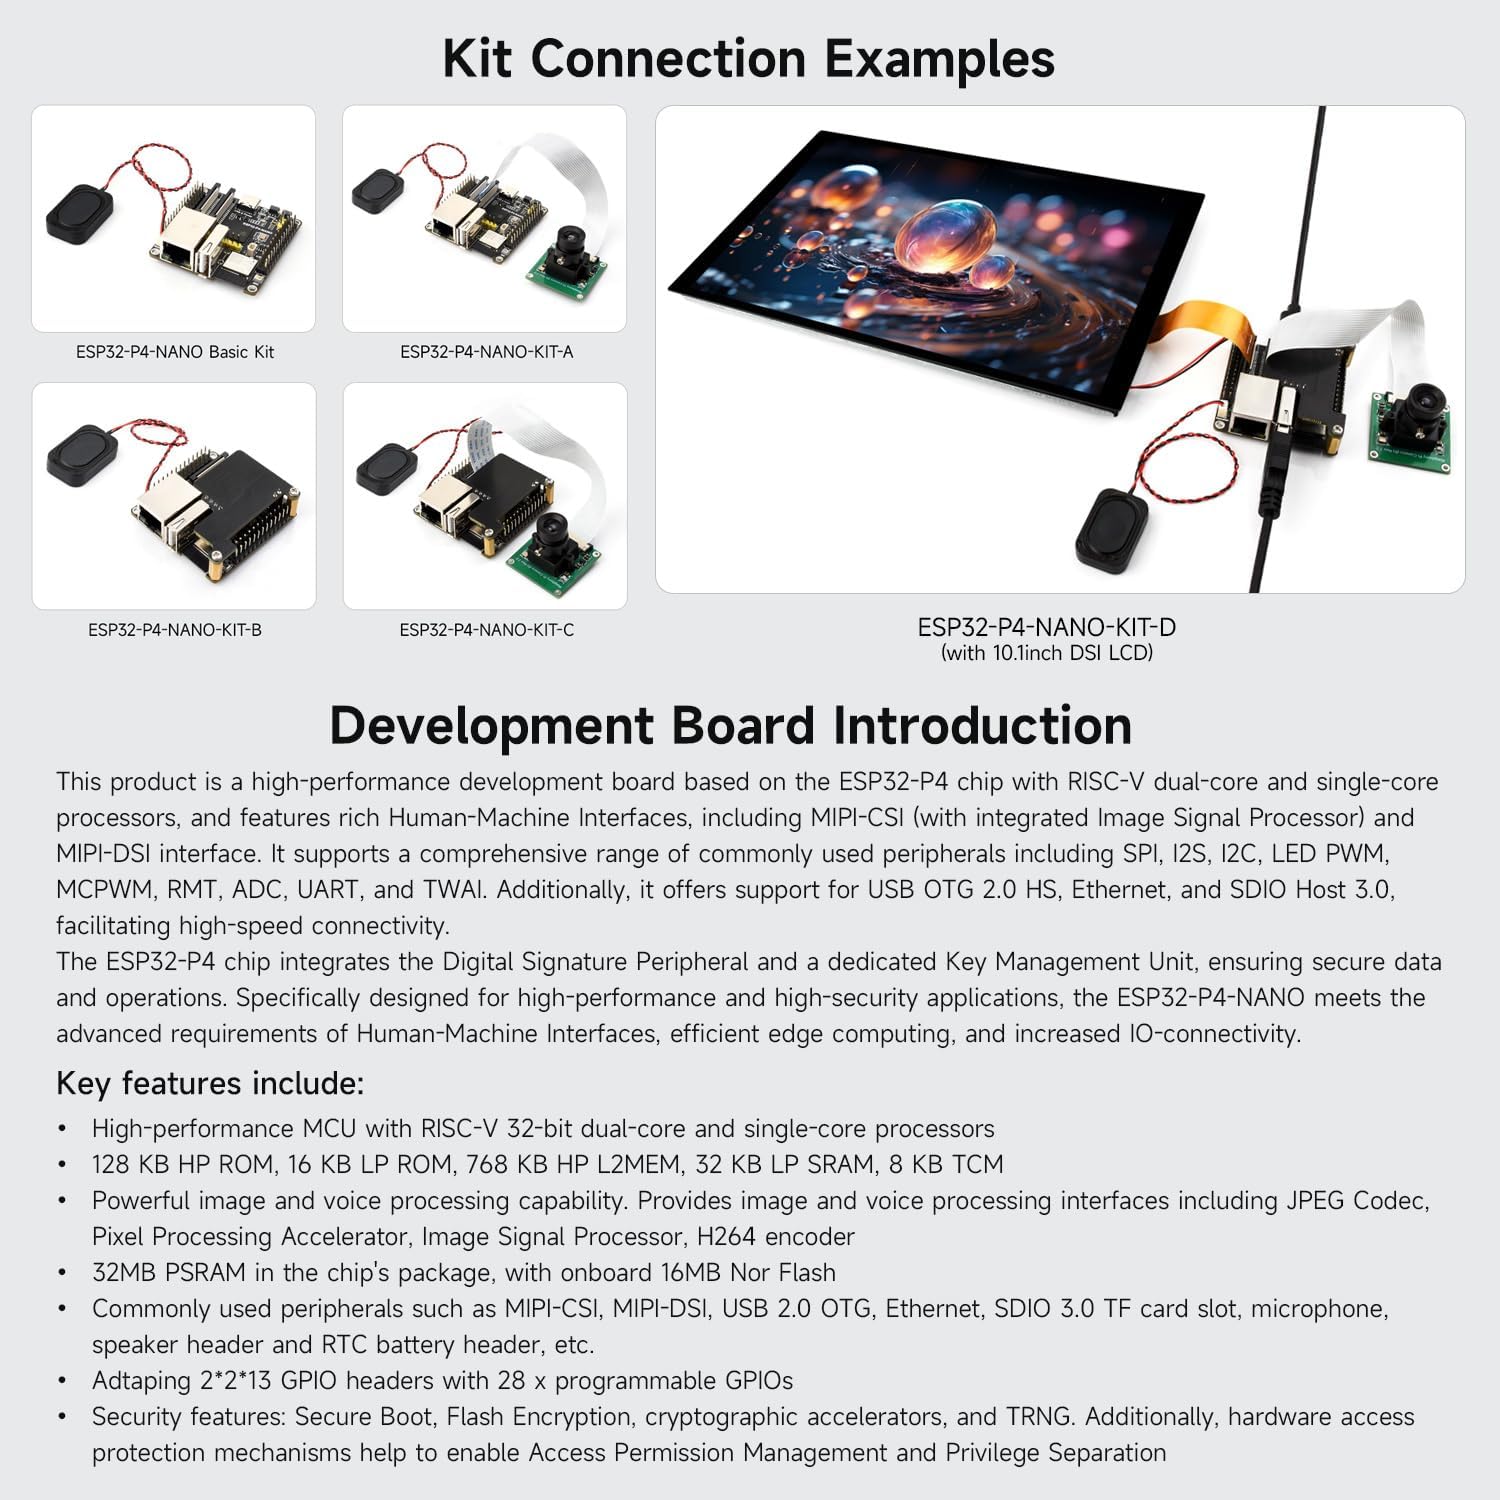
Afbeelding 5.2: Examples of how various kits, including KIT-A, can be connected, demonstrating the board with camera and speaker.
6. Gebruiksaanwijzing
Once the board is set up and programmed, follow these general guidelines for operation.
6.1 Basisbediening
- Inschakelen: Connect the USB Type-C cable to a power source. The USER-LED (component 6) should illuminate, indicating power.
- Program Upload: Use your chosen IDE (ESP-IDF or Arduino) to compile and upload your code to the board via the USB Type-C port.
- Resetting the Board: Press the RESET button (component 8) to restart the loaded program.
- Download Mode: To enter download mode for flashing new firmware, press and hold the BOOT button (component 7) while pressing and releasing the RESET button, then release the BOOT button.
6.2 Utilizing Peripherals
- Camera: Access the RPi Camera (B) through the MIPI-CSI interface using appropriate libraries and code examples from the Waveshare Wiki or Espressif documentation.
- Spreker: Generate audio output via the speaker header. Ensure your code includes audio playback functionalities.
- Netwerken: Utilize the 100Mbps Ethernet port (component 14) for wired network connectivity or the integrated Wi-Fi 6 and Bluetooth 5/BLE for wireless communication.
- Opslag: Insert a TF card into the SDIO 3.0 TF card slot (component 17) for external storage.
- GPIO's: Connect various sensors, actuators, and other modules to the programmable GPIO headers (component 16) as required by your project.
7. Onderhoud
Goed onderhoud garandeert de lange levensduur en betrouwbare werking van uw ontwikkelingsbord.
- Behandeling: Always handle the board by its edges to avoid touching sensitive components. Use anti-static precautions when working with the board.
- Schoonmaak: Houd het bord schoon en vrij van stof en vuil. Gebruik een zachte, droge borstel of perslucht om het schoon te maken. Vermijd vloeibare reinigingsmiddelen.
- Opslag: Store the board in an anti-static bag in a dry, cool environment when not in use.
- Voeding: Use only recommended 5V power supplies. Over-voltage kan de printplaat beschadigen.
- Firmware-updates: Regularly check the Waveshare Wiki for firmware updates and security patches to ensure optimal performance and security.
8. Probleemoplossing
In dit gedeelte worden veelvoorkomende problemen besproken waarmee u te maken kunt krijgen.
- Board gaat niet aan:
- Ensure the USB Type-C cable is securely connected to both the board and a functional power source.
- Controleer of de stroombron 5V levert.
- Check if the USER-LED (component 6) illuminates.
- Programma-upload mislukt:
- Controleer of het juiste bord en de juiste poort zijn geselecteerd in uw IDE.
- Try entering download mode manually by holding the BOOT button during reset.
- Ensure all necessary drivers are installed for the USB-to-serial converter.
- Camera Interface Issues:
- Some users have reported challenges with the camera interface functionality. Waveshare acknowledges this and suggests monitoring Espressif's official resources for potential software fixes or updated examples.
- Ensure the FFC cable is correctly seated and not damaged.
- Verify that your code correctly initializes and accesses the MIPI-CSI interface.
- Geen wifi-/bluetoothverbinding:
- Check your code for correct Wi-Fi/Bluetooth initialization and credentials.
- Ensure the ESP32-C6-MINI module is properly functioning.
For further assistance, consult the official Waveshare Wiki or contact their technical support.
9. Specificaties
| Functie | Detail |
|---|---|
| Merk | Waveshare |
| Modelnaam | ESP32-P4-NANO-KIT-A |
| Verwerker | ESP32-P4 (RISC-V 32-bit dual-core and single-core) |
| RAM | 32 MB PSRAM |
| Flash-geheugen | 16 MB noch Flash |
| Draadloze connectiviteit | Wi-Fi 6 (802.11ax), Bluetooth 5/BLE (via ESP32-C6-MINI) |
| Ethernet | 100Mbps RJ45 |
| USB | USB 2.0 OTG (Type-A Port), USB Type-C (Power/Debug) |
| Camera-interface | MIPI-CSI 2-lane |
| Scherminterface | MIPI-DSI 2-lane |
| Opslag | SDIO 3.0 TF card slot |
| GPIO's | 28 programmable GPIOs (2*2*13 headers) |
| Geluid | Onboard microphone, Speaker header (8Ω 2W speaker included in kit) |
| Afmetingen | 50 x 50 mm (approximate board size) |
| Gewicht | ~9.5 ounces (total item weight) |
10. Ondersteuning en middelen
For the most up-to-date information, detailed tutorials, and example code, please refer to the official Waveshare Wiki. This resource is regularly updated and provides comprehensive documentation for all Waveshare products.
- Official Waveshare Wiki: https://www.waveshare.com/wiki (Please note: specific product page link may vary, search for "ESP32-P4-NANO")
- Technische ondersteuning: If you encounter issues not covered in this manual or the Wiki, please contact Waveshare customer support through their official webplaats.
Information regarding warranty is typically provided with the product packaging or available on the manufacturer's official webplaats.