
1. Product voorbijview
This document provides instructions for the WORKPRO 125mm 8-Hole Rubber Pad, designed as a replacement or accessory for the WORKPRO Random Orbital Sander Model W124785. This pad is essential for attaching sanding discs to your random orbital sander, facilitating efficient material removal and finishing tasks.
Belangrijkste kenmerken:
- Doel: Designed for random orbital sanders.
- Verenigbaarheid: Specifically for WORKPRO Random Sander W124785.
- Diameter: 125mm (approximately 5 inches).
- Hole Configuration: 8 dust extraction holes for efficient dust collection.
- Bijlage type: Hook-and-loop (Magic type) for quick and secure disc changes.

Image 1.1: The WORKPRO 125mm 8-Hole Random Orbital Sander Rubber Pad.
2. Specificaties
Detailed specifications for the WORKPRO Random Orbital Sander Rubber Pad are provided below:
| Specificatie | Detail |
|---|---|
| Merk | WERKPRO |
| Modelcompatibiliteit | WORKPRO Random Sander W124785 |
| Schijfdiameter | 125mm |
| Gatconfiguratie | 8-Hole (4 screw holes, 8 dust holes) |
| Bijlagetype | Hook-and-loop (Magic type) |
| Materiaal | Rubber, Hard Plastic |
| Kleur | Zwart |
| Artikelgewicht | 70 gram |
| Pakket afmetingen | 14.2x13.3x2.7cm |
| UPC | 820909610946 |

Image 2.1: Diagram showing the dimensions of the rubber pad, including 125mm diameter and 11mm thickness.
3. Installatie en installatie
Proper installation of the rubber pad is crucial for safe and effective operation of your random orbital sander. Ensure the sander is unplugged before beginning installation.
- Maak de schuurmachine klaar: Ensure your WORKPRO Random Orbital Sander (Model W124785) is turned off and unplugged from the power source.
- Verwijder de oude pad (indien van toepassing): If replacing an existing pad, locate the screws securing the old pad to the sander base. Use an appropriate screwdriver to remove these screws and detach the old pad.
- Align the New Pad: Position the new WORKPRO 125mm 8-Hole Rubber Pad onto the sander base. Align the four screw holes on the pad with the corresponding screw holes on the sander base. Ensure the 8 dust extraction holes on the pad also align with the sander's dust collection system.
- Zet het kussen vast: Insert the screws (typically from your sander, not included with the pad) through the aligned holes in the rubber pad and into the sander base. Tighten the screws securely, but do not overtighten, as this can damage the pad or the sander.
- Installatie verifiëren: Gently tug on the pad to ensure it is firmly attached and does not wobble. Check that the hook-and-loop surface is clean and ready for a sanding disc.

Image 3.1: The rubber pad correctly installed on a WORKPRO random orbital sander.

Image 3.2: Visual guide showing the pad and its installation process on a sander.
4. Gebruiksaanwijzing
Once the rubber pad is securely installed, you can attach sanding discs and begin sanding operations.
- Select Sanding Disc: Choose a 125mm sanding disc with 8 dust extraction holes that matches the grit required for your task.
- Schuurschijf bevestigen: Align the holes on the sanding disc with the holes on the rubber pad. Press the sanding disc firmly onto the hook-and-loop surface of the pad. Ensure it is centered and securely attached.
- Sluit stroom aan: Plug in your random orbital sander.
- Begin met schuren: Turn on the sander. Allow the pad to reach full speed before making contact with the workpiece. Apply light, even pressure and move the sander in overlapping passes across the surface. Avoid excessive pressure, which can reduce sanding effectiveness and damage the pad or workpiece.
- Stofafzuiging: The 8-hole design facilitates dust extraction when connected to a compatible dust collection system, helping to keep your work area cleaner and improving sanding performance.
- Remove Sanding Disc: When finished, turn off and unplug the sander. Peel the sanding disc off the hook-and-loop pad.

Image 4.1: Detail of the hook-and-loop surface for attaching sanding discs.
5. Onderhoud
Regular maintenance will extend the life of your rubber pad and ensure optimal performance.
- Schoonmaak: After each use, remove any remaining sanding dust or debris from the hook-and-loop surface. A stiff brush or compressed air can be used to clear the dust extraction holes and the hook-and-loop fasteners.
- Inspectie: Periodically inspect the pad for signs of wear, tear, or damage, such as worn hook-and-loop fasteners, cracks in the rubber, or deformation. A damaged pad can lead to uneven sanding and poor results.
- Opslag: Store the pad in a clean, dry environment away from direct sunlight and extreme temperatures. Avoid storing it with sanding discs attached for extended periods, as this can compress the hook-and-loop fasteners.
- Vervanging: Replace the pad when the hook-and-loop fasteners no longer securely hold sanding discs, or if the pad shows significant wear or damage.
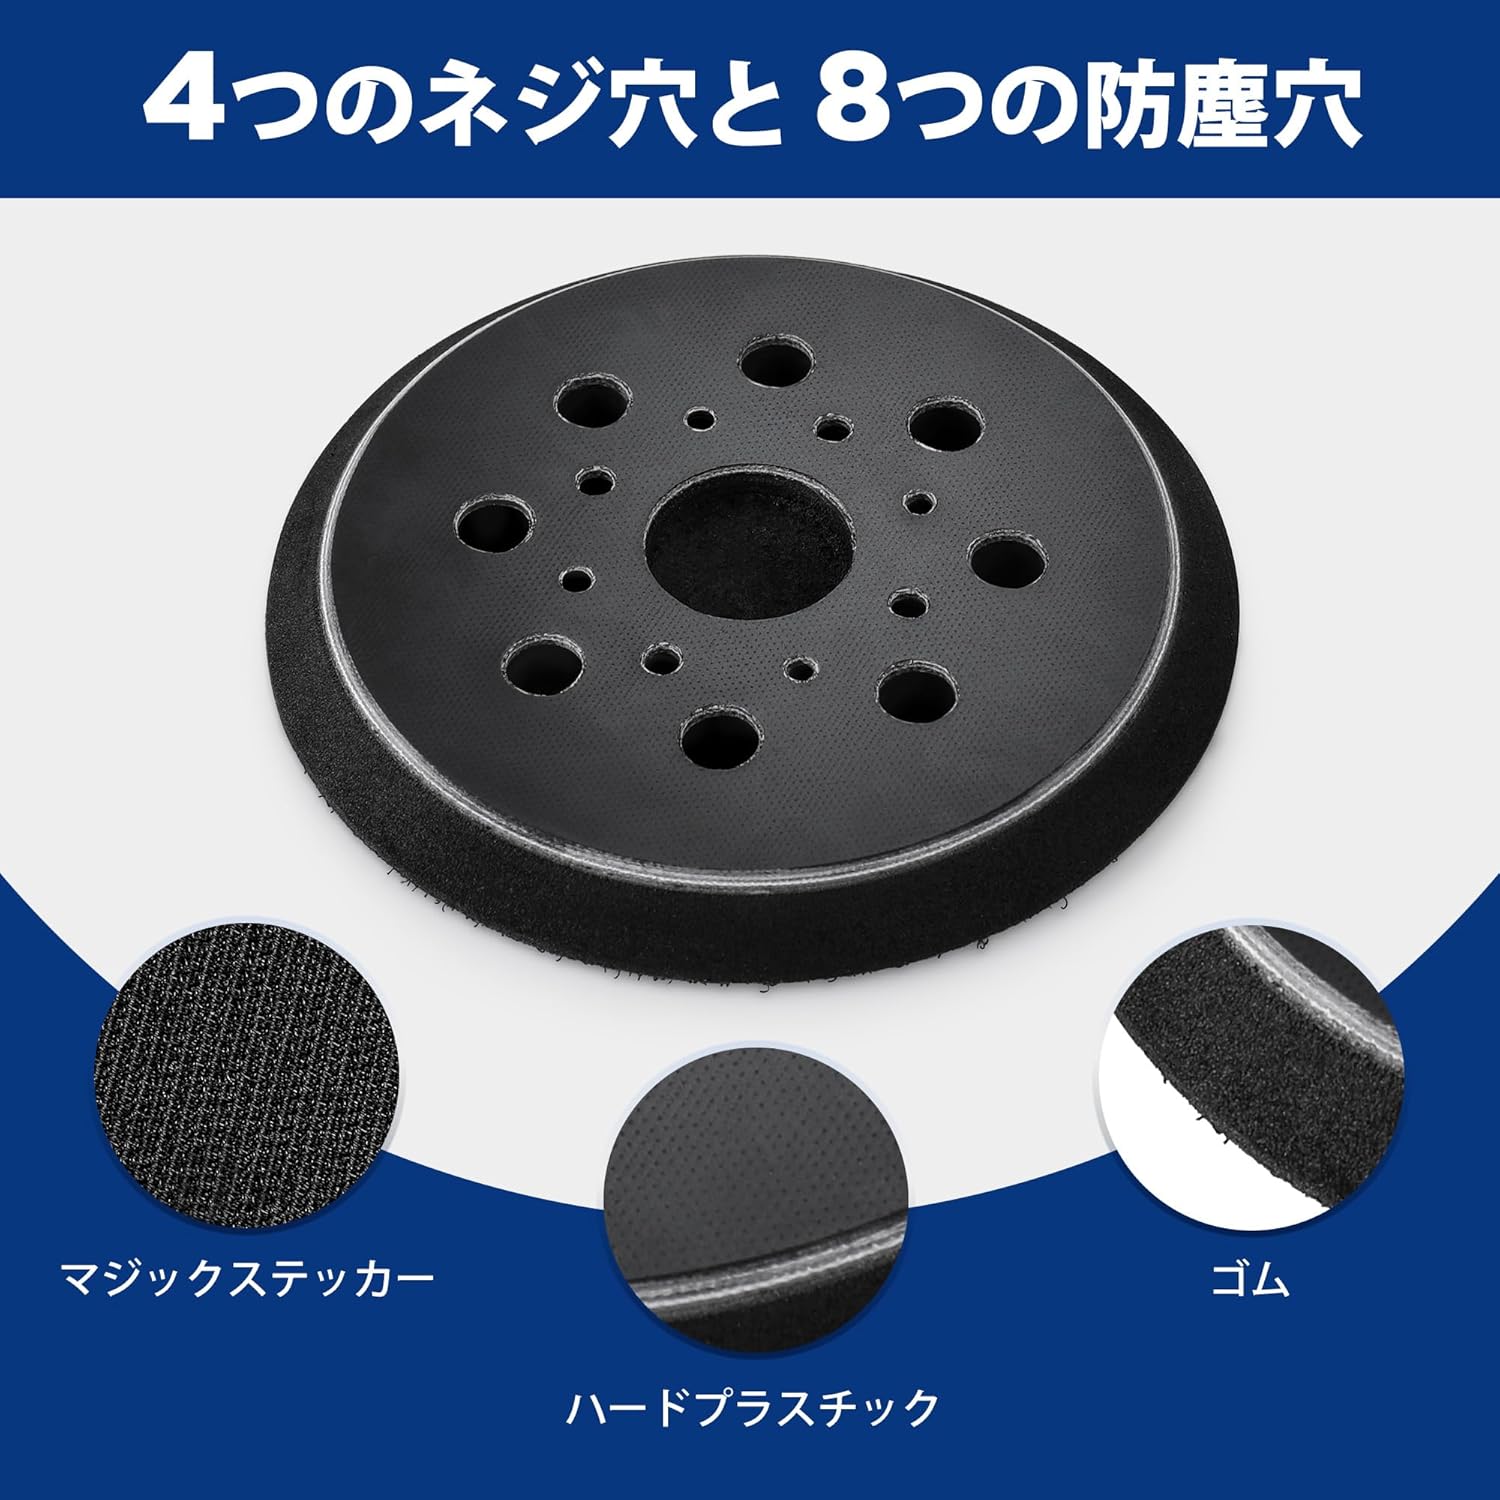
Afbeelding 5.1: Ontploft view illustrating the different components of the pad: hook-and-loop, rubber, and hard plastic base.
6. Probleemoplossing
If you encounter issues with your WORKPRO rubber pad, consider the following common troubleshooting steps:
- Sanding Disc Not Sticking:
- Check if the hook-and-loop surface of the pad is clean and free of debris. Clean as described in the Maintenance section.
- Inspect the hook-and-loop fasteners for wear. If they are flattened or damaged, the pad may need replacement.
- Ensure the sanding disc itself has a compatible hook-and-loop backing.
- Ongelijkmatige schuurresultaten:
- Verify that the pad is securely attached to the sander and not wobbling. Re-tighten screws if necessary.
- Check the pad for any deformation or damage that might cause uneven contact with the workpiece. Replace if damaged.
- Ensure the sanding disc is properly centered and flat on the pad.
- Slechte stofafzuiging:
- Ensure all 8 dust extraction holes on the pad and sanding disc are aligned with the sander's dust collection system.
- Clear any blockages in the dust extraction holes on the pad and the sander.
- Verify that your sander's dust collection system (bag or vacuum) is functioning correctly and not full.
7. Garantie en ondersteuning
For warranty information, product support, or to purchase replacement parts, please refer to the documentation provided with your WORKPRO Random Orbital Sander W124785 or visit the official WORKPRO website. Specific warranty details for this replacement pad may be covered under the original sander's warranty or as a separate accessory warranty.
Contactgegevens:
- For general inquiries or support, please visit the WORKPRO Store op Amazon.
- Refer to your original product packaging for direct customer service contact details.