1. Inleiding
This manual provides essential information for the safe and effective operation of your Mastech MS8301A Digital Multimeter. Please read this manual thoroughly before using the device to ensure proper functionality and to prevent potential hazards. Keep this manual for future reference.
2. Veiligheidsinformatie
Always adhere to the following safety precautions to avoid electric shock or personal injury, and to prevent damage to the multimeter or the equipment under test.
- Lees de instructies: Understand all instructions and safety information before use.
- Nominaal voltage: Breng niet meer aan dan de aangegeven hoeveelheidtage, as marked on the multimeter, between the terminals or between any terminal and ground.
- Testkabels: Controleer de testkabels op beschadigde isolatie of blootliggend metaal. Vervang ze indien beschadigd.
- Circuit Disconnection: Schakel de stroomtoevoer naar het circuit uit en ontlaad alle hoogspanningsbatterijen.tage condensatoren voordat u weerstand, continuïteit, diodes of capaciteit test.
- Functie Selectie: Zorg ervoor dat de functieschakelaar in de juiste stand staat voor de meting die wordt uitgevoerd.
- Live circuits: Do not measure current on a live circuit with the test leads connected in parallel.
- Bedrijfsomgeving: Do not operate the multimeter in explosive gas, vapor, or damp omgevingen.
- Persoonlijke beschermingsmiddelen: Always wear appropriate personal protective equipment, such as safety glasses, when working with electrical circuits.
- Veiligheidsclassificatie: This device is rated for CAT III 600V. Do not exceed this rating.
3. Product voorbijview
3.1 Kenmerken
The Mastech MS8301A Digital Multimeter offers a range of features for various electrical measurements:
- Weergave: 2000 tellingen
- Gegevensopslag: Hiermee wordt de weergegeven waarde bevroren voor gemakkelijke notatie.
- Batterijtester: For 1.5V and 9V batteries.
- Compact ontwerp: Product Size: 150mm x 74mm x 48mm (5.9" x 2.9" x 1.7")
- Lichtgewicht: Product Weight: 220g (0.48lb)

Image: Detailed features and specifications of the Mastech MS8301A multimeter, including display count, data hold, battery test function, and physical dimensions.
3.2 Componenten
The Mastech MS8301A package typically includes the following components:
- Mastech MS8301A Digital Multimeter Unit
- Testkabels (rood en zwart)
- AAA Batteries (2x1.5V)
- Calibration Certificate (if applicable)
- Snelstartgids
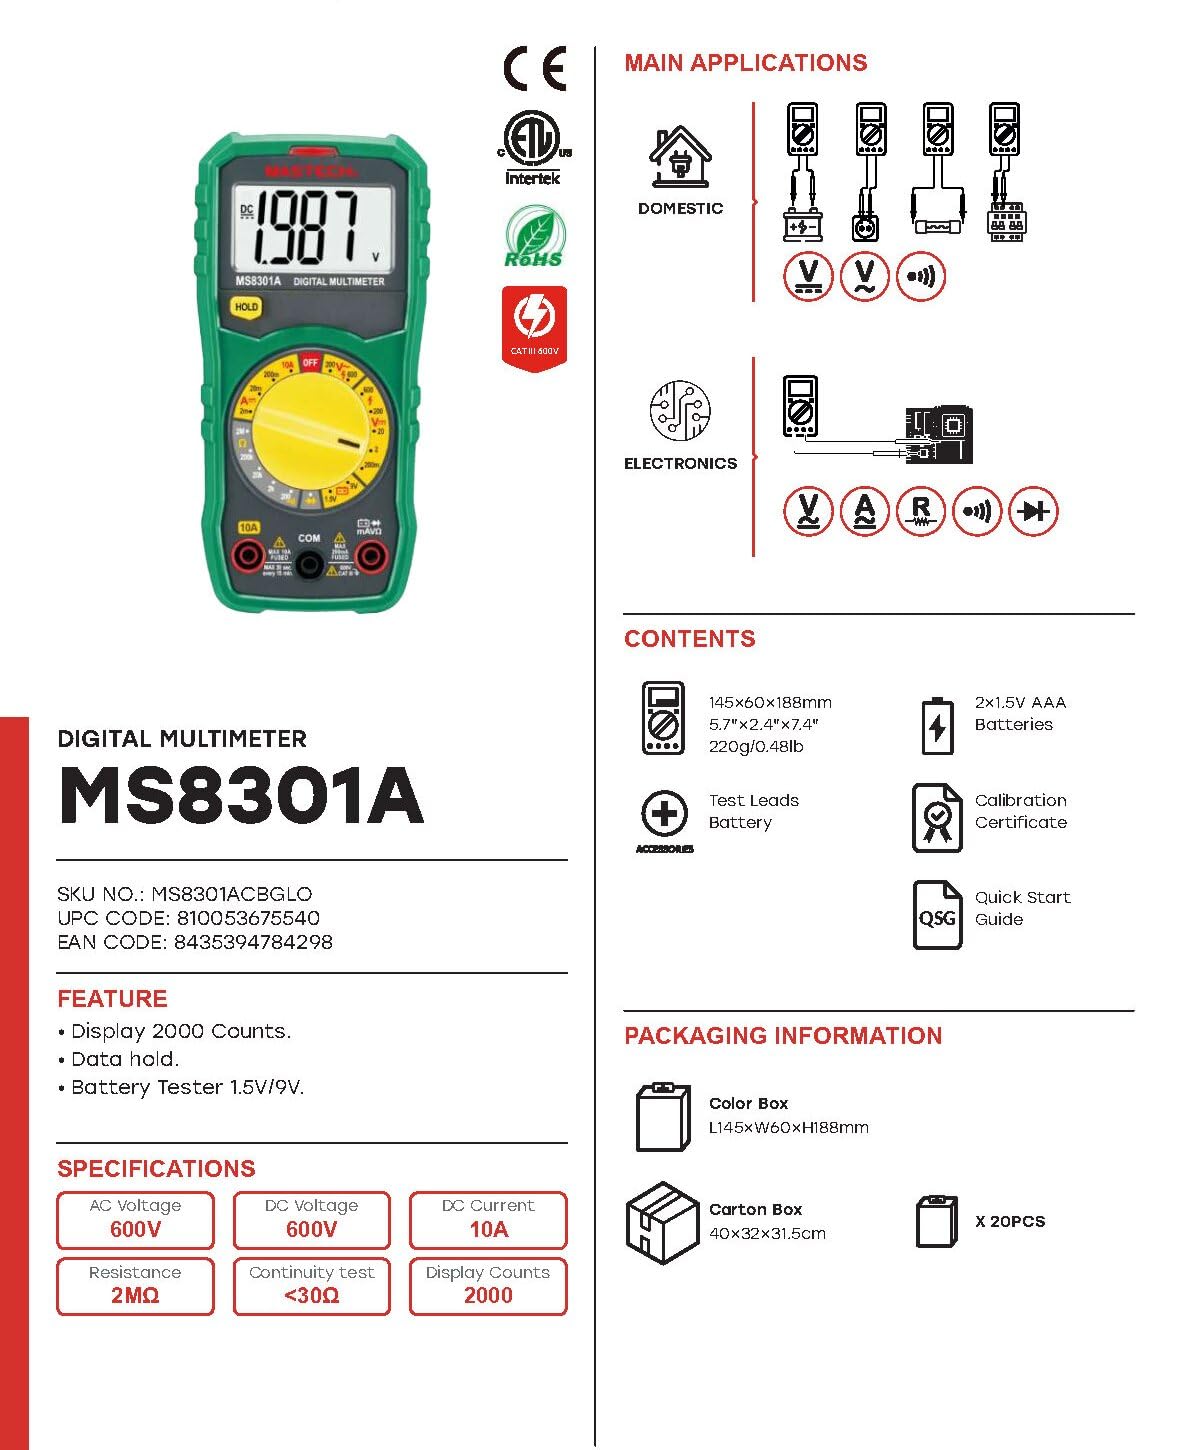
Image: The Mastech MS8301A Digital Multimeter showing its front panel, rotary switch, display, input jacks, and a list of included accessories such as test leads and batteries.
4. Instellen
4.1 Batterij installatie
- Ensure the multimeter is turned off and disconnect any test leads.
- Zoek het klepje van het batterijcompartiment aan de achterkant van de multimeter.
- Draai de bevestigingsschroef/schroeven los en verwijder de afdekking.
- Plaats twee 1.5V AAA-batterijen en let daarbij op de juiste polariteit (+ en -) zoals aangegeven in het batterijcompartiment.
- Plaats het deksel van het batterijcompartiment terug en bevestig het met de schroef/schroeven.
4.2 Testkabels aansluiten
Sluit de meetsnoeren aan op de juiste ingangen van de multimeter:
- Plaats de zwart testleiding in de COM (gewone) jack.
- Voor de meeste metingen (Vol.)tage, Resistance, Diode, Continuity, Temperature, Battery Test), insert the rood testleiding in de VΩmA krik.
- For high current measurements (up to 10A), insert the rood testleiding in de 10A krik.
5. Gebruiksaanwijzing
Before taking any measurement, ensure the test leads are correctly connected and the rotary switch is set to the desired function.
5.1 DC-volume metentage (V=)
- Set the rotary switch to the desired V= range (e.g., 20V for measuring up to 20V DC).
- Sluit de rode testkabel aan op de positieve (+) kant van het circuit en de zwarte testkabel op de negatieve (-) kant.
- Lees het deeltage-waarde op het display.
5.2 AC-volume metentage (V~)
- Set the rotary switch to the desired V~ range (e.g., 200V for measuring up to 200V AC).
- Sluit de meetsnoeren aan op de wisselstroomspanning.tagDe bron.
- Lees het deeltage-waarde op het display.
5.3 Het meten van gelijkstroom (A=)
- Belangrijk: Disconnect power to the circuit before connecting the multimeter in series.
- Set the rotary switch to the desired A= range (e.g., 200mA or 10A). Remember to move the red lead to the 10A jack for high current.
- Onderbreek het circuit waar de stroomsterkte moet worden gemeten.
- Sluit de multimeter in serie aan op het circuit en zorg ervoor dat de stroom door de multimeter loopt.
- Schakel de stroom naar het circuit in en lees de huidige waarde af op het display.
5.4 Weerstand meten (Ω)
- Belangrijk: Zorg ervoor dat het circuit spanningsloos is en alle condensatoren ontladen zijn voordat u de weerstand meet.
- Set the rotary switch to the desired Ω bereik.
- Sluit de testkabels aan op het te meten onderdeel.
- Lees de weerstandswaarde af op het display.
5.5 Diodetest (→|)
- Belangrijk: Zorg ervoor dat de diode losgekoppeld is van het circuit.
- Zet de draaischakelaar op de Diode Test positie.
- Sluit de rode meetsnoer aan op de anode en de zwarte meetsnoer op de kathode van de diode. Op het display wordt het voorwaartse volume weergegeven.tage laten vallen.
- Draai de aansluitingen om. Op het display moet "OL" (Open Loop) verschijnen als de diode goed werkt.
5.6 Continuïteitstest ())))
- Belangrijk: Zorg ervoor dat het circuit spanningsloos is.
- Zet de draaischakelaar op de Continuïteitstest positie.
- Sluit de testdraden aan op het te testen onderdeel of de te testen draad.
- If the resistance is below approximately 30Ω, the buzzer will sound, indicating continuity. The display will also show the resistance value.
5.7 Batterijtest (1.5V/9V)
- Zet de draaischakelaar op de 1.5V or 9V battery test position, corresponding to the battery type.
- Sluit de rode meetsnoer aan op de positieve (+) pool van de batterij en de zwarte meetsnoer op de negatieve (-) pool.
- Lees de batterij voltage op het display.
5.8 Gegevens bewaren
Press the "HOLD" button to freeze the current reading on the display. Press it again to release the hold function and resume live readings.
6. Specificaties
| Meting | Bereik | Oplossing |
|---|---|---|
| DC voltage | 200mV / 2V / 20V / 200V / 600V | 100µV / 1mV / 10mV / 100mV / 1V |
| AC voltage | 200V / 600V | 100mV / 1V |
| DC-stroom | 2mA / 20mA / 200mA / 10A | 1µA / 10µA / 100µA / 10mA |
| Weerstand | 200Ω / 2kΩ / 20kΩ / 200kΩ / 2MΩ | 0.1Ω / 1Ω / 10Ω / 100Ω / 1kΩ |
| Continuïteitstest | Buzzer sounds at <30Ω | — |
| Diode Test | Doorsturen voltagik laat vallen | — |
| Batterijtest | 1.5V / 9V | — |
Algemene specificaties
- Weergave: 2000 tellingen
- Voeding: 2 x 1.5V AAA-batterijen
- Afmetingen: 150 mm x 74 mm x 48 mm (5.9 "x 2.9" x 1.7 ")
- Gewicht: 220 gram (0.48 pond)
- Veiligheidsclassificatie: KAT III 600V
- Materiaal: Acrylonitril-butadieen-styreen (ABS)
- Kleur: Blauw

Image: A table detailing manual ranging specifications for various Mastech digital multimeters, including the MS8301A, showing display counts, safety ratings, and measurement capabilities.
7. Onderhoud
7.1 Batterij vervangen
When the battery low indicator appears on the display, replace the batteries immediately to ensure accurate readings. Follow the steps outlined in Section 4.1 for battery installation.
7.2 Reinigen
Veeg de behuizing af met advertentieamp Reinig de multimeter met een doek en een mild reinigingsmiddel. Gebruik geen schuurmiddelen of oplosmiddelen. Zorg ervoor dat de multimeter volledig droog is voor gebruik.
7.3 Opslag
If the multimeter is not used for an extended period, remove the batteries to prevent leakage and damage to the device. Store in a cool, dry place away from direct sunlight.
8. Probleemoplossing
| Probleem | Mogelijke oorzaak | Oplossing |
|---|---|---|
| Geen weergave of zwak display | Dead or low batteries; incorrect battery polarity. | Vervang de batterijen. Controleer of de batterijen in de juiste richting zitten. |
| "OL" (Overload) wordt weergegeven | Measurement exceeds selected range; open circuit. | Select a higher range; check for open circuit in the component or leads. |
| Onjuiste metingen | Onjuiste functie geselecteerd; slechte aansluiting van de meetsnoeren; beschadigde meetsnoeren. | Verify function switch position; ensure secure lead connection; inspect and replace damaged leads. |
| Geen continuïteitspiep | Open circuit; resistance too high. | Check for breaks in the circuit; ensure resistance is below 30Ω. |
9. Garantie en ondersteuning
Mastech products are designed for reliability and performance. For specific warranty information, please refer to the warranty card included with your product or contact Mastech customer support. Keep your purchase receipt as proof of purchase.
For technical support or service inquiries, please visit the official Mastech webwebsite of neem contact op met hun erkende servicecentra.


