1. Veiligheidsinformatie
Lees alle veiligheidsinstructies zorgvuldig door voordat u dit product gebruikt. Het niet opvolgen van deze instructies kan leiden tot een elektrische schok, brand of andere gevaren.
- Stel de projector niet bloot aan regen of vocht om brand of elektrische schokken te voorkomen.
- Open de projector niet.asing. Er bevinden zich geen onderdelen die door de gebruiker kunnen worden onderhouden. Laat al het onderhoud over aan gekwalificeerd servicepersoneel.
- Zorg voor goede ventilatie. Blokkeer de ventilatieopeningen niet.
- Gebruik uitsluitend de stroomadapter die bij de projector is geleverd.
- Vermijd direct oogcontact met de projectorlens wanneer de projector in werking is.amp staat aan.
- Houd de projector uit de buurt van warmtebronnen en direct zonlicht.
2. Inhoud van het pakket
Controleer of alle hieronder vermelde artikelen in uw pakket zitten:
- 1 x Jectse Mini LED Projector
- 1 x Remote Control (2 AAA batteries not included)
- 1 x AV Line (3-in-1 RCA cable)
- 1 x Gebruiksaanwijzing
- 1 x Stroomadapter

Figure 2.1: Contents of the Jectse Mini LED Projector package.
3. Product voorbijview
The Jectse Mini LED Projector is a compact and portable device designed for various multimedia applications. It features a 1080P resolution, LED light source, and multiple connectivity options.

Afbeelding 3.1: Voorkant en bovenkant view of the Jectse Mini LED Projector.
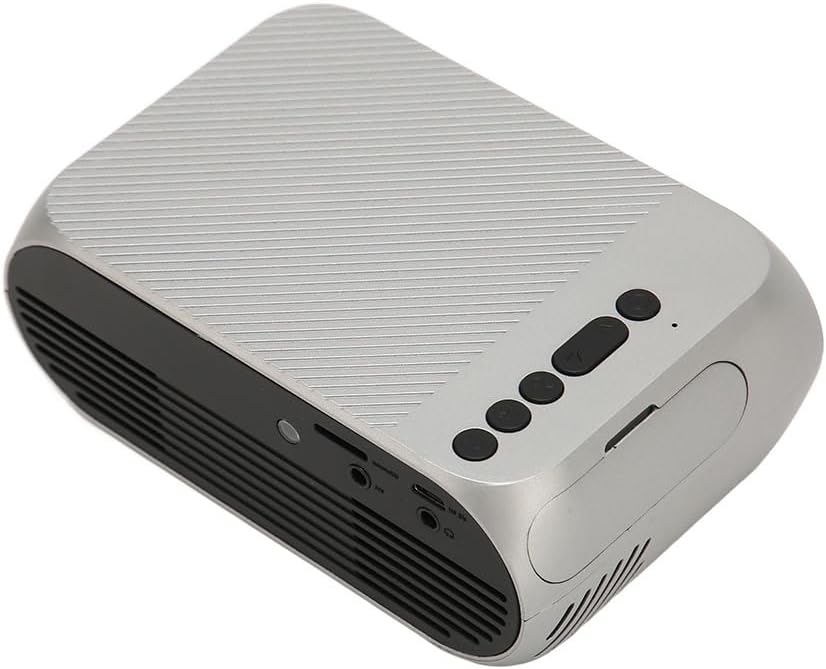
3.1 Projectorcomponenten

Figure 3.2: Top panel controls of the Jectse Mini LED Projector.
- Lens: Projecteert het beeld op het scherm.
- Ventilatierooster: Zorgt voor een goede luchtcirculatie voor koeling.
- Bedieningsknoppen: (Refer to Figure 3.2) For basic navigation and power control.
- Focuswiel: Past de helderheid van het beeld aan.
Afbeelding 3.3: Achterkant en zijkant view met in-/uitgangspoorten.
3.2 Invoer-/uitvoerpoorten
- HD Multimedia Interface (HDMI): For connecting devices like laptops, gaming consoles, and media players.
- AV-poort: Voor het aansluiten van oudere apparaten met behulp van de meegeleverde AV-kabel.
- USB-poort: Voor het aansluiten van USB-drives om media af te spelen. files direct.
- Stroomverbruik: Voor het aansluiten van de stroomadapter.
- Audio Output (3.5mm Jack): Voor het aansluiten van externe luidsprekers of een hoofdtelefoon.
4. Instellen
4.1 Plaatsing
Place the projector on a stable, flat surface. Ensure there is adequate space around the projector for ventilation. The ideal projection distance is between 1.5 to 2 meters for optimal image size and clarity.

Figure 4.1: Recommended projection distance and screen sizes.
4.2 Stroomaansluiting
- Sluit de voedingsadapter aan op de voedingsingang van de projector.
- Steek de voedingsadapter in een geschikt stopcontact (100-240V).
4.3 Invoerbronnen aansluiten
The projector supports HD Multimedia Interface, AV, and USB inputs.

Figure 4.2: Projector compatibility with various devices.
- HD Multimedia Interface: Connect an HD Multimedia Interface cable from your source device (e.g., laptop, game console) to the projector's HD Multimedia Interface port.
- AV: Connect the included AV cable to the projector's AV port and the corresponding audio/video output ports on your source device.
- USB-poort: Steek een USB-stick in de USB-poort van de projector.
4.4 Focusaanpassing
After powering on the projector, rotate the focus wheel (usually located near the lens) until the projected image appears clear and sharp.
5. Gebruiksaanwijzing
5.1 In-/uitschakelen
- Inschakelen: Press the Power Switch button on the projector or the power button on the remote control.
- Uitschakelen: Press the Power Switch button again. The projector will shut down.
5.2 Bronselectie
After powering on, use the "Signal Source Button" on the projector or the "Source" button on the remote control to cycle through available input sources (HD Multimedia Interface, AV, USB).
5.3 Menunavigatie
Use the Direction Buttons and Confirm Button on the projector or the arrow keys and OK button on the remote control to navigate through the projector's on-screen menu for settings adjustments (e.g., picture mode, aspect ratio, sound settings).
5.4 Gebruik van de afstandsbediening
Insert two AAA batteries (not included) into the remote control. Point the remote control towards the projector's IR receiver to operate functions such as power, source selection, volume, and menu navigation.
6. Onderhoud
6.1 De lens reinigen
Gebruik een zachte, pluisvrije doek die speciaal is ontworpen voor optische lenzen om de projectorlens voorzichtig schoon te vegen. Gebruik geen schurende reinigingsmiddelen en oefen geen overmatige kracht uit, aangezien dit krassen op de lens kan veroorzaken.
6.2 Algemene reiniging
Wipe the exterior of the projector with a soft, dry cloth. Do not use liquid cleaners or solvents. Ensure the ventilation grilles are free from dust and debris to maintain optimal cooling.
7. Probleemoplossing
| Probleem | Mogelijke oorzaak | Oplossing |
|---|---|---|
| Geen afbeelding geprojecteerd |
|
|
| Afbeelding is wazig |
|
|
| Geen geluid |
|
|
| Afstandsbediening werkt niet |
|
|
8. Specificaties
| Functie | Detail |
|---|---|
| Merk | Jekt |
| Modelnummer | Jectse3giz17bkpy |
| Oplossing | 1920*1080p |
| Lichtbron | LED |
| LED-levensduur | 3000 uur |
| Projectieafstand | 1.5-2m |
| Projectieverhouding | 1.6:1 |
| Beeldverhouding | 16:9 |
| Stroomverbruik | 100-240V |
| Productgrootte | 13 x 8.5 x 5 cm (ongeveer 5.1 x 3.3 x 2 inch) |
| Artikelgewicht | 1.1 pond |
| Connectiviteitstechnologie | HD Multimedia Interface, AV, USB |
| Speciale kenmerken | Adjustable, Portable Design |
9. Garantie en ondersteuning
For warranty information or technical support, please refer to the contact details provided with your purchase or visit the official Jectse webwebsite. Bewaar uw aankoopbewijs voor garantieclaims.