1. Inleiding
Thank you for choosing the Conentool 21V Cordless Impact Drill/Driver Kit. This tool is designed for various drilling and screwdriving tasks in wood, metal, plastics, and masonry. Please read this manual carefully before operating the tool to ensure safe and efficient use. Keep this manual for future reference.

Image 1.1: The Conentool 21V Cordless Impact Drill/Driver Kit, including the drill, two 2500mAh batteries, charger, and a variety of drill bits and accessories in a carrying case.
2. Algemene veiligheidsinstructies
WAARSCHUWING: Lees alle veiligheidswaarschuwingen, instructies, illustraties en specificaties die bij dit elektrische gereedschap worden geleverd. Het niet opvolgen van alle onderstaande instructies kan leiden tot elektrische schokken, brand en/of ernstig letsel.
2.1 Veiligheid op het werkgebied
- Zorg dat de werkplek schoon en goed verlicht is. Rommelige of donkere plekken zijn een uitnodiging voor ongelukken.
- Gebruik geen elektrisch gereedschap in explosieve atmosferen, zoals in de aanwezigheid van ontvlambare vloeistoffen, gassen of stof. Elektrisch gereedschap creëert vonken die het stof of de dampen kunnen ontsteken.
- Houd kinderen en omstanders uit de buurt tijdens het bedienen van een elektrisch gereedschap. Afleidingen kunnen ervoor zorgen dat u de controle verliest.
2.2 Elektrische veiligheid
- Stekkers van elektrisch gereedschap moeten passen bij het stopcontact. Wijzig de stekker nooit op welke manier dan ook.
- Vermijd lichamelijk contact met geaarde oppervlakken, zoals leidingen, radiatoren, fornuizen en koelkasten. Er is een verhoogd risico op een elektrische schok als uw lichaam geaard is.
- Stel elektrisch gereedschap niet bloot aan regen of natte omstandigheden. Water dat in een elektrisch gereedschap komt, vergroot het risico op een elektrische schok.
2.3 Persoonlijke veiligheid
- Draag altijd oogbescherming. Gebruik een veiligheidsbril, stofbril of gelaatsscherm.
- Draag gehoorbescherming wanneer u het gereedschap gedurende langere tijd gebruikt.
- Kleed u goed. Draag geen losse kleding of sieraden. Houd uw haar en kleding uit de buurt van bewegende delen.
- Blijf alert, let op wat u doet en gebruik uw gezonde verstand bij het bedienen van elektrisch gereedschap.
3. Inhoud van het pakket
Controleer of alle hieronder vermelde artikelen in uw pakket zitten. Als er artikelen ontbreken of beschadigd zijn, neem dan contact op met de klantenservice.
- 1 x Conentool 21V Cordless Impact Drill/Driver
- 2 x 2500mAh lithium-ionbatterijen
- 1 x acculader
- 1 x Flexibele asverlenging
- Various Drill Bits (for wood, metal, masonry)
- Various Screwdriver Bits
- Stopcontactadapters
- Draagtas
- Gebruiksaanwijzing

Image 3.1: A complete overview of the kit contents, including the drill, two batteries, charger, flexible shaft, various drill bits, screwdriver bits, and socket adapters, all neatly arranged.
4. Product voorbijview
Familiarize yourself with the main components of your drill/driver:
- Chuck: Holds drill bits and screwdriver bits.
- Koppelafstelring: Selects the desired torque setting.
- Moduskeuzering: Switches between screwdriving, drilling, and impact drilling modes.
- Snelheidskeuzeschakelaar: Changes between high and low-speed gears.
- Trekkerschakelaar: Activates the tool and controls speed (variable speed).
- Vooruit/achteruit-keuzeschakelaar: Verandert de draairichting.
- LED-werklamp: Verlicht het werkgebied.
- Batterijpakket: Voorziet het gereedschap van stroom.
- Batterij-ontgrendelingsknop: Voor het verwijderen van de batterij.
- Hendel: Ergonomische handgreep voor comfortabel gebruik.

Afbeelding 4.1: Een interne view highlighting the brushless motor, which provides increased power, efficiency, and a quieter operation with no sparks.
5. Instellen
5.1 De batterij opladen
The battery pack is not fully charged at the time of purchase. It is recommended to fully charge the battery before first use.
- Sluit de oplader aan op een standaard stopcontact.
- Schuif het accupakket op het laadstation. Zorg ervoor dat het vastklikt.
- The charger indicator light will show the charging status. A red light typically indicates charging, and a green light indicates a full charge.
- Zodra deze volledig is opgeladen, koppelt u de oplader los van het stopcontact en verwijdert u de batterij.

Image 5.1: The battery charger connected to a wall outlet, with a battery pack inserted for charging. The red light indicates charging, and the green light indicates a completed charge.
5.2 De batterij installeren en verwijderen
- Installeren: Align the battery pack with the base of the tool handle and slide it in until it clicks securely into place.
- Verwijderen: Press the battery release button (usually located at the front of the battery) and slide the battery pack out of the tool.

Afbeelding 5.2: Een doorsnede view of the 2500mAh battery pack, illustrating its internal lithium-ion cells and power management system, designed for up to 90 minutes of use per battery.
5.3 Boor-/schroevendraaierbits monteren en demonteren
- Installeren: Rotate the chuck counter-clockwise to open the jaws. Insert the desired bit into the chuck as far as it will go. Rotate the chuck clockwise to tighten the jaws firmly around the bit.
- Verwijderen: Draai de boorkop tegen de klok in om de bekken los te maken en de bit eruit te trekken.
Ensure the bit is securely fastened to prevent it from slipping during operation.
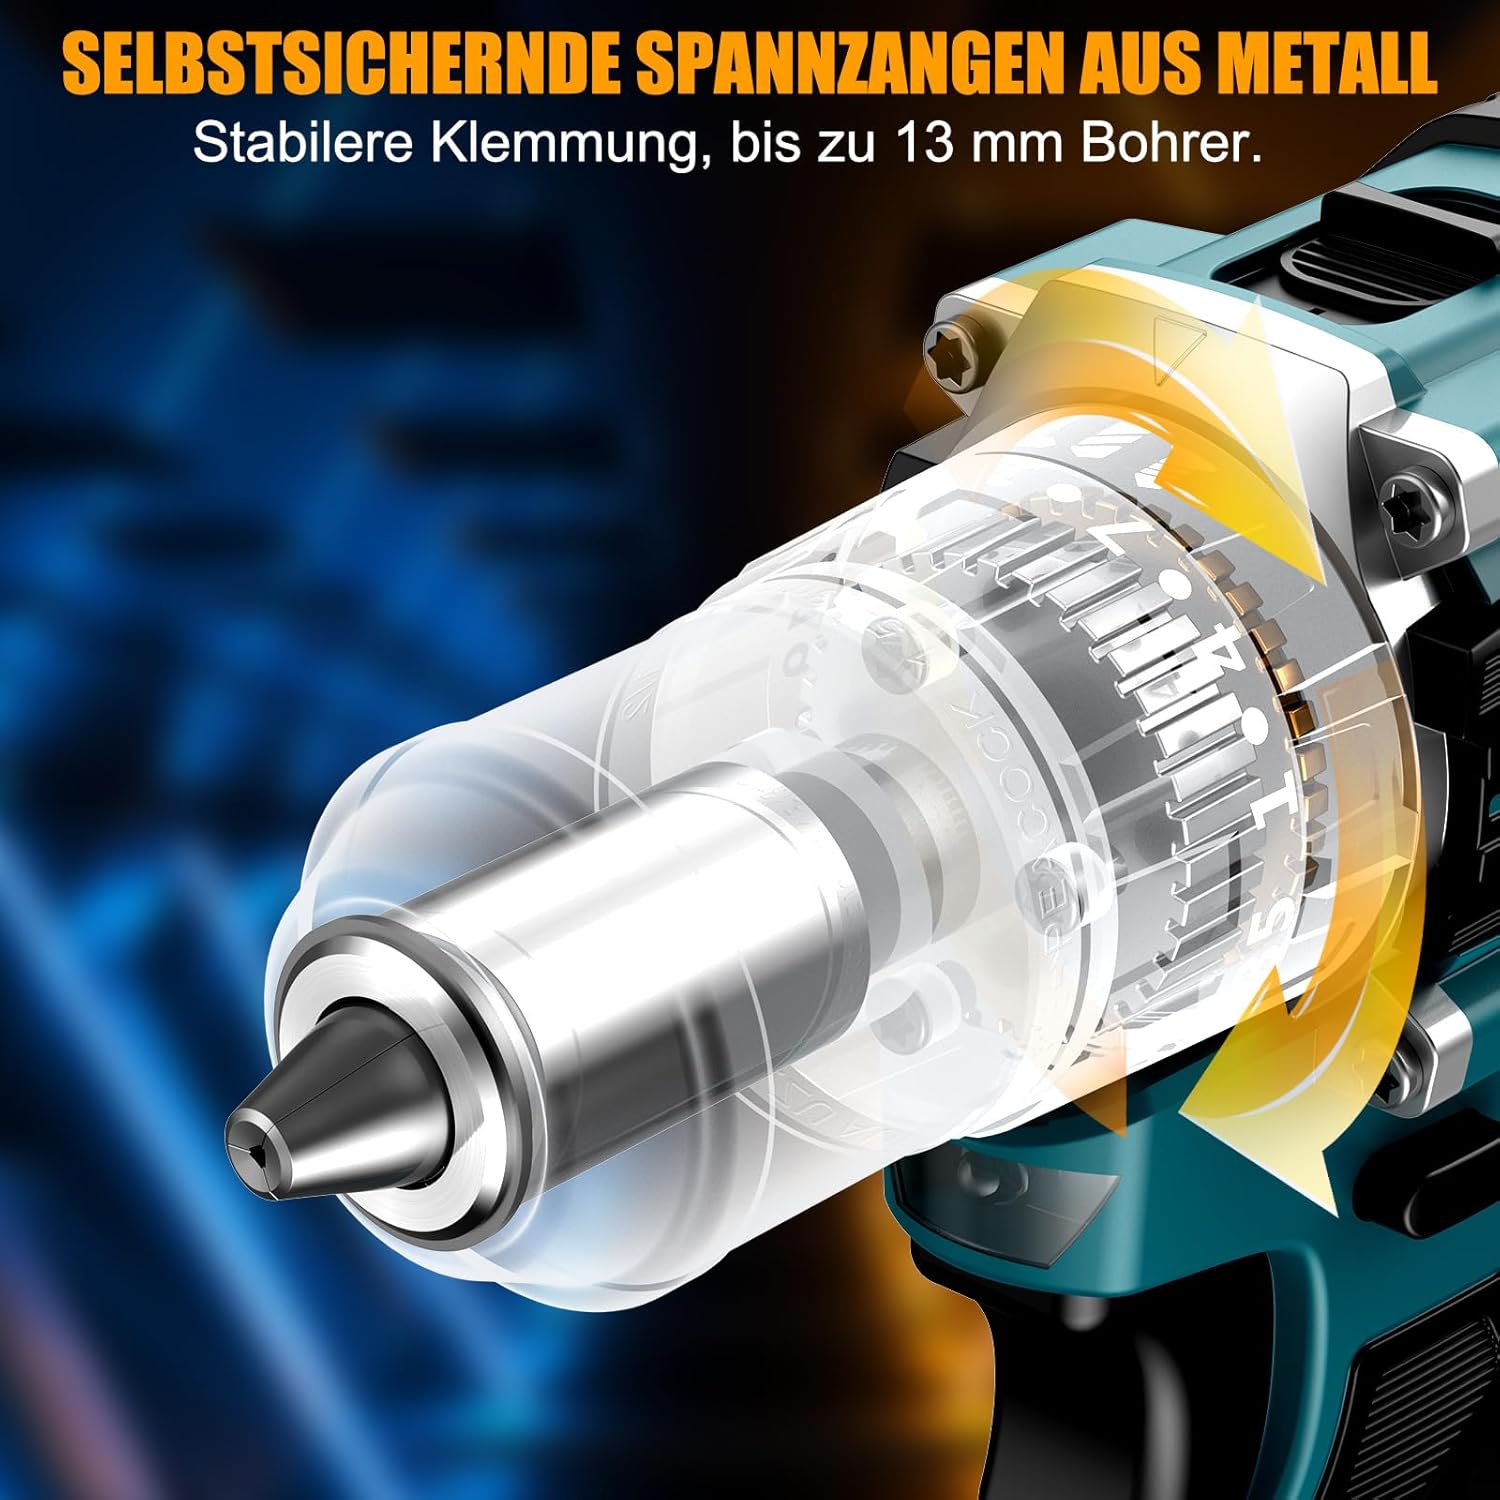
Afbeelding 5.3: Een gedetailleerde view of the self-locking metal chuck, demonstrating its stable clamping mechanism capable of holding drill bits up to 13mm securely.
6. Gebruiksaanwijzing
6.1 In-/uitschakelen en snelheidsregeling
- To turn the tool ON, press the trigger switch. The speed is variable; press the trigger further for higher speed.
- Om het gereedschap UIT te schakelen, laat u de trekkerschakelaar los.
- The integrated LED work light will illuminate when the trigger is pressed, providing visibility in dimly lit areas.
6.2 Vooruit/achteruit rotatie
The forward/reverse selector switch is located above the trigger. Push it to the left for forward rotation (for screwdriving and drilling) and to the right for reverse rotation (for removing screws or freeing jammed bits). Ensure the tool is stopped before changing direction.
6.3 Speed Gear Selection
The drill features a 2-speed gear selector switch on top of the tool:
- Versnelling 1 (lage snelheid, 0-650 tpm): Ideal for high-torque applications like driving large screws or drilling large holes.
- Versnelling 2 (Hoge snelheid, 0-1850 tpm): Suitable for fast drilling in softer materials and smaller diameter holes.
Always select the appropriate gear for the task. Change gears only when the tool is completely stopped.
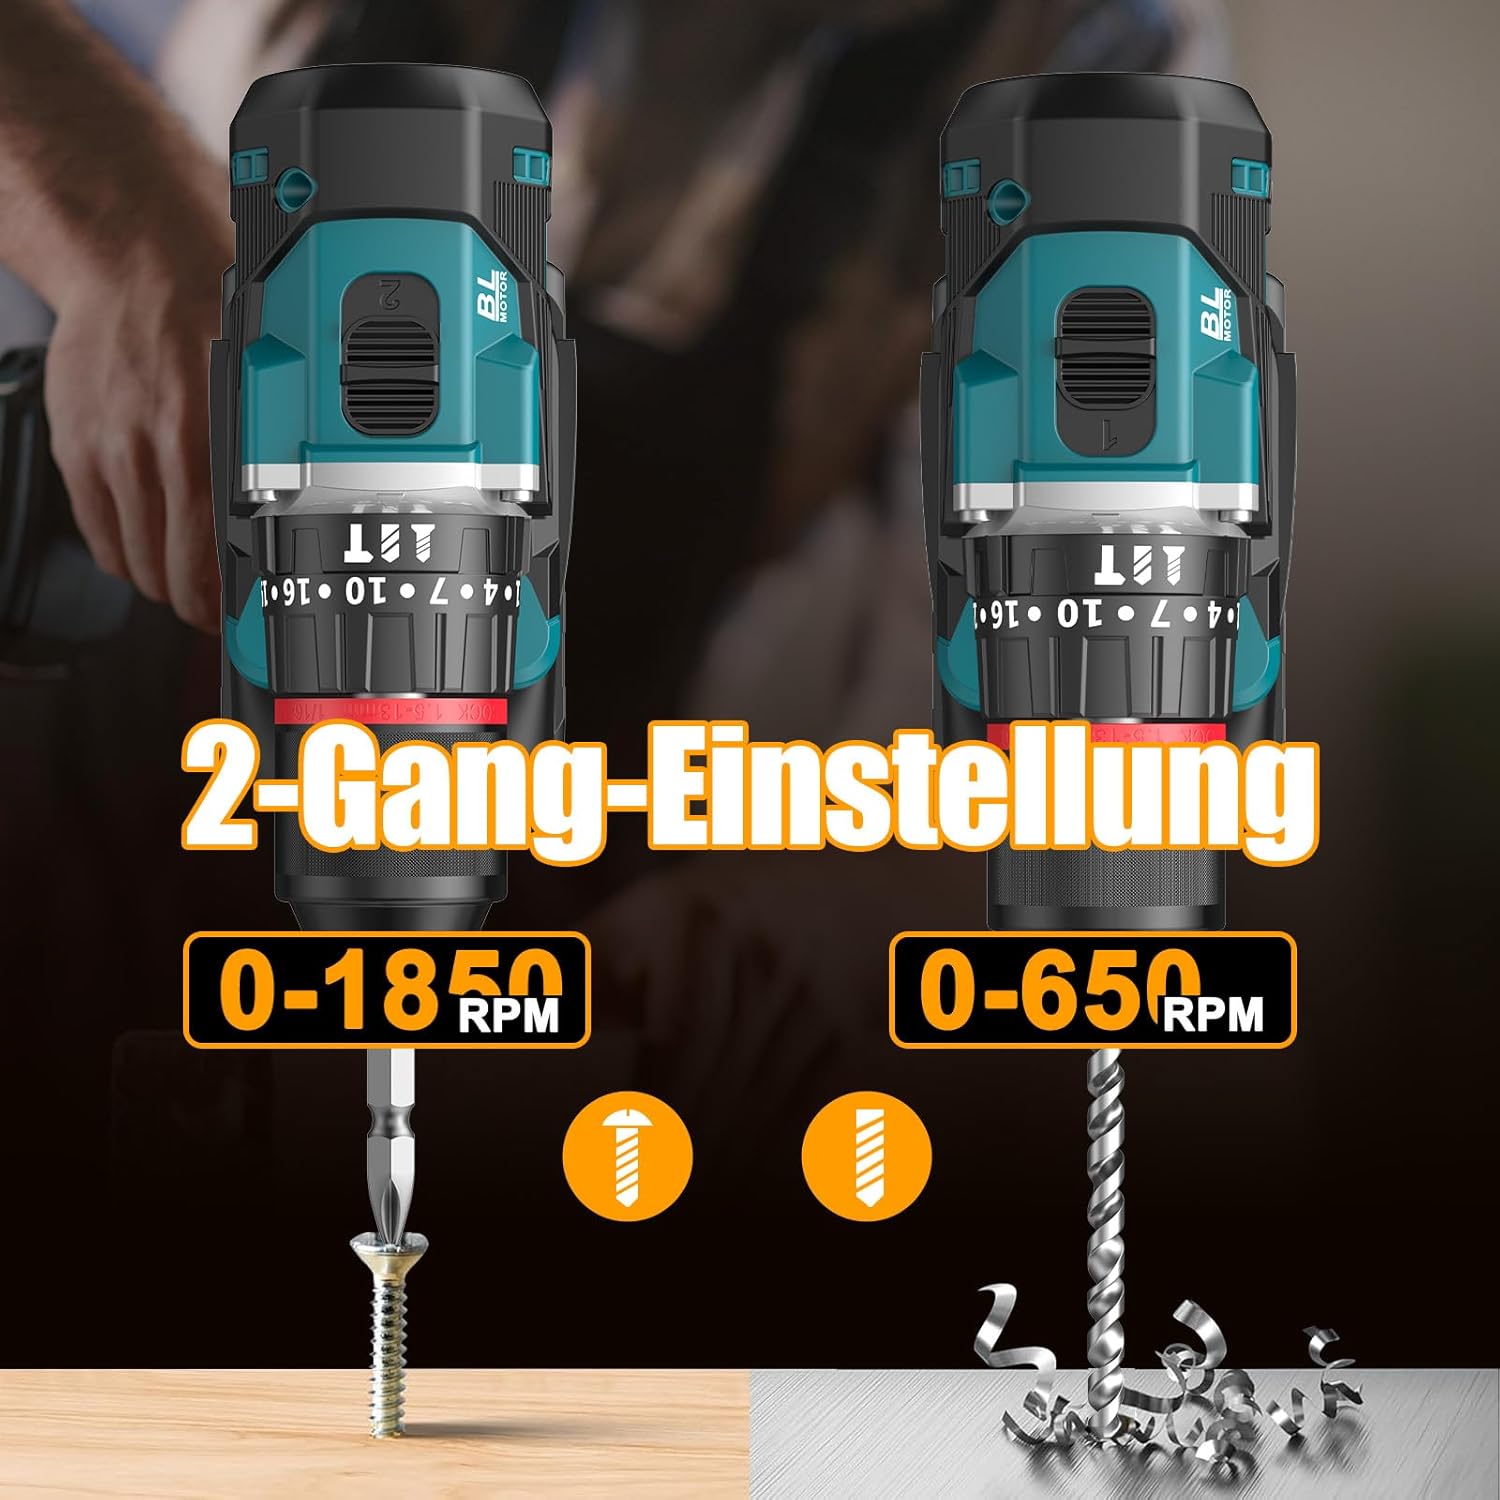
Image 6.1: An illustration demonstrating the two-speed gear settings: Gear 1 (0-650 RPM) for screwdriving and Gear 2 (0-1850 RPM) for drilling, allowing for optimal performance based on the application.
6.4 Torque Adjustment and Mode Selection
The torque adjustment ring allows you to set the desired torque for screwdriving applications, preventing overtightening or stripping screws. The mode selector ring allows you to switch between different operating modes.
- Screwdriving Mode (Torque Settings 1-35): Use these settings to match the torque to the screw size and material. Lower numbers for smaller screws/softer materials, higher numbers for larger screws/harder materials.
- Boormodus (Boorpictogram): For general drilling without impact. The clutch is disengaged, providing maximum torque.
- Impactboormodus (Hamer Icoon): For drilling into masonry or concrete, providing a hammering action in addition to rotation.
The drill offers 35+3 settings, including 35 torque settings for screwdriving and 3 modes (screwdriving, drilling, impact drilling).

Image 6.2: A visual representation of the 35+3 torque and mode settings, indicating precise power control and a maximum torque of 55 N.m, suitable for various materials like wood, brick, plastic, and metal.
7. Onderhoud
7.1 Reinigen
- Koppel altijd de accu los voordat u reinigings- of onderhoudswerkzaamheden uitvoert.
- Houd de ventilatieopeningen van het gereedschap schoon om oververhitting te voorkomen.
- Gebruik een zachte, damp doek om het gereedschap schoon te maken casing. Gebruik geen agressieve chemicaliën of schurende reinigingsmiddelen.
7.2 Opslag
- Bewaar het gereedschap en de accu's op een koele, droge plaats, uit de buurt van direct zonlicht en vocht.
- Store the tool in its carrying case to protect it from dust and damage.
- Buiten bereik van kinderen houden.

Image 7.1: A person carrying the Conentool drill kit in its durable black carrying case, designed for convenient storage and transport of the tool and its accessories.
7.3 Batterijonderhoud
- Do not store batteries in a discharged state. Recharge them regularly, especially if not used for extended periods.
- Stel batterijen niet bloot aan extreme temperaturen.
- Probeer de accu niet te demonteren of aan te passen.
8. Probleemoplossing
| Probleem | Mogelijke oorzaak | Oplossing |
|---|---|---|
| Tool start niet | Batterij niet opgeladen of niet goed geplaatst. | Zorg ervoor dat de batterij volledig is opgeladen en correct is geplaatst. |
| Verminderd vermogen of snelheid | De batterij is bijna leeg. | Laad de batterij op. |
| Bit slipt in de klauw | De klauw is niet voldoende vastgedraaid. | Tighten the chuck firmly around the bit. Ensure the bit shank is clean. |
| Oververhitting | Verstopte ventilatiesleuven; continu intensief gebruik. | Maak de ventilatiesleuven schoon. Laat het gereedschap afkoelen bij langdurig gebruik. |
9. Specificaties
| Functie | Specificatie |
|---|---|
| Modelnummer | ebvc-sd-de |
| Deeltage | 21 Volt |
| Batterijtype | Lithium-ion |
| Batterijcapaciteit | 2500 mAh (elk) |
| Max Torque | 55Nm |
| Koppelinstellingen | 35 + 3 Modes (Screwdriving, Drilling, Impact Drilling) |
| Onbelaste snelheid (versnelling 1) | 0-650 toeren per minuut |
| Onbelaste snelheid (versnelling 2) | 0-1850 toeren per minuut |
| Chuck-maat | 13 mm (3/8 inch) Keyless |
| Productafmetingen | 35x31x10cm |
| Gewicht (met batterij) | 1.5 kilogram |
10. Garantie en ondersteuning
Conentool products are manufactured to high-quality standards. In the unlikely event of a defect due to material or manufacturing fault, please contact your retailer or Conentool customer service. Please retain your proof of purchase for warranty claims.
For further assistance, technical support, or to inquire about spare parts, please refer to the contact information provided with your purchase or visit the official Conentool webplaats.