1. Inleiding
Thank you for choosing the WORKPRO 1500W Rotary Hammer Drill. This heavy-duty tool is designed for demanding tasks such as drilling in concrete, wood, and steel, as well as chiseling applications. This manual provides essential information for the safe and efficient operation, maintenance, and troubleshooting of your rotary hammer drill. Please read it thoroughly before first use and keep it for future reference.

Image 1.1: WORKPRO 1500W Rotary Hammer Drill and included accessories.
2. Algemene veiligheidsinstructies
Neem altijd de basisveiligheidsmaatregelen in acht om het risico op brand, elektrische schokken en persoonlijk letsel te verminderen. Het niet opvolgen van deze instructies kan leiden tot ernstig letsel.
- Veiligheid werkgebied: Houd de werkruimte schoon en goed verlicht. Rommelige of donkere ruimtes zijn een risico op ongelukken. Gebruik geen elektrisch gereedschap in explosieve atmosferen, zoals in de buurt van ontvlambare vloeistoffen, gassen of stof.
- Elektrische veiligheid: Stekkers van elektrisch gereedschap moeten in het stopcontact passen. Wijzig de stekker nooit op enigerlei wijze. Vermijd lichamelijk contact met geaarde oppervlakken. Stel elektrisch gereedschap niet bloot aan regen of vocht.
- Persoonlijke veiligheid: Always wear eye protection. Use hearing protection when operating the tool for extended periods. Wear a dust mask if drilling in dusty conditions. Dress properly; avoid loose clothing or jewelry.
- Gebruik en onderhoud van gereedschap: Forceer het elektrische gereedschap niet. Gebruik het juiste elektrische gereedschap voor uw toepassing. Haal de stekker uit het stopcontact voordat u aanpassingen uitvoert, accessoires verwisselt of elektrisch gereedschap opbergt.
- Onderhoud: Onderhoud elektrisch gereedschap. Controleer op verkeerde uitlijning of vastlopen van bewegende onderdelen, breuk van onderdelen en andere omstandigheden die de werking van het elektrisch gereedschap kunnen beïnvloeden.
3. Product Components and Included Items
Familiarize yourself with the parts of your WORKPRO Rotary Hammer Drill and the accessories provided.

Image 3.1: Key components of the rotary hammer drill, including SDS-PLUS Chuck, Four Functions Switch, Grease Pot, Shock Absorber, On/Off Switch, Cushioned Handle, Variable Speed Control, 360° Rotatable Handle, and Heat Outlet.
Meegeleverde accessoires:

Image 3.2: The complete set of accessories includes a carrying case, rotary hammer drill, SDS-plus point flat bit (250mm), SDS-plus point chisel bit (250mm), wrench, grease, SDS-plus drill bits (8mm, 10mm, 12mm), and a dust collector.
- 1 x Heavy-duty Rotary Hammer Drill
- 3 x SDS-plus Drill Bits (8 mm, 10 mm, 12 mm)
- 1 x Round Shank Chisel (Φ14 × 250 mm)
- 1 x Flat Chisel (Φ14 × 250 mm)
- 1 x Grease container
- 1 x Carbon Brush set
- 1 x stofkap
- 1 x sleutel
- 1 x draagtas
4. Opstelling en montage
4.1 Het hulphandvat bevestigen
The 360° rotatable handle provides better control and comfort. Loosen the handle clamp, position the handle to your desired angle, and tighten the clamp veilig.
4.2 Inserting and Removing SDS-plus Bits
The SDS-plus chuck allows for quick and secure bit changes.
- Invoegen: Clean the bit shank. Pull back the chuck collar, insert the bit into the chuck until it clicks into place. Release the collar. Pull on the bit to ensure it is securely locked.
- Verwijderen: Pull back the chuck collar and pull the bit out.

Image 4.1: Illustration of the auto-lock SDS-plus chuck for secure bit clampind.
4.3 Attaching the Dust Collector
For cleaner operation and to protect the user, attach the dust collector to the front of the tool when drilling.

Image 4.2: The anti-dust cover protects users and the machine from dust and debris.
5. Gebruiksaanwijzing
The WORKPRO Rotary Hammer Drill features four operating modes and variable speed control for versatile applications.
5.1 Modusselectie
Use the four-function switch located on the side of the tool to select the desired operating mode:
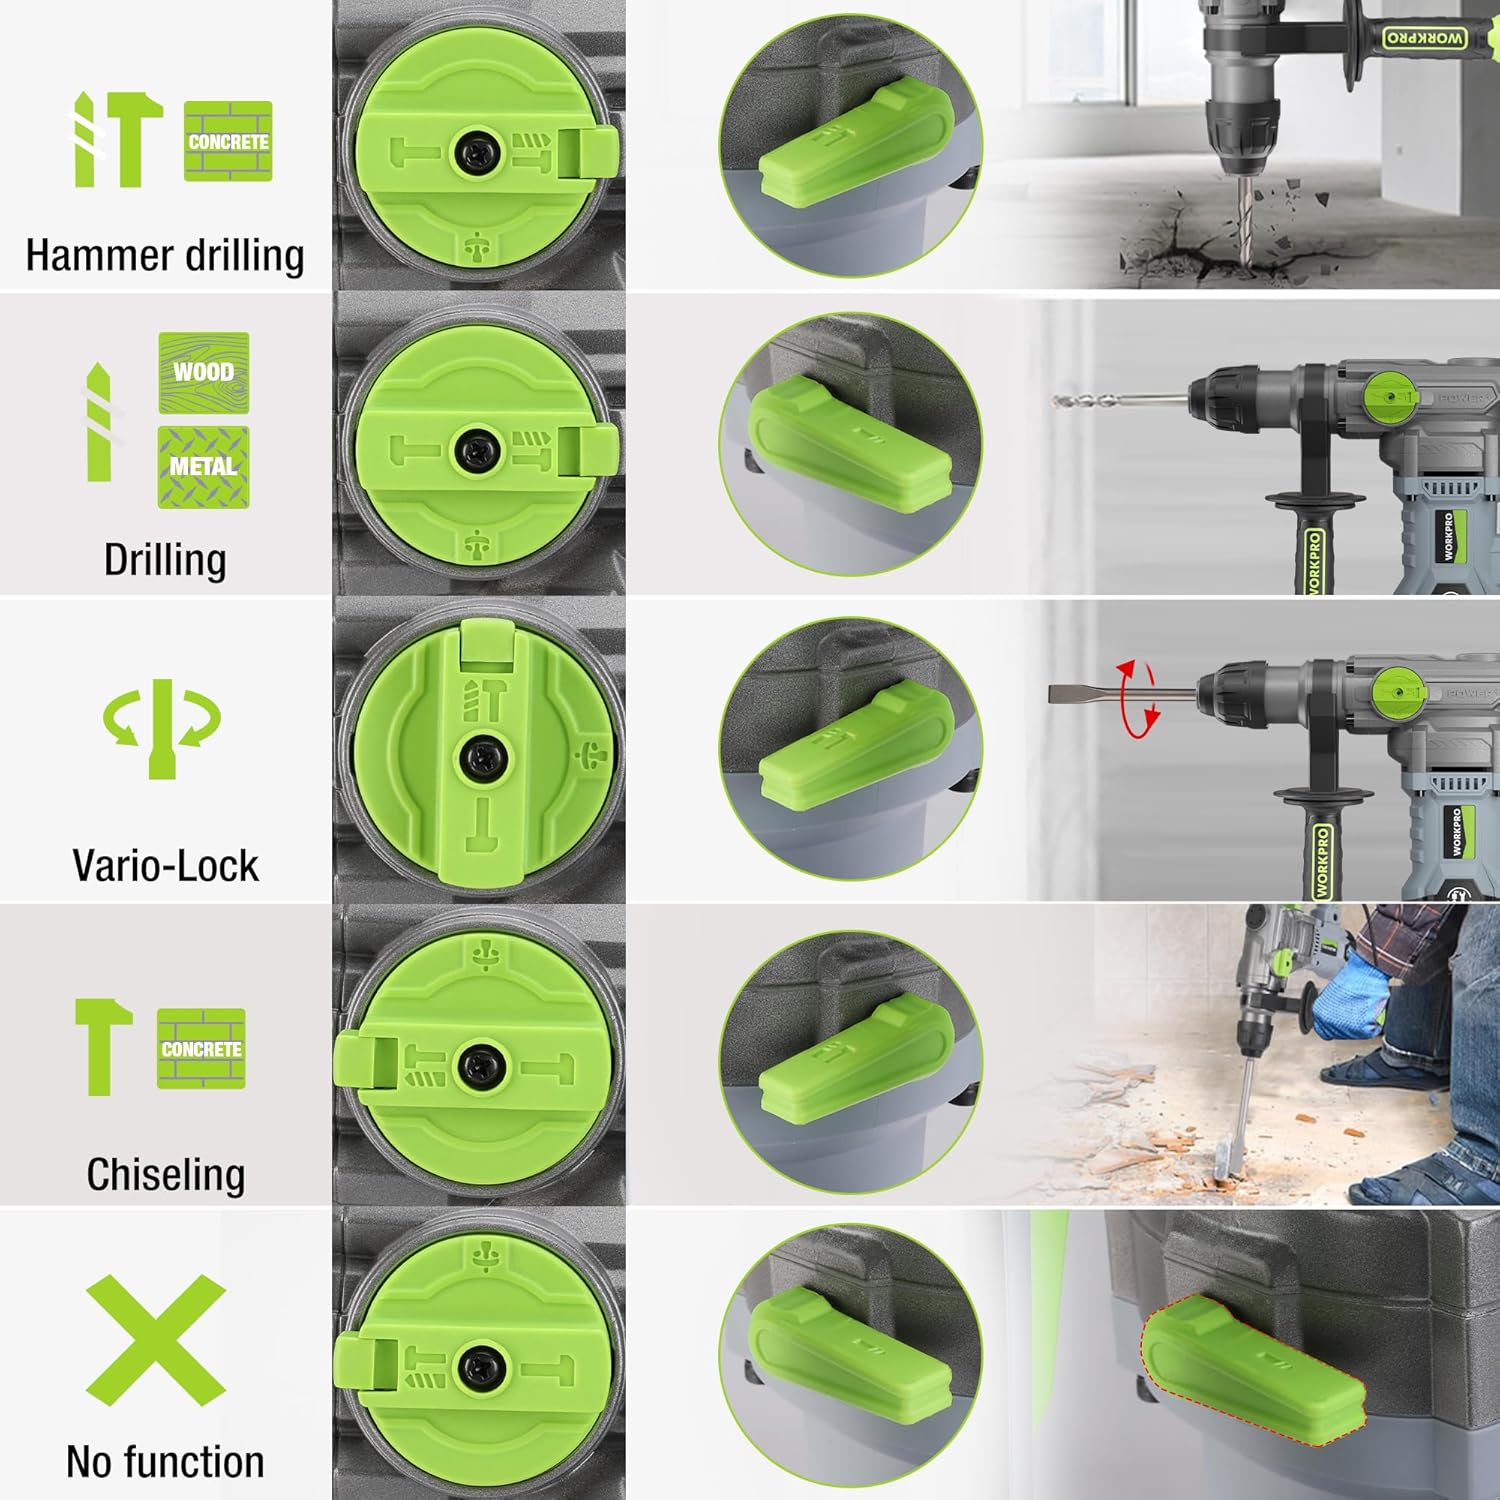
Image 5.1: The four-function switch allows selection between Hammer Drilling, Drilling, Vario-Lock (Chisel Adjust), and Chiseling modes.
- Hamerboren: Voor het boren in beton en metselwerk met slag.
- Boren: For drilling in wood, metal, and plastic without impact.
- Chiseling (Hammer Only): Voor licht beitelwerk in beton en metselwerk.
- Vario-Lock (Chisel Adjust): Allows you to rotate and lock the chisel in various positions to optimize the working angle.

Image 5.2: Visual representation of the hammer drilling, drilling, hammer, and chisel adjust modes.
5.2 Variabele snelheidsregeling
The variable speed control allows you to adjust the rotation speed (0-930 RPM) and impact frequency (0-4300 BPM) to match the material and application.
- Rotate the speed adjustment dial to increase or decrease the speed.
- Start with a lower speed for precise drilling and increase as needed.
5.3 Drilling Capacities
The tool offers excellent drilling performance across various materials:
- Concreet: Tot 32 mm
- Hout: Tot 42 mm
- Staal: Tot 13 mm
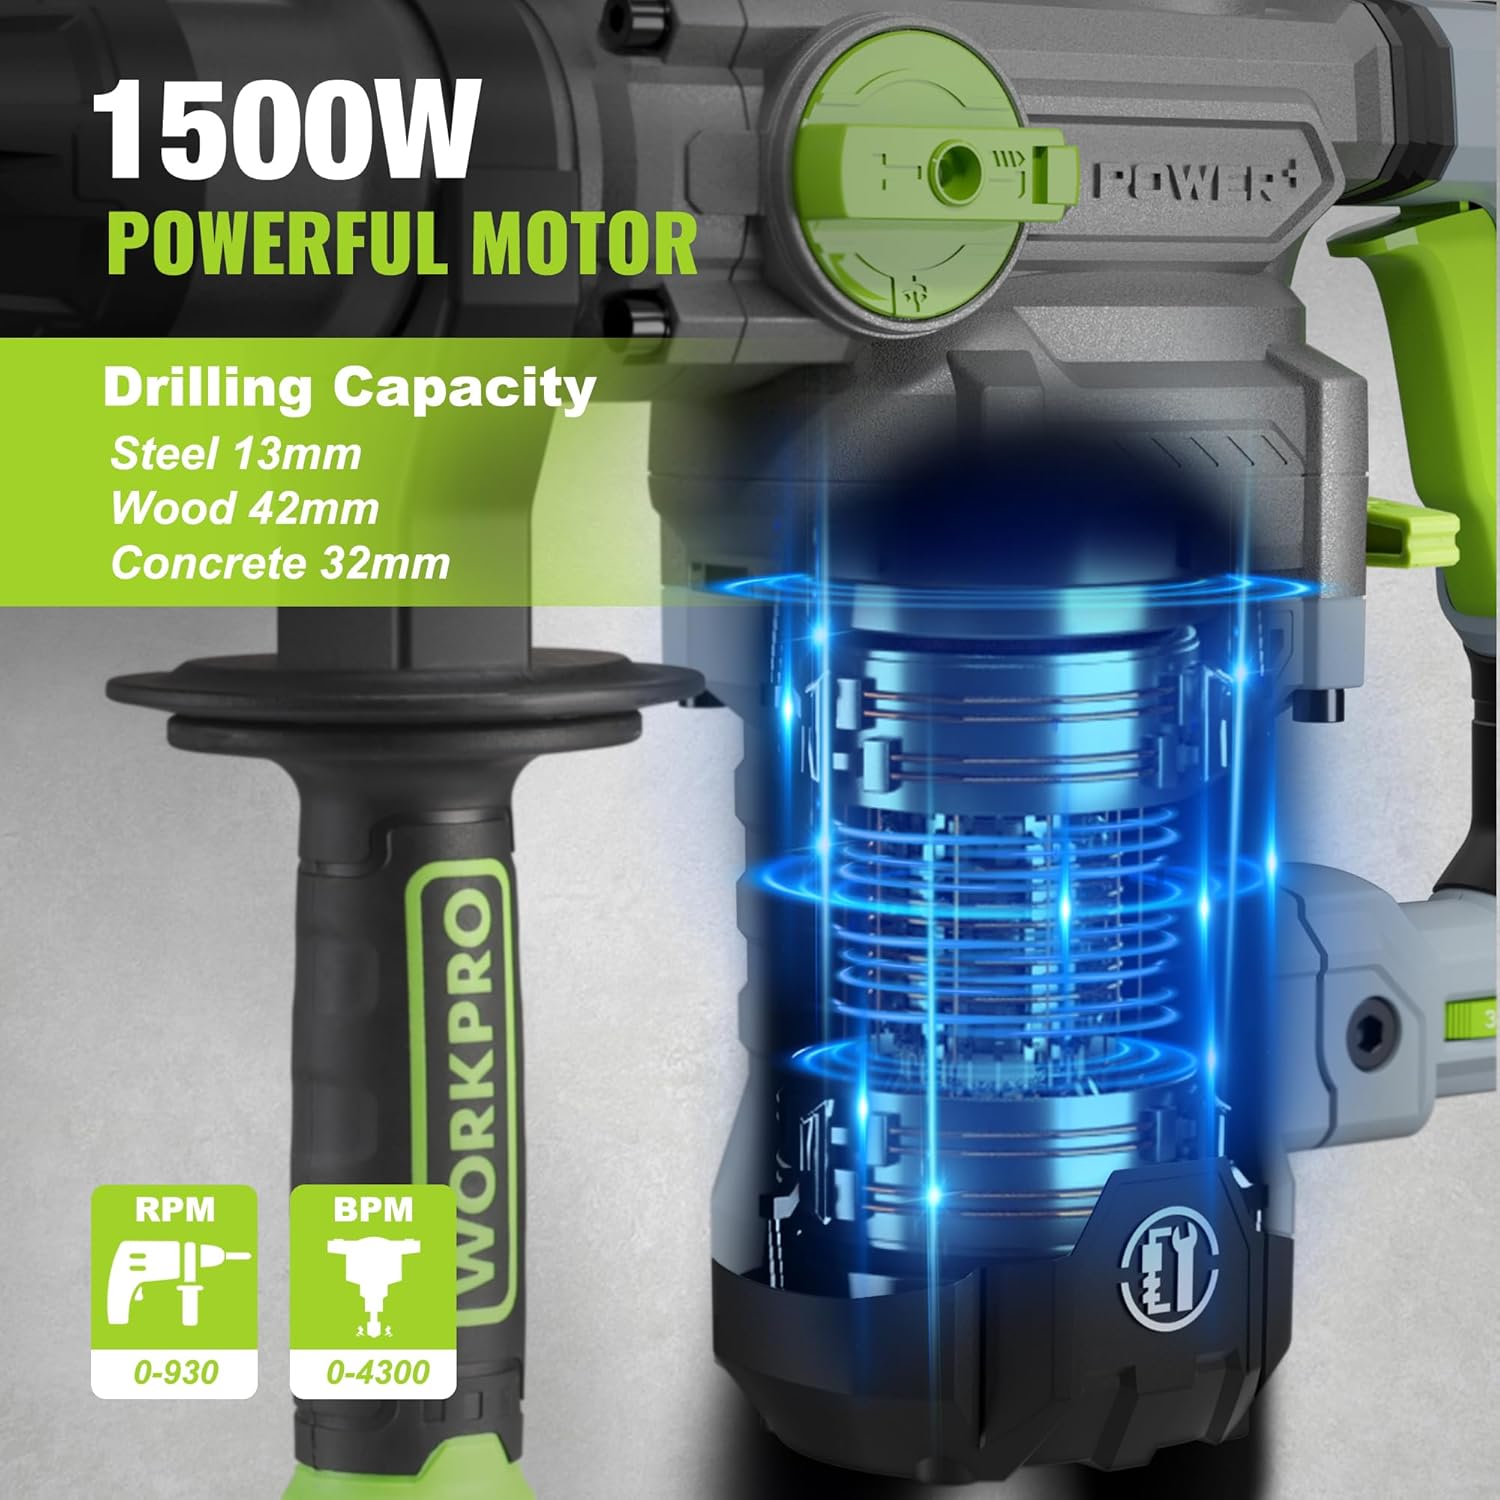
Image 5.3: The 1500W motor provides sufficient power for drilling in steel, wood, and concrete.
5.4 Toepassing Exampde

Image 5.4: The tool is suitable for various tasks including chiseling concrete, removing tiles, concrete drilling, and floor breaking.
6. Onderhoud
Regelmatig onderhoud zorgt ervoor dat uw gereedschap lang meegaat en optimaal presteert.
6.1 Reinigen
- Koppel het gereedschap altijd los van de stroomvoorziening voordat u het schoonmaakt.
- Reinig de ventilatieopeningen regelmatig om oververhitting te voorkomen.
- Veeg de gereedschapsbehuizing af met een zachte, damp lap. Gebruik geen agressieve chemicaliën of schurende schoonmaakmiddelen.
- The tool features a dust-proof design and anti-dust bottom structure to extend its service life.
6.2 Grease Replenishment
To maintain optimal performance and durability, replenish the grease every 30-40 hours of cumulative use.
- Use the provided wrench to open the grease pot.
- Apply the advanced lubricant (grease) as instructed.
- Securely close the grease pot after replenishment.
Image 6.1: Instructions for grease replenishment using the provided spanner and grease.
6.3 Vervanging van de koolborstels
Carbon brushes are wear parts and should be checked periodically. Replace them when they are worn down to their limit to ensure consistent motor performance.
7. Probleemoplossing
In dit gedeelte worden veelvoorkomende problemen besproken. Voor problemen die hier niet worden vermeld, kunt u contact opnemen met de klantenservice.
| Probleem | Mogelijke oorzaak | Oplossing |
|---|---|---|
| Tool start niet | Geen stroomtoevoer; Defecte schakelaar; Versleten koolborstels | Check power connection; Test switch; Replace carbon brushes |
| Verminderde boorprestaties | Dull drill bit; Incorrect mode selected; Insufficient grease | Replace or sharpen drill bit; Select correct mode; Replenish grease |
| Overmatige trillingen/geluid | Loose components; Damaged bit; Internal issue | Check all connections; Replace bit; Contact service center |
| Oververhitting | Verstopte ventilatieopeningen; Langdurig intensief gebruik | Clean ventilation slots; Allow tool to cool down |
8. Technische specificaties
| Functie | Specificatie |
|---|---|
| Modelnummer | W125244A |
| Ingangsvolumetage | 230-240V |
| Frequentie | 50Hz |
| Nominaal ingangsvermogen | 1500 W |
| Snelheid zonder belasting | 0-930 rpm ±10% |
| Impactfrequentie | 0-4300 bpm ±10% |
| Single Impact Force | 5.5 J |
| Boorcapaciteit (Beton) | 32mm |
| Boorcapaciteit (Hout) | 42mm |
| Boorcapaciteit (staal) | 13mm |
| Type boorkop | SDS-plus |
| Productafmetingen (L x B x H) | 38.6x10.4x26.4cm |
| Gewicht | 8.34 kg |
| Energiebron | Elektrische kabel |
| Aantal versnellingen | 6 (Variable Speed) |
9. Garantie- en ondersteuningsinformatie
For warranty details, product support, or service inquiries, please refer to the warranty card included with your purchase or contact WORKPRO customer service directly. Keep your proof of purchase for any warranty claims.