
1. Inleiding
This manual provides detailed instructions for the installation, operation, and maintenance of your Roca VICTORIA PLUS A5A2J18C00 Thermostatic Bath-Shower Column. Please read this manual thoroughly before installation and use to ensure proper function and safety. Keep this manual for future reference.

Figure 1: Roca VICTORIA PLUS A5A2J18C00 Thermostatic Bath-Shower Column
2. Veiligheidsinformatie
- Zorg ervoor dat alle watertoevoerleidingen zijn afgesloten voordat u met de installatie begint.
- Als u over een bepaald onderdeel van het installatieproces twijfelt, raadpleeg dan een gekwalificeerde loodgieter.
- Gebruik geen schurende reinigingsmiddelen of agressieve chemicaliën op het product, aangezien dit de afwerking kan beschadigen.
- Controleer regelmatig op lekkages en verhelp deze zo snel mogelijk om waterschade te voorkomen.
- The thermostatic mixer is designed to maintain a constant water temperature. Do not tamper with the factory settings unless necessary and with caution.
3. Inhoud van het pakket
Controleer vóór de installatie of alle onderdelen aanwezig en onbeschadigd zijn:
- Thermostatische mengkraan
- Adjustable height shower column (1295 mm to 1670 mm)
- Overhead shower head (ø 245 mm)
- Hand shower (ø 100 mm, 3 functions)
- 1.7 m metallic flexible hose
- Shower column mounting kit
4. Specificaties
| Functie | Specificatie |
|---|---|
| Modelnummer | A5A2J18C00 |
| Merk | Rots |
| Materiaal | Metaal |
| Kleur/afwerking | Chroom |
| Montagetype | Muurbevestiging |
| Verstelbare hoogte | 1295 mm tot 1670 mm |
| Diameter van de hoofddouche | ø245mm |
| Diameter van de handdouche | ø 100 mm (3 functions) |
| Slanglengte | 1.7 minuten |
| Aantal handgrepen | 1 |
| Productafmetingen | 128.5x53.5x137cm |
| Productgewicht | 6.16 kg |
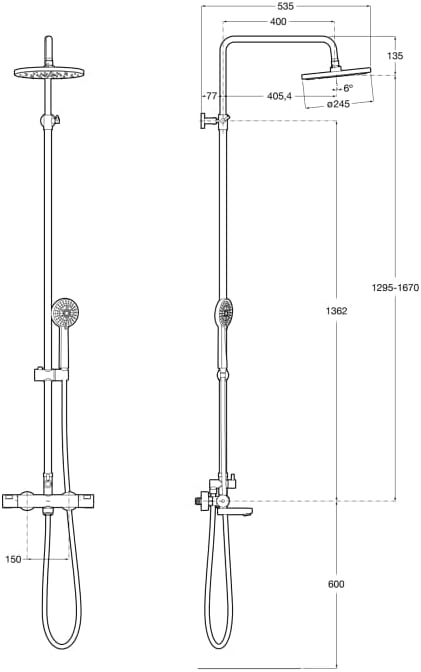
Afbeelding 2: Technische tekening met belangrijke afmetingen voor de installatie.
5. Installatie
Professional installation is recommended. Ensure you have all necessary tools and safety equipment before proceeding.
5.1. Bereid het installatiegebied voor
- Turn off the main water supply to your bathroom.
- Verwijder alle bestaande doucheaccessoires.
- Clean the wall surface where the shower column will be mounted.
5.2. Mount the Thermostatic Mixer
- Install the eccentric connectors into the wall water outlets. Ensure they are securely tightened and properly aligned.
- Attach the decorative escutcheons over the eccentric connectors.
- Connect the thermostatic mixer to the eccentric connectors. Ensure the hot water inlet (marked red) and cold water inlet (marked blue) are correctly aligned. Tighten the nuts using a wrench, protecting the finish with a cloth.
5.3. Install the Shower Column
- Attach the lower part of the shower column to the top outlet of the thermostatic mixer.
- Assemble the adjustable height mechanism onto the main column.
- Mark the position for the upper wall bracket on the wall, ensuring the column is vertical and at the desired height.
- Drill holes at the marked positions, insert wall plugs, and secure the upper wall bracket.
- Secure the shower column to the upper wall bracket using the provided screws and Allen key.
5.4. Attach Shower Components
- Screw the overhead shower head onto the shower arm. Ensure a watertight seal.
- Connect the metallic flexible hose to the hand shower and the outlet on the thermostatic mixer.
- Place the hand shower into its adjustable holder on the column.
6. Bediening
6.1. Thermostatic Mixer
- Temperatuurregeling: The right handle controls the water temperature. Push the safety button and turn to adjust above 38°C.
- Stroomregeling: The left handle controls the water flow and diverts water between the overhead shower, hand shower, and bath filler (if applicable).
6.2. Hand Shower Functions
The hand shower features 3 spray functions. Rotate the shower head face to switch between spray patterns.
6.3. Adjustable Height and Angle
- The hand shower holder can be adjusted up or down the column and tilted to your preferred angle.
- The overhead shower head can be tilted and swiveled to adjust the spray direction.
7. Onderhoud
7.1. Schoonmaken
- Reinig de chroomoppervlakken regelmatig met een zachte doek en milde zeep of een niet-schurend reinigingsmiddel dat speciaal is ontwikkeld voor badkamerarmaturen.
- Avoid using abrasive sponges, scouring pads, or harsh chemical cleaners, as these can damage the finish.
- For shower heads, periodically rub the silicone nozzles to dislodge any limescale buildup.
7.2. Limescale Removal
In hard water areas, limescale can build up. Use a descaling solution suitable for bathroom fixtures, following the manufacturer's instructions. Rinse thoroughly after cleaning.
8. Probleemoplossing
| Probleem | Mogelijke oorzaak | Oplossing |
|---|---|---|
| Geen waterstroom of lage druk | Water supply off, clogged filters, kinked hose | Check water supply, clean filters in the mixer, straighten hose. |
| Watertemperatuur fluctueert | Inconsistent hot/cold water supply, thermostatic cartridge issue | Check water heater, consult a professional for cartridge inspection. |
| Lekken van verbindingen | Losse verbindingen, beschadigde afdichtingen | Tighten connections, replace seals/washers if damaged. |
| Shower head/hand shower spray uneven | Limescale buildup in nozzles | Clean nozzles by rubbing or using a descaling solution. |
9. Garantie en ondersteuning
For warranty information and customer support, please refer to the documentation provided with your purchase or visit the official Roca webwebsite. Bewaar uw aankoopbewijs voor garantieclaims.