Invoering
This manual provides detailed instructions for the installation, operation, and maintenance of your CASAINC M6628-A-10-BN Brushed Nickel Wall Mounted Shower System. Please read this manual thoroughly before installation and use to ensure proper function and longevity of the product.
The shower system features a 2-function 10-inch dual shower head, a height-adjustable sliding rod with a handheld shower, and a CUPC certified pressure-balancing valve designed to prevent scalding.
Veiligheidsinformatie
- The shower system is equipped with a CUPC certified valve that monitors water pressure balance. This feature protects against sudden temperature changes caused by fluctuations in hot or cold water pressure, reducing the risk of scalding.
- The system utilizes American standard 1/2 inch NPT threads, ensuring compatibility with most standard U.S. plumbing connections.
- Ensure all connections are properly sealed to prevent leaks. Professional installation is recommended.
Inhoud van het pakket
Your CASAINC M6628-A-10-BN shower system includes the following components:
- 10-inch Square Rainfall Shower Head
- Douche arm
- Handdouche
- 59-inch Stainless Steel Shower Hose
- Sliding Rod with Adjustable Holder
- Pressure Balanced Valve with Trim Kit
- Installatiehardware

Image: All components of the CASAINC Brushed Nickel Shower System, including the square rainfall shower head, handheld shower, sliding rod, valve, and hose.
Specificaties
| Functie | Detail |
|---|---|
| Merk | CASAINC |
| Modelnummer | M6628-A-10-BN |
| Kleur | Geborsteld nikkel |
| Materiaal | Messing, roestvrij staal |
| Afwerkingstype | Geborsteld |
| Aantal handgrepen | 1 |
| Montagetype | Muurbevestiging |
| Hoofdmaat | 10 inch |
| Productafmetingen | 27.95 x 12.6 x 6.5 inch |
| Artikelgewicht | 12.67 pond |
| Certificeringen | CUPC Certified |
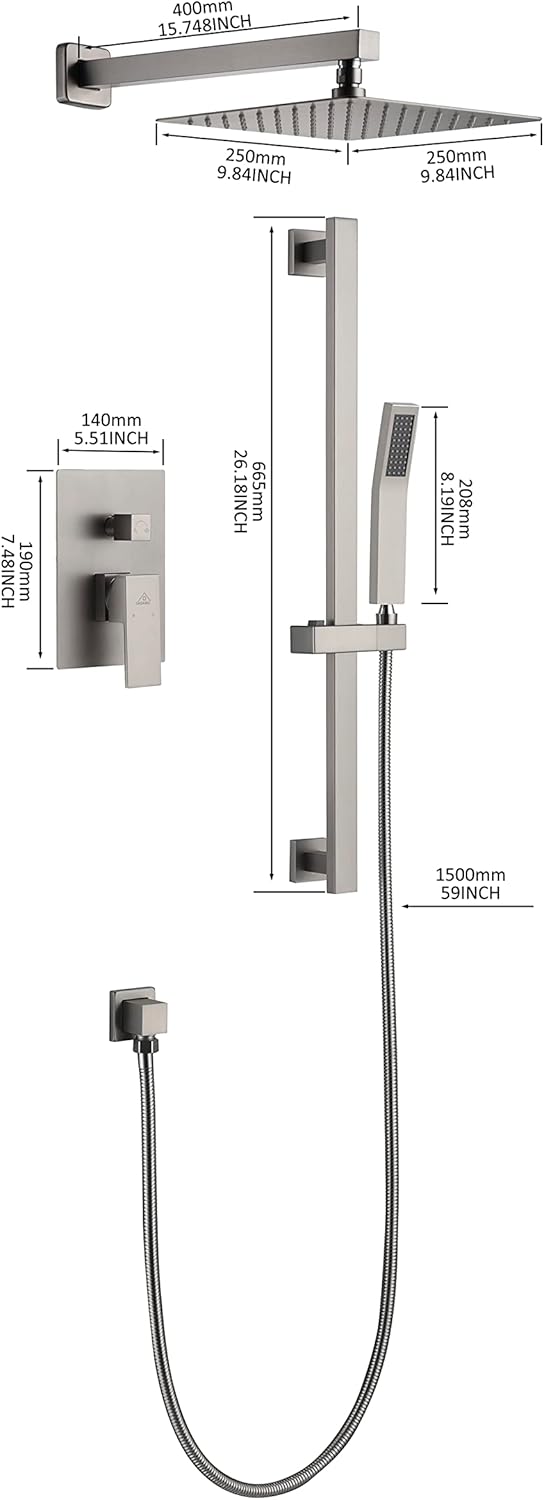
Image: Diagram showing the dimensions of the shower head, shower arm, valve trim, handheld shower, and sliding rod.
Instellen en installeren
Professional installation is recommended for this shower system. Refer to the general installation video and the included instruction manual for detailed steps.
Benodigde gereedschappen:
- Plumber's Putty
- Moersleutel
- Sleufschroevendraaier
- Elektrische boormachine
Installatiestappen voorbijview:
- Voorbereiding: Ensure the main body of the valve is correctly embedded in the wall. If the handle knob cannot be used because the main body is embedded too deeply, adjustments are required.
- Outline Panel: Use a pencil to draw an outline of the panel along its edge on the wall tile.
- Componenten verwijderen: Carefully remove the handle, diverter knob, and panel from the valve body.
- Opening snijden: Use a cutter to cut along the outlined lines of the panel. Exercise caution to avoid cutting into the inside of the pipe and valve body.
- Install Panel: Trap the panel into the wall and install the water distribution knob and handle.
- Gaten dichten: After the panel is embedded, fix any gaps between the panel and the brick surface with glass glue.

Image: Diagram illustrating the hot water, cold water, rainfall showerhead, and handheld shower connections to the G 1/2 NPT pressure balanced valve with a 2-way diverter.
Installatie video:
Video: General installation guide for a square shower valve. Please note that the model shown in the video may differ from your specific product, but the connection type and installation steps are generally the same. Always refer to your actual product and the installation instructions provided in the package.
Gebruiksaanwijzing
Waterstroomregeling:
- The main handle controls water flow and temperature. Rotate the handle to adjust temperature and lift/lower to adjust flow intensity.
Functie Selectie:
- The diverter knob allows you to switch between the 10-inch rainfall shower head and the handheld shower.
Adjusting the Handheld Shower:
- The handheld shower is connected to a 59-inch stainless steel hose for flexible use.
- The sliding rod allows for height adjustment of the handheld shower. Press the button on the holder to slide it up or down to your desired height.
- The handheld shower holder can also be rotated 360 degrees to adjust the shower angle.

Image: Illustration of the two shower functions: handheld and rainfall.
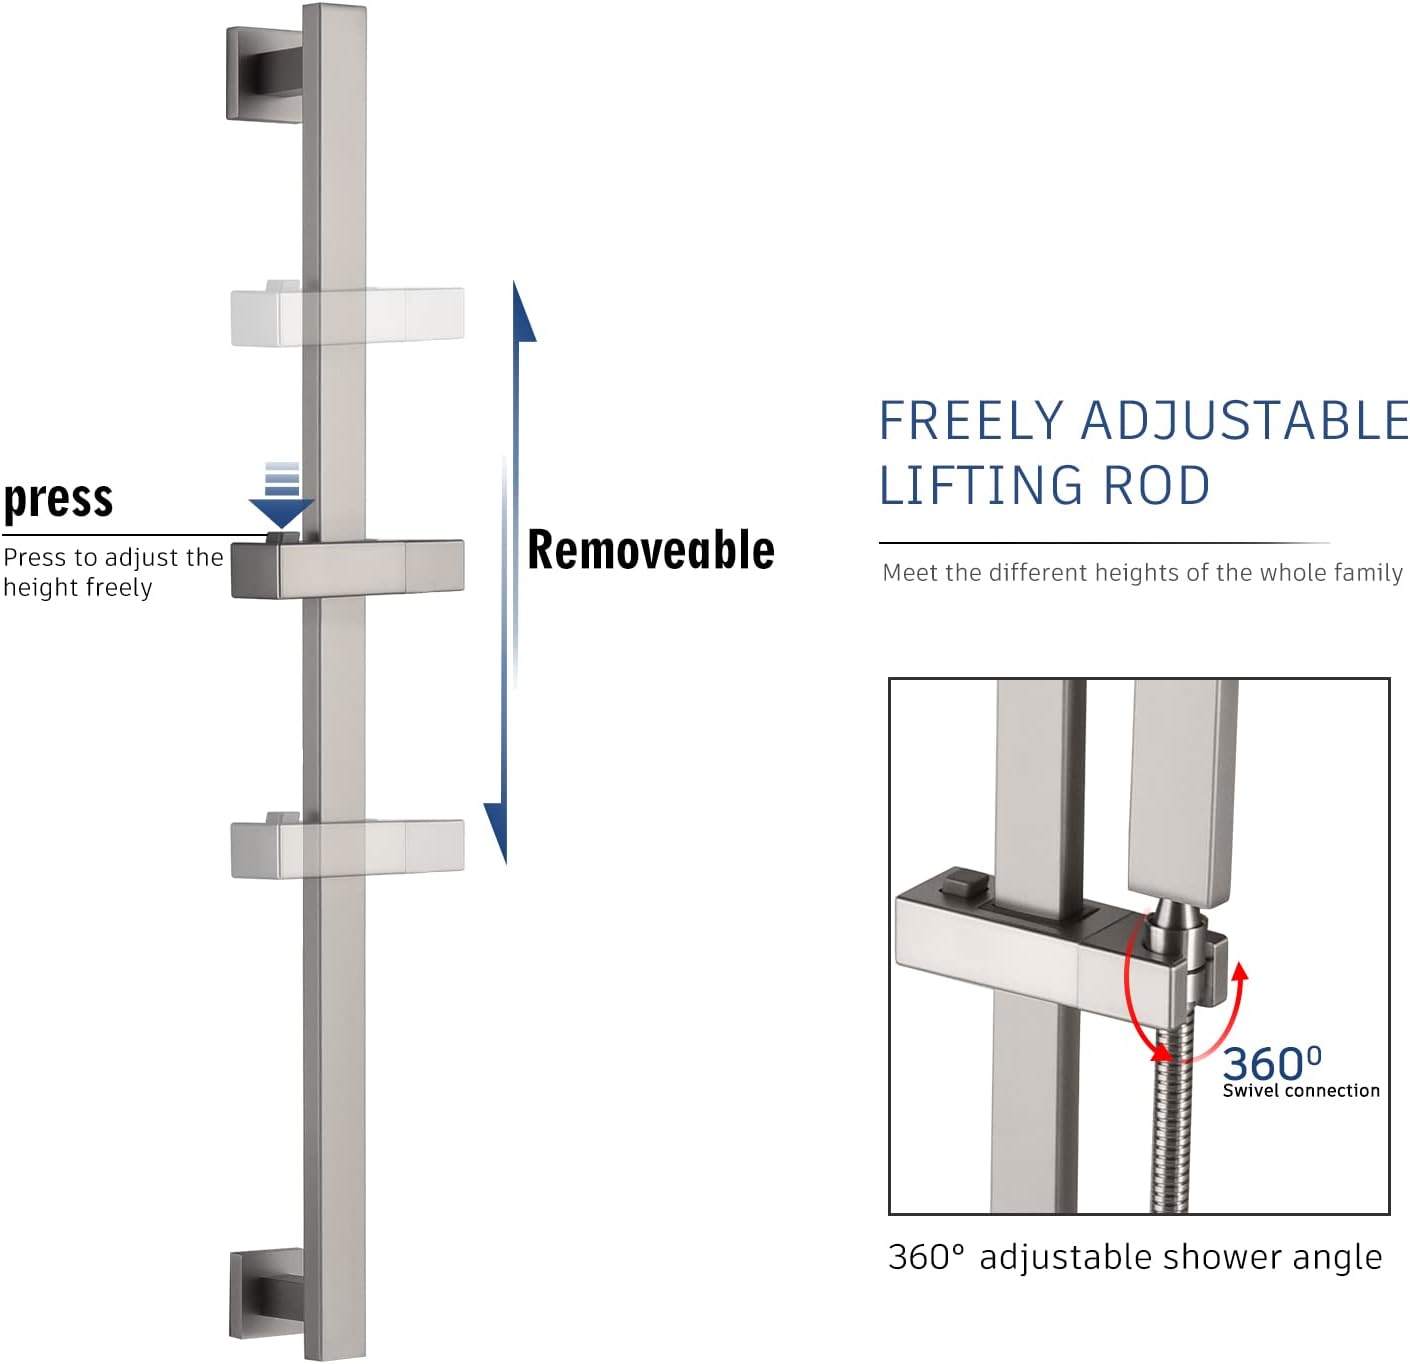
Image: The freely adjustable lifting rod for the handheld shower, demonstrating how to press a button to adjust height and the 360-degree adjustable shower angle.
Onderhoud
Regular maintenance helps preserve the finish and functionality of your shower system.
- Reinigingssproeiers: The stainless steel handheld shower and top shower are equipped with easy-to-clean rubber nozzles. Gently rub the nozzles to remove mineral buildup and prevent clogs.
- Afwerking Zorg: The advanced electroplating coating technology ensures durability and resistance to fading and spots. Clean the surface with a soft, damp doek en milde zeep. Vermijd schurende reinigingsmiddelen, agressieve chemicaliën of schuursponsjes, omdat deze de afwerking kunnen beschadigen.
- Keramische patroon: The CUPC certified ceramic cartridge is designed for long-lasting, leak-free operation.

Afbeelding: Close-up view of the shower head, highlighting the 360-degree swivel connection and self-cleaning silicone jet nozzles.

Image: A CUPC certified ceramic cartridge, indicating its durability and leak-free operation, lasting 2X longer than industry standard.
Probleemoplossing
- Lage waterdruk: If water pressure is low, check for clogs in the shower head nozzles. Clean the rubber nozzles as described in the Maintenance section. Ensure your home's water supply has adequate pressure. Note that if overall water pressure is low, one of the shower functions may experience reduced flow.
- Temperatuurschommelingen: The CUPC certified pressure-balancing valve is designed to prevent sudden temperature changes. If you experience significant fluctuations, ensure the hot and cold water supply lines are correctly connected and that there are no blockages in the system.
- Lekken: Check all connections for tightness. If leaks persist, professional assistance may be required to inspect internal seals or the cartridge.
Garantie-informatie
CASAINC offers a Lifetime-Limited-Maintenance warranty on this shower system. This warranty covers free replacement of accessories or products for non-human quality problems. Please retain your proof of purchase for warranty claims.
Klantenservice
Our dedicated customer support team is available 24/7 to assist you with any questions or concerns. For quick and professional assistance regarding consultation, logistics, installation, or missing items, please reach out to us by clicking the order details page on your purchase platform.