1. Inleiding
Bedankt voor uw aankoopasing the IRRADIO VDP-4600HDW LCD/LED Projector. This manual provides essential information for the safe and efficient operation of your device. Please read it thoroughly before use and retain it for future reference.
2. Veiligheidsinstructies
- Blokkeer de ventilatieopeningen niet. Zorg voor voldoende luchtcirculatie rond de projector om oververhitting te voorkomen.
- Kijk niet rechtstreeks in de projectorlens als de lamp is aan, omdat het felle licht oogbeschadiging kan veroorzaken.
- Houd de projector uit de buurt van water of andere vloeistoffen. Gebruik de projector niet in droge omstandigheden.amp of natte omstandigheden.
- Gebruik uitsluitend de stroomadapter die bij de projector is geleverd.
- Probeer de projector niet zelf te repareren. Laat alle onderhoudswerkzaamheden over aan gekwalificeerd personeel.
- Plaats de projector op een stabiele, vlakke ondergrond om te voorkomen dat hij omvalt.
3. Inhoud van het pakket
Controleer of alle artikelen in uw pakket aanwezig zijn:
- IRRADIO VDP-4600HDW Projector
- Afstandsbediening
- Stroomkabel
- HDMI-kabel
- AV-kabel
- Gebruiksaanwijzing
4. Product voorbijview
4.1. Projectorcomponenten

Figuur 4.1: Algemeen view of the IRRADIO VDP-4600HDW Projector. This image displays the projector from an angled perspective, highlighting its compact design and the lens on the front left side, with ventilation grilles and control buttons visible on the top and sides.

Figuur 4.2: Voorkant view of the projector. This image focuses on the large projection lens on the left, with the IRRADIO logo and ventilation grilles on the right side of the front panel.

Figuur 4.3: Achterkant view of the projector. This image shows the VGA port, focus adjustment knob, and keystone correction knob on the rear panel, along with additional ventilation.
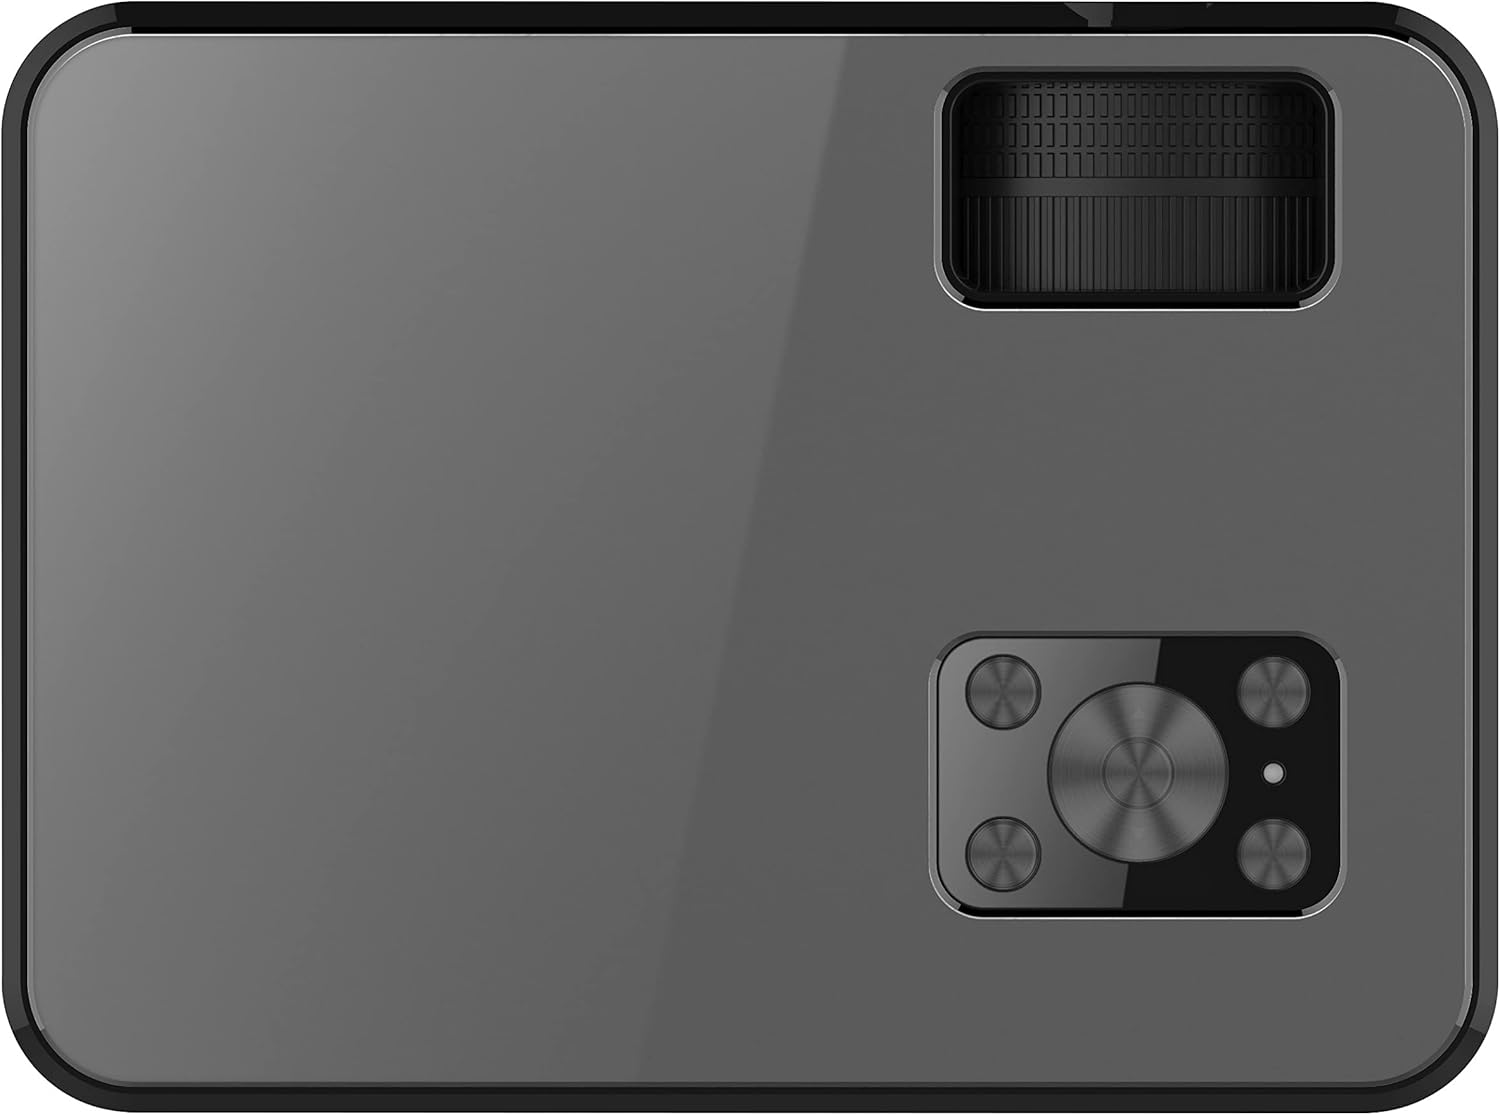
Figuur 4.4: Bovenkant view of the projector. This image displays the control panel with navigation buttons (up, down, left, right, OK), source, menu, and exit buttons, along with the power button and volume controls.

Figuur 4.5: Kant view of the projector showing input/output ports. This image highlights two HDMI ports, AV input, two USB ports, and a 3.5mm headphone jack (audio out).

Figuur 4.6: Tegenoverliggende zijde view of the projector. This image shows the power input port and additional ventilation grilles.

Figuur 4.7: Onderkant view of the projector. This image displays the mounting points for ceiling installation and rubber feet for stable placement on a flat surface.
4.2. Afstandsbediening
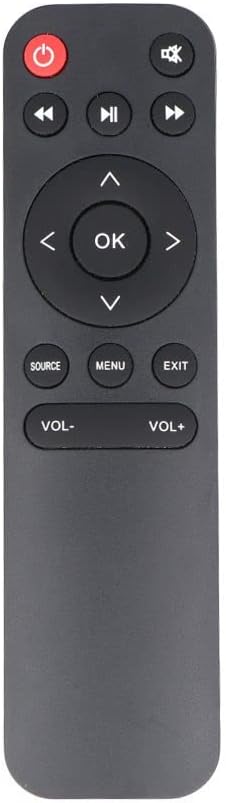
Figuur 4.8: The remote control for the IRRADIO VDP-4600HDW Projector. It features buttons for power, mute, navigation (up, down, left, right, OK), source selection, menu, exit, and volume control.
4.3. Ports and Controls Overview
- Aan/uit-knop: Schakelt de projector in/uit.
- Lens: Projecteert het beeld.
- Scherpstelring: Past de helderheid van het beeld aan.
- Keystone-correctie: Corrigeert beeldvervorming.
- HDMI-poorten (x2): Connect to HDMI-enabled devices (laptops, gaming consoles, Blu-ray players).
- USB-poorten (x2): Sluit USB-sticks aan om media af te spelen.
- VGA-poort: Aansluiten op computers met VGA-uitgang.
- AV-poort: Connect to older devices using composite video.
- 3.5 mm audio-uitgang: Sluit externe luidsprekers of een hoofdtelefoon aan.
- IR ontvanger: Voor signalen voor afstandsbediening.
5. Instellen
5.1. Plaatsing
Place the projector on a stable, flat surface or mount it to the ceiling. Ensure the projector is positioned directly in front of the projection screen or wall. The optimal projection distance ranges from 1.52 meters to 3.48 meters, yielding a screen size between 50 and 120 inches.
- Frontprojectie: Place the projector in front of the screen.
- Achterprojectie: Plaats de projector achter een doorschijnend scherm.
- Plafondmontage: The projector can be inverted and mounted to the ceiling. Adjust settings in the OSD menu for inverted projection.
5.2. Stroomaansluiting
- Sluit het netsnoer aan op de stroomaansluiting van de projector.
- Plug the other end of the power cable into a standard electrical outlet (220V AC, 50Hz).
- Druk op de aan/uit-knop op de projector of afstandsbediening om deze in te schakelen.
5.3. Scherpstelling en Keystone-aanpassing
- Zet de projector aan en geef een beeld weer.
- Draai de Scherpstelring (located near the lens) until the image appears sharp and clear.
- Pas de Keystone Correctie knob (located on the rear panel) to correct any trapezoidal distortion, making the image rectangular.
6. In bedrijf
6.1. Aan/uit
Druk op de aan/uit-knop op de projector of op de afstandsbediening om het apparaat in of uit te schakelen.
6.2. Selectie ingangsbron
Druk na het inschakelen op de BRON button on the remote control or the projector's control panel to cycle through available input sources (HDMI1, HDMI2, USB1, USB2, VGA, AV).
6.3. Externe apparaten aansluiten
- HDMI: Connect an HDMI cable from your device (e.g., laptop, game console) to one of the projector's HDMI ports. Select the corresponding HDMI input.
- VGA: Connect a VGA cable from your computer to the projector's VGA port. Select the VGA input.
- AV: Use the provided AV cable to connect to devices with composite video output. Select the AV input.
- USB-poort: Insert a USB flash drive into a USB port. The projector's media player interface will appear automatically or can be accessed via the source menu.
6.4. Media afspelen (USB)
The integrated media player supports various formats:
- Afbeeldingsformaten: JPEG, BMP, PNG, MPO
- Videoformaten: MPEG1, MPEG2, H.263, H.264, AVS, MJPEG, RV30, RV40, HEVC
- Audioformaten: MPEG1, MPEG2, LPCM, MP3
Navigeren door files using the remote control's arrow keys and press OK selecteren.
6.5. Wireless Audio Connection
The projector features an integrated wireless audio function for connecting to external audio devices. Refer to the on-screen display (OSD) menu for specific pairing instructions. Typically, you will need to enable the wireless audio feature in the projector's settings and then pair it with your desired external speaker or headphone.
7. Onderhoud
7.1. Lensreiniging
Use a soft, lint-free cloth and a specialized lens cleaning solution to gently wipe the lens. Avoid abrasive materials or excessive pressure.
7.2. Reiniging van het stoffilter
Regularly check and clean the dust filters to ensure optimal airflow and prevent overheating. Use a soft brush or a vacuum cleaner with a brush attachment to remove dust from the ventilation grilles.
7.3. Opslag
When not in use for extended periods, store the projector in a cool, dry place, protected from dust and direct sunlight. Use the original packaging or a protective case.
8. Probleemoplossing
- Geen stroom: Zorg ervoor dat de stroomkabel goed is aangesloten en dat het stopcontact werkt.
- Geen afbeelding: Check the input source selection. Ensure the connected device is powered on and sending a signal. Verify cable connections.
- Wazig beeld: Adjust the focus ring. Ensure the projection distance is within the optimal range.
- Vervormd beeld: Pas de keystone-correctie aan.
- Geen geluid: Check the volume settings on both the projector and the connected device. If using external speakers, ensure they are properly connected or paired via wireless audio.
- Afstandsbediening werkt niet: Replace the batteries. Ensure there are no obstructions between the remote and the projector's IR receiver.
9. Specificaties
| Functie | Specificatie |
|---|---|
| Projectiesysteem | LCD panel with LED light source |
| Oorspronkelijke resolutie | 1920x1080 (Full HD 1080p) |
| Dynamische contrastverhouding | 2000:1 |
| Helderheid van de lichtbron | 3000 Lumen |
| LED Lamp Leven | 50,000 uur |
| Lens | Handmatige scherpstelling |
| Draadloze audiofunctie | Geïntegreerd |
| Connectiviteit | 2x HDMI, 2x USB, VGA, AV Composite, 3.5mm Headphone Jack (output) |
| Beeldverhouding | 16:9 Native / 4:3 Compatible |
| Optimale projectiegrootte | 50" - 120" |
| Optimale projectieafstand | 1.52 m tot 3.48 m |
| Projectiemodi | Front, Rear, Ceiling (Front/Rear) |
| Geluid | 1x 3W Hi-Fi Speaker |
| Koelsysteem | Dubbel koelsysteem |
| OSD-taal | 23 talen |
| Stroomvoorziening | 220V AC 50Hz (single phase) |
| Gewicht | 1.4 kg |
| Afmetingen (B x H x D) | 222x91x173mm |
10. Garantie en ondersteuning
Information regarding specific warranty terms and support contacts is not available in the provided product data. Please refer to the product packaging or the retailer's website voor garantiedetails en informatie over klantenondersteuning.


