
1. Inleiding
This manual provides essential instructions for the safe installation, operation, and maintenance of your OOYCYOO 100A MPPT Solar Charge Controller. Please read this manual thoroughly before installation and use to ensure optimal performance and longevity of the product. Keep this manual for future reference.
Veiligheidsmaatregelen
- Zorg ervoor dat alle bedrading correct is aangesloten en vastgezet om kortsluiting of schade te voorkomen.
- Sluit altijd eerst de accu aan, dan het zonnepaneel en als laatste de belasting. Ontkoppelen in omgekeerde volgorde.
- Do not attempt to repair or modify the controller yourself. Contact qualified personnel for service.
- Installeer de controller op een goed geventileerde plaats, uit de buurt van brandbare materialen en direct zonlicht.
- Draag tijdens de installatie de juiste persoonlijke beschermingsmiddelen (PBM's), waaronder oogbescherming en geïsoleerde handschoenen.
2. Product voorbijview
The OOYCYOO 100A MPPT Solar Charge Controller is designed to efficiently manage power from your solar panels to charge various battery types, including 12V, 24V, 36V, and 48V systems. It features advanced Maximum Power Point Tracking (MPPT) technology for high conversion efficiency.
Belangrijkste kenmerken:
- Automatic identification of 12V/24V/36V/48V DC system voltage.
- High maximum power tracking rate (≥99%) and conversion rate (>99%).
- Compatible with multiple battery types: USER (customizable), Flooded, Sealed, Gel, and Lithium (LiFePO4, Li(NiCoMn)O2).
- Programmable settings for absorption voltage, zwevende voltage, en laag voltage ontkoppelen.
- Integrated LCD display showing charge amount (KWH) and other operational data.
- Comprehensive protection functions: PV over current/power, PV short circuit, PV reverse polarity, night reverse charging, battery reverse polarity, battery over voltage, battery over discharge, battery overheating, controller overheating, lithium battery low temperature, load short circuit, load overload, TVS high voltage transiënten.
- Built-in cooling fan for efficient heat dissipation, activating when temperature >45℃ and deactivating when <40℃.
- USB 5V 2A charging ports.
Component identificatie:

Figuur 1: Voor- en achterkant view of the OOYCYOO 100A MPPT Solar Charge Controller, showing the LCD display and connection terminals.

Figuur 2: Gedetailleerd view of the controller's connection terminals, including Solar Panel, Battery, Load, Remote Temp Sensor, and USB ports.
3. Specificaties
| Parameter | Waarde |
|---|---|
| Nominale laadstroom | 100A |
| Systeem Nominale Voltage | 12V/24V/36V/48V DC Auto Identifying |
| Maximaal PV Open Circuit Voltage | 150V DC |
| 12V System Max. PV Input Power | 1300W (Voc ≤96V) |
| 24V System Max. PV Input Power | 2600W (Voc ≤112V) |
| 36V System Max. PV Input Power | 3800W |
| 48V System Max. PV Input Power | 5000W (Voc ≤150V) |
| MPPT Best Working Voltage Range (12V) | DC18V-DC96V |
| MPPT Best Working Voltage Range (24V) | DC36V-DC112V |
| MPPT Best Working Voltage Range (48V) | DC72V-DC150V |
| Maximum DC/DC Transfer Efficiency | 98.7% |
| Power Terminal Wire Gauge | 10 AWG |
| Afmetingen (L x B x H) | 12 cm x 7.8 cm x 3.2 cm |
| Gewicht | 9.5 kg (4.3 lbs) |
| Bedrijfstemperatuur | Up to 40℃ (Fan operates above 45℃) |
| Materiaal | Metaal |
| Weergavetype | LCD |
| USB-uitgang | 5V 2A |
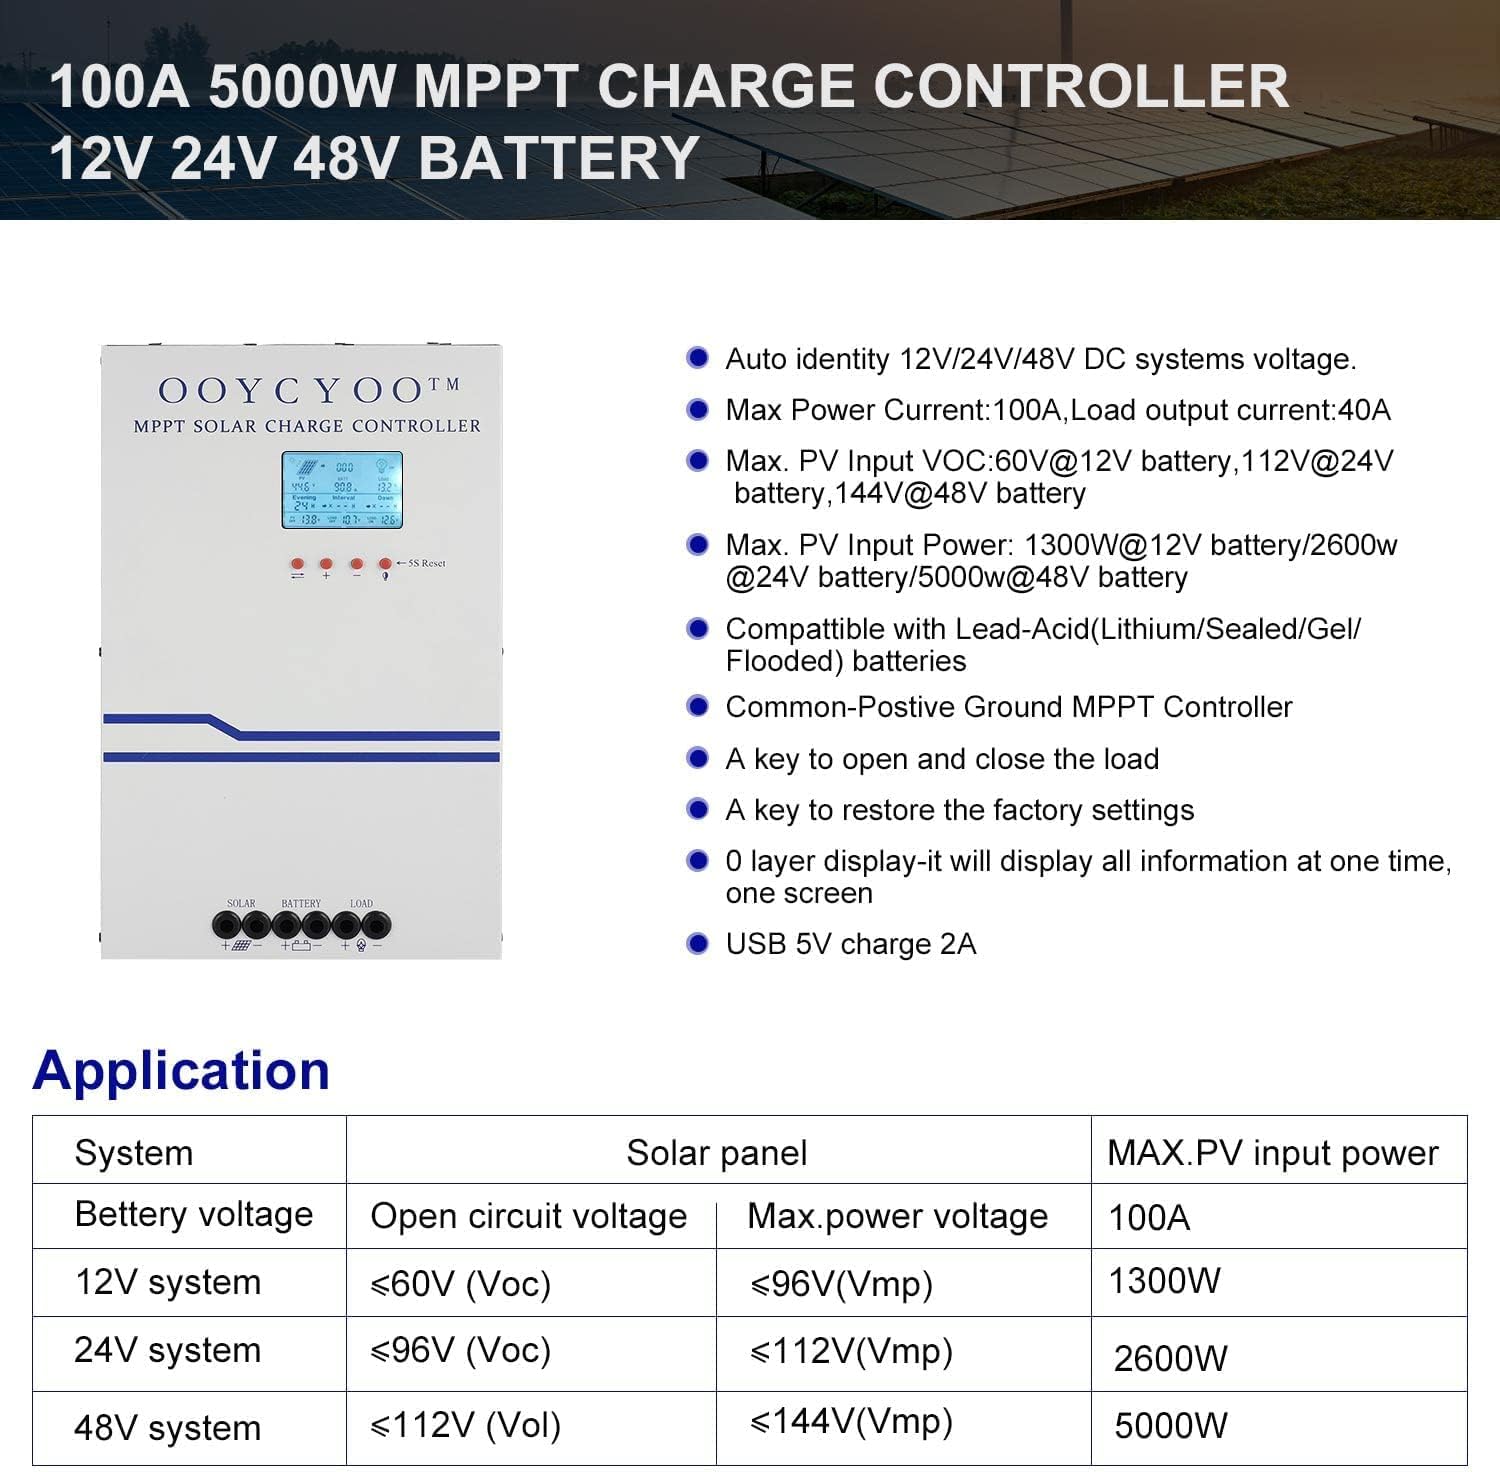
Figuur 3: Application table detailing solar panel input requirements for different system voltagen.
4. Installatie en installatie
Proper installation is crucial for the safe and efficient operation of your solar charge controller. Refer to Figure 2 for terminal identification.
Installatiestappen:
- Montage: Choose a dry, well-ventilated location, protected from direct sunlight, high temperatures, and moisture. Ensure adequate clearance around the controller for air circulation, especially for the cooling fan. Use the mounting holes provided to secure the controller to a stable surface.
- Batterijverbinding: Connect the battery cables to the battery terminals on the controller (marked with '+' and '-'). Ensure correct polarity. Connect the other end of the cables to your battery bank. Always connect the battery first.
- Aansluiting zonnepaneel: Connect the solar panel cables to the PV terminals on the controller (marked with '+' and '-'). Ensure correct polarity. Connect the other end of the cables to your solar panel array.
- Belastingsaansluiting (optioneel): If you are connecting a DC load directly to the controller, connect the load cables to the load terminals (marked with '+' and '-'). Ensure correct polarity.
- Aansluiting temperatuursensor: Connect the included temperature sensor to the designated 'TEMP SENSOR' port. Place the sensor near the battery to ensure accurate temperature compensation for charging.
- Inschakelen: Once all connections are secure and verified for correct polarity, the controller will power on and display information on the LCD screen.
Compatibele batterijtypen:
The controller supports various battery types. Ensure you select the correct battery type in the controller settings for proper charging and protection.

Figuur 4: The controller is compatible with AGM, Sealed, Gel, Flooded, and Lithium-Iron Phosphate batteries.
5. Gebruiksaanwijzing
LCD Display and Navigation:
The backlit LCD display provides real-time operational data. It directly shows the amount of charge in KWH, eliminating the need for external measuring instruments. Use the buttons below the display to navigate through menus and adjust settings.
- Navigatie knoppen: Typically, there are buttons for 'Up', 'Down', 'Enter', and 'Escape' or similar functions to browse and confirm settings.
- 5S Reset: A dedicated button or combination of buttons may be available for a 5-second reset, which can be used to restart the controller or clear certain errors.
Parameterinstellingen:
The controller allows user-programmable settings for various parameters, especially for the 'USER' battery type. Consult the on-screen menu for specific options.
- Selectie batterijtype: It is critical to select the correct battery type (AGM, Sealed, Gel, Flooded, or Lithium) to ensure proper charging algorithms and prevent battery damage. For Lithium batteries, specific voltage parameters may need to be set.
- Oplaadvolumetagzijn: For 'USER' battery types, you can customize absorption voltage, vlotter voltage, en laag voltage disconnect (LVD) thresholds. Refer to your battery manufacturer's specifications for recommended values.
- Load Timer: If a DC load is connected, you may be able to set a timer for its operation.
- Fabrieksinstellingen: A key is available to restore the factory settings if needed.
6. Onderhoud
Regular maintenance ensures the long-term reliability and performance of your solar charge controller.
- Schoonmaak: Periodically clean the exterior of the controller with a dry cloth. Ensure the ventilation openings are free from dust and debris to maintain proper airflow for cooling.
- Verbindingscontroles: Annually, inspect all wiring connections for tightness and corrosion. Loose connections can cause overheating and power loss.
- Milieu-inspectie: Ensure the installation environment remains dry and free from excessive dust or extreme temperatures.
- Firmware-updates: Controleer die van de fabrikant website periodically for any available firmware updates, though this controller may not support user updates.
7. Probleemoplossing
In dit gedeelte worden veelvoorkomende problemen besproken. Voor problemen die hier niet worden vermeld, kunt u contact opnemen met de klantenservice.
| Probleem | Mogelijke oorzaak | Oplossing |
|---|---|---|
| Controller not powering on / No display | Batterij niet aangesloten of omgekeerde polariteit; Batterijvolumetage too low; Loose battery connection. | Controleer de batterijaansluitingen en de polariteit. Zorg ervoor dat het batterijvolume correct is.tage is above the minimum operating threshold. Tighten connections. |
| No charging from solar panels | PV-panelen niet aangesloten of met omgekeerde polariteit; PV-volumetage too low/high; Shading on panels; PV short circuit. | Controleer de PV-aansluitingen en de polariteit. Zorg ervoor dat het PV-volumetage is within the controller's operating range. Remove shading. Check for PV short circuit. |
| Batterij niet volledig opgeladen | Incorrect battery type setting; Insufficient solar input; Battery degradation. | Verify battery type setting. Increase solar panel capacity or reduce load. Test battery health. |
| Laden werkt niet | Load not connected or reverse polarity; Load short circuit; Load overload; Battery low voltage disconnect (LVD) activated. | Check load connections and polarity. Check for short circuits or overloads. Charge battery. |
| Oververhitting van de controller | Poor ventilation; Excessive ambient temperature; Overload. | Ensure adequate airflow around the controller. Reduce load if possible. Relocate to a cooler environment. |
8. Garantie en ondersteuning
OOYCYOO products are manufactured to high-quality standards. Specific warranty terms and conditions are typically provided with your purchase documentation or can be found on the official OOYCYOO webplaats.
For technical support, troubleshooting assistance, or warranty claims, please contact OOYCYOO customer service through the retailer where you purchased the product or visit the official OOYCYOO webwebsite voor contactgegevens.
Please have your product model number (100A 12V 24V 36V 48V) and purchase date available when contacting support.