
1. Inleiding
This manual provides detailed instructions for the ANBERNIC RG351MP Handheld Game Console. Please read this manual thoroughly before using the device to ensure proper operation and to maximize your gaming experience. Keep this manual for future reference.
2. Veiligheidsinformatie
- Stel het apparaat niet bloot aan extreme temperaturen, direct zonlicht of hoge luchtvochtigheid.
- Zorg ervoor dat u het apparaat niet laat vallen en blootstelt aan sterke schokken.
- Houd het apparaat uit de buurt van water en andere vloeistoffen.
- Probeer het apparaat niet zelf te demonteren of te repareren. Neem contact op met geautoriseerd servicepersoneel voor hulp.
- Gebruik uitsluitend de meegeleverde oplaadkabel en adapter.
- Zorg voor voldoende ventilatie tijdens gebruik en opladen.
- This product contains a Lithium Polymer battery. Dispose of batteries responsibly according to local regulations.
3. Inhoud van het pakket
Controleer of alle artikelen in het pakket aanwezig zijn:
- 1 x RG351MP Game Console
- 1 x WIFI Module
- 1 x 64G SD Card
- 1 x USB-oplaadkabel
- 1 x Gebruikershandleiding
- 1 x Schermbeschermer
- 1 x Wipes
4. Product voorbijview
Familiarize yourself with the various components and controls of your ANBERNIC RG351MP console.
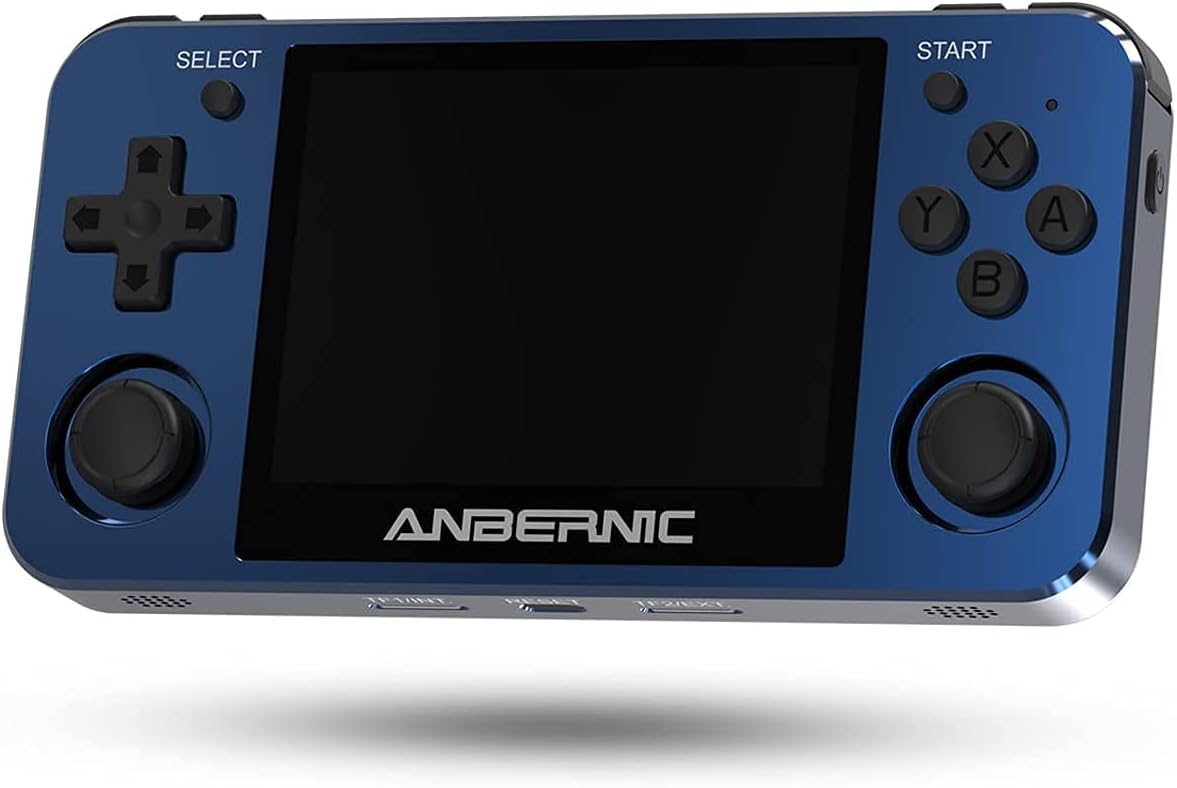
Figuur 4.1: Voorzijde View. This image displays the front of the ANBERNIC RG351MP console, featuring the 3.5-inch IPS screen, D-pad, action buttons (X, Y, A, B), SELECT and START buttons, and dual analog joysticks.

Figure 4.2: Console Layout. This image provides various angles of the console, highlighting the L1/L2/R1/R2 shoulder buttons, OTG and DC ports on the top, volume controls on the side, and TF/EXT, Reset, and TF2/EXT slots on the bottom.

Afbeelding 4.3: Terug View. The rear of the console is shown, displaying the ANBERNIC logo, model number RG351MP, and regulatory markings. This view also indicates the location of the internal Li-Po battery.

Figure 4.4: Screen Display. This image emphasizes the console's 3.5-inch IPS screen with OCA full lamination and 640x480 resolution, providing a clear visual experience.
5. Instellen
5.1 Het apparaat opladen
Before initial use, fully charge the console. Connect the provided USB charging cable to the DC port on the top of the console and the other end to a compatible USB power adapter (maximum load 2A). A full charge typically takes approximately 4 hours.
5.2 De TF-kaart plaatsen
The console supports dual TF card slots. The primary TF1/EXT slot is for the operating system and pre-installed games. The TF2/EXT slot can be used to expand storage up to 256GB for additional games.
- Locate the TF1/EXT slot on the bottom of the console.
- Gently insert the pre-installed 64GB TF card into the slot until it clicks into place.
- If using an additional TF card for games, insert it into the TF2/EXT slot.

Figure 5.1: TF Card Insertion. This image illustrates the process of inserting a TF card into the console's expansion slot, demonstrating how to properly seat the card.
5.3 In-/uitschakelen
- Inschakelen: Press and hold the Power button (located on the side) for a few seconds until the screen illuminates.
- Uitschakelen: Press and hold the Power button until the power-off menu appears, then select "Shutdown" or "Power Off". Alternatively, a quick press of the Power button may put the device into sleep mode, depending on system settings.
5.4 Connecting the WIFI Module
The console supports an external WIFI module for network connectivity. Insert the provided WIFI module into one of the OTG USB ports (located on the top of the console). Once connected, you can configure network settings within the system menu.
6. Gebruiksaanwijzing
6.1 Basisnavigatie
- D-pad / Analog Joysticks: Use these to navigate through menus and control in-game characters.
- Een knop: Confirm selection or perform primary action.
- B-knop: Go back or perform secondary action.
- X / Y Buttons: Perform specific in-game actions as defined by the game.
- Startknop: Pause game, open in-game menus, or confirm selections.
- SELECT-knop: Access system menus or perform specific in-game functions.
- L1/L2/R1/R2-knoppen: Shoulder buttons for various in-game controls.
6.2 Game Selection and Launching
From the main menu, navigate to the desired game system (e.g., PS1, GBA, NES). Select a game from the list using the D-pad or analog stick and press the A button to launch it.
6.3 Saving and Loading Game States
Most emulators support "save states" which allow you to save your progress at any point in a game, independent of the game's internal save system. Refer to the specific emulator's hotkey combinations (often a combination of SELECT + L1/R1 or similar) for saving and loading states.
6.4 Systeeminstellingen
Access the system settings menu (usually via the SELECT button or a dedicated menu option) to adjust:
- Taal: Wijzig de systeemtaal.
- Weergave: Adjust screen brightness, aspect ratio, and video filters.
- Geluid: Control volume levels and audio output.
- Netwerk: Configure Wi-Fi settings (requires external Wi-Fi module).
- Controllerinstellingen: Map buttons or calibrate joysticks.
6.5 Adding New Games
To add new games, you will need to transfer game ROMs to the TF2/EXT card. Ensure the ROMs are in a format supported by the console's emulators. Connect the TF2/EXT card to a computer using a card reader and copy the game files to the appropriate system folders on the card. After reinserting the card into the console, refresh the game list in the system menu.
7. Onderhoud
7.1 Het apparaat reinigen
Use a soft, dry, lint-free cloth to clean the console's exterior. For the screen, use a screen-specific cleaning solution and a microfiber cloth. Do not use abrasive cleaners or solvents.
7.2 Batterijonderhoud
- Zorg ervoor dat de batterij niet te vaak volledig ontladen wordt.
- Bewaar het apparaat op een koele, droge plaats wanneer u het gedurende langere tijd niet gebruikt.
- Als het apparaat langere tijd niet gebruikt wordt, laad het dan voor het opbergen op tot ongeveer 50%.
7.3 Software-updates
Periodically check the official ANBERNIC website or community forums for firmware updates. Updates can improve performance, add features, or fix bugs. Follow the provided instructions carefully when performing any software updates.
8. Probleemoplossing
| Probleem | Mogelijke oorzaak | Oplossing |
|---|---|---|
| Apparaat gaat niet aan. | Low battery; TF card not properly inserted; System crash. | Charge the device for at least 30 minutes. Ensure TF1/EXT card is correctly inserted. Press the Reset button (located on the bottom of the console) with a thin object. |
| Games are not loading or crashing. | Corrupt game file; Incorrect emulator settings; TF card issue. | Verifieer het spel file integrity. Check emulator settings (e.g., core, video driver). Reinsert or try a different TF card. |
| Het scherm is zwart of flikkert. | Software issue; Hardware malfunction. | Start het apparaat opnieuw op. Als het probleem aanhoudt, neem dan contact op met de klantenservice. |
| Geen geluid. | Volume too low; Muted; Headphone jack issue. | Increase volume using the side buttons. Check system sound settings. Ensure no headphones are partially inserted. |
9. Specificaties
| Functie | Detail |
|---|---|
| Model | RG351MP |
| Materiaal | Aluminum alloy shell, CNC process |
| Scherm | 3.5 inch IPS screen, OCA full lamination, 640*480 resolution |
| CPU | RK3326 quad core 1.5 GHz |
| GPU | Mali-G31 MP2 |
| RAM | DDR3L 1GB |
| Intern geheugen | 16GB (for system) |
| Systeem | Open source Linux-systeem |
| Game Support | Vibrating motor, supports 20+ game formats. Users can download relevant game formats. |
| Spreker | High quality double horn stereo speaker |
| Batterij | Li-polymer 3500 mAh, lasting approximately 6 hours |
| Opladen | 1.3A charging, matching maximum load 2A, USB charging cable, 4 hours for full charge |
| TF-kaartondersteuning | Supports TF card max to 256GB (dual TF card slots) |
| Andere functies | Support external network card WIFI, Double OTG, Double 3D rocker, Support 3.5mm stereo earphones. |
| Afmetingen | 6.6 x 3.8 x 1.9 inch (verpakkingsafmetingen) |
| Artikelgewicht | 15.2 ons |
10. Garantie en ondersteuning
10.1 Garantie-informatie
ANBERNIC products are covered by a limited warranty. Please refer to the warranty card included in your package or visit the official ANBERNIC webRaadpleeg de website voor gedetailleerde garantievoorwaarden. Bewaar uw aankoopbewijs voor garantieclaims.
10.2 Klantenservice
If you encounter any issues or have questions not covered in this manual, please contact ANBERNIC customer support. You can usually find contact information on the official ANBERNIC webwebsite of via de winkel waar u het product hebt gekocht.