Sorand AC 230V Floor Heating Thermostat
Sorand AC 230V Digital Programmable Floor Heating Thermostat User Manual
Model: AC 230V Floor Heating Thermostat
Invoering
This manual provides comprehensive instructions for the installation, operation, and maintenance of your Sorand AC 230V Digital Programmable Floor Heating Thermostat. Please read this manual carefully before installation and use to ensure proper function and safety.
The thermostat is designed for electronic floor heating systems and other electrical heating elements. It features a large LCD with backlight, programmable temperature settings, and internal/external temperature sensing capabilities.
Veiligheidsinformatie
- De installatie moet worden uitgevoerd door een gekwalificeerde elektricien.
- Zorg ervoor dat de stroom is losgekoppeld voordat u met de installatie of het onderhoud begint.
- Stel de thermostaat niet bloot aan water of overmatige vochtigheid.
- Werk binnen het gespecificeerde volumetage en stroomlimieten.
Inhoud van het pakket
Controleer of alle artikelen in het pakket aanwezig zijn:
- 1 x Sorand AC 230V Digital Programmable Floor Heating Thermostat
- 1 x External Temperature Sensor Cable (approx. 3 meters)
- 2 x Montageschroeven
- 1 x Gebruikershandleiding (dit document)

Image: Contents of the Sorand thermostat package, showing the main unit, external sensor cable, mounting screws, and the instruction manual.
Instellen en installeren
Belangrijk: Installation should only be carried out by a qualified electrician. Ensure the main power supply is turned off before commencing any wiring work.
Bedradingsschema
Refer to the wiring diagram on the back of the thermostat unit for correct connections. The terminals are typically labeled as follows:
- L1, N1: Power input (AC 230V)
- LOAD (1, 2): Connection to the heating element
- NTC (5, 6): Connection for the external floor temperature sensor

Afbeelding: Achterkant view of the Sorand thermostat, displaying the wiring terminals and a simplified diagram for electrical connections.
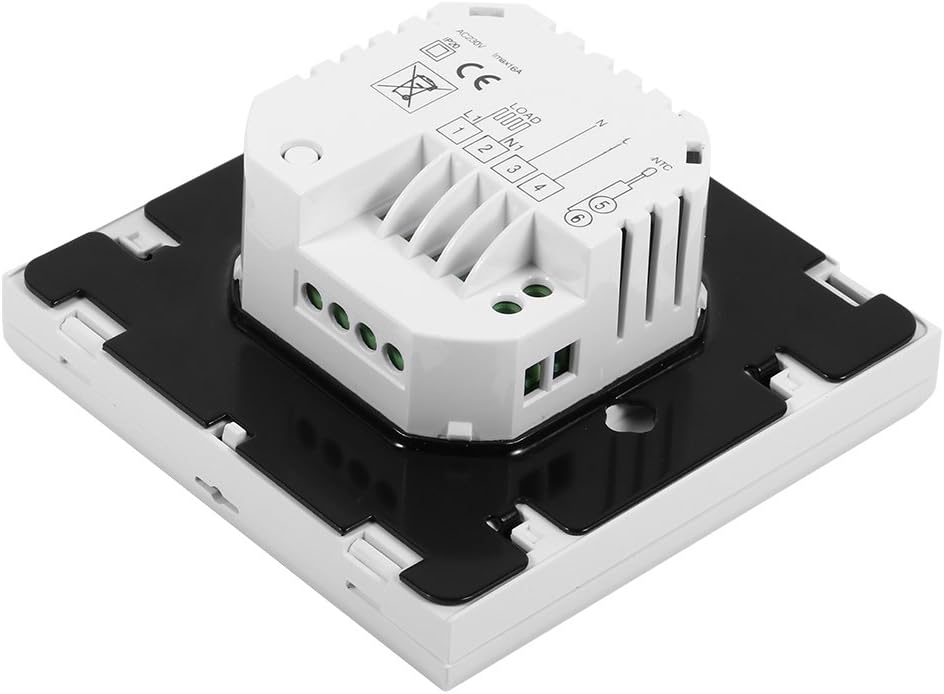
Afbeelding: Zijkant view of the Sorand thermostat, illustrating the internal components and ports for wiring connections.
Montage
- Prepare a standard electrical wall box (86x86mm recommended).
- Connect the power supply, heating load, and external sensor wires according to the wiring diagram.
- Carefully push the wired thermostat into the wall box.
- Bevestig de thermostaat met de meegeleverde schroeven aan de inbouwdoos.
- Bevestig het frontpaneel van de thermostaat.
Gebruiksaanwijzing
The thermostat features a large LCD and touch-sensitive buttons for easy operation.
Knopfuncties
- ⏻ (Stroom): Schakelt de thermostaat AAN/UIT.
- ↻ (Mode/Cycle): Switches between manual mode and programmable mode.
- ⏱ (Clock/Time): Sets the time and enters programming mode.
- ▲ (Up Arrow): Increases temperature setting or adjusts values.
- ▼ (Down Arrow): Decreases temperature setting or adjusts values.

Afbeelding: Voorzijde view of the Sorand thermostat, highlighting the LCD screen and the five touch-sensitive control buttons below it.
Tijd en dag instellen
- Houd de ⏱ 3 seconden ingedrukt houden om naar de tijdinstelmodus te gaan.
- Gebruik de ▲ En ▼ knoppen om het uur aan te passen, druk dan op ⏱ om te bevestigen en over te gaan naar de minuten, en vervolgens de dag van de week.
- Pers ⏱ again to exit, or wait for 10 seconds for automatic exit.
Bediening in handmatige modus
In manual mode, the thermostat maintains a constant temperature set by the user.
- Druk op de ↻ button to switch to manual mode (indicated by a hand icon or similar on the display).
- Gebruik de ▲ En ▼ knoppen om de gewenste temperatuur in te stellen.
- The thermostat will now maintain this temperature.
Programmable Mode Operation (6 Periods)
The thermostat allows for 6 programmable periods per day, enabling different temperature settings at different times.
- Druk op de ↻ button to switch to programmable mode (indicated by a clock icon or similar).
- Houd de ⏱ Houd de knop 3 seconden ingedrukt om de programmeermodus te activeren.
- The display will show the first period (e.g., "Period 1"). Use ▲ En ▼ to set the start time and desired temperature for this period.
- Pers ⏱ to move to the next period and repeat the process for all 6 periods.
- After setting all periods, press ⏱ again or wait for automatic exit to save settings.
The thermostat will automatically follow the programmed schedule.
Sensor Selection (Internal/External)
The thermostat can use its internal sensor or the external floor sensor. The selection method is typically found in advanced settings or by a specific button combination. Refer to the on-screen indicators for the active sensor.
Onderhoud
- Reinig het display van de thermostaat en casinReinig met een zachte, droge doek. Gebruik geen schuurmiddelen of oplosmiddelen.
- Ensure the thermostat is free from dust and debris to maintain optimal performance.
- No user-serviceable parts inside. Do not attempt to open or repair the unit.
Probleemoplossing
| Probleem | Mogelijke oorzaak | Oplossing |
|---|---|---|
| Thermostaat gaat niet aan. | Geen stroomvoorziening; verkeerde bedrading. | Controleer de stroomonderbreker. Controleer de bedrading (raadpleeg een gekwalificeerde elektricien). |
| De verwarming gaat niet aan/uit. | Incorrect temperature setting; thermostat in OFF mode; wiring issue. | Adjust set temperature. Ensure thermostat is ON. Check heating element wiring. |
| Onjuiste temperatuurmeting. | Sensor malfunction; incorrect sensor selected. | Verify sensor connection. Check if internal or external sensor is active. |
| Het scherm is leeg of knippert. | Stroomschommelingen; interne fout. | Reset power to the thermostat. If issue persists, contact support. |
Specificaties
| Functie | Detail |
|---|---|
| Merk | Sorand |
| Model | AC 230V Floor Heating Thermostat |
| Werkvolumetage | Wisselstroom 230V, 50/60Hz |
| Laadstroom | 12/16A (Electric Heating) |
| Nauwkeurigheid | ±0.5℃ |
| Set-point Temperature Range | 5℃ - 35℃ |
| Limit Temperature Range | 5℃ - 99℃ |
| Stroomverbruik | <0.3W |
| Temperatuursensor | NTC (Internal and External) |
| Surface Size | Afmetingen: ca. 86 x 86 x 40 mm (3.4 x 3.4 x 1.6 inch) |
| External Sensor Cable Length | Ongeveer 3 meter (9.8 voet) |
| Materiaal | PC+ABS |
| Weergavetype | Digitaal LCD met achtergrondverlichting |
| Controlemethode | Touchpad-bediening |
Garantie en ondersteuning
This product is covered by the manufacturer's standard warranty. Please refer to the product packaging or your point of purchase for specific warranty terms and conditions.
For technical support, troubleshooting assistance, or warranty claims, please contact your retailer or the manufacturer directly. Keep your purchase receipt as proof of purchase.