Invoering
This manual provides detailed instructions for the installation and operation of your auomii Universal Ceiling Fan Remote Control Kit, Model KLK19008. This kit is designed to add wireless control to your existing ceiling fan and light fixture, offering convenience with fan speed adjustment, light control, and timing functions.
Product voorbijview
The auomii Universal Ceiling Fan Remote Control Kit provides convenient wireless control for your ceiling fan and light. It includes a compact receiver unit and a user-friendly remote control.
Componenten
- Zender met afstandsbediening
- Ontvangereenheid
- Wall Mount Holder for Remote
- Wire Nuts (for electrical connections)
- Montageschroeven en ankers

Belangrijkste kenmerken
- 3 ventilatorsnelheden: Laag middel hoog.
- Lichtregeling: On/Off functionality for the fan light (non-dimmable).
- Timingfunctie: Set the fan to turn off after 1 hour, 2 hours, 4 hours, or 8 hours.
- Beep On/Off Setting: Audible feedback for button presses can be enabled or disabled.
- Compact Receiver: Designed to fit into small fan canopies.


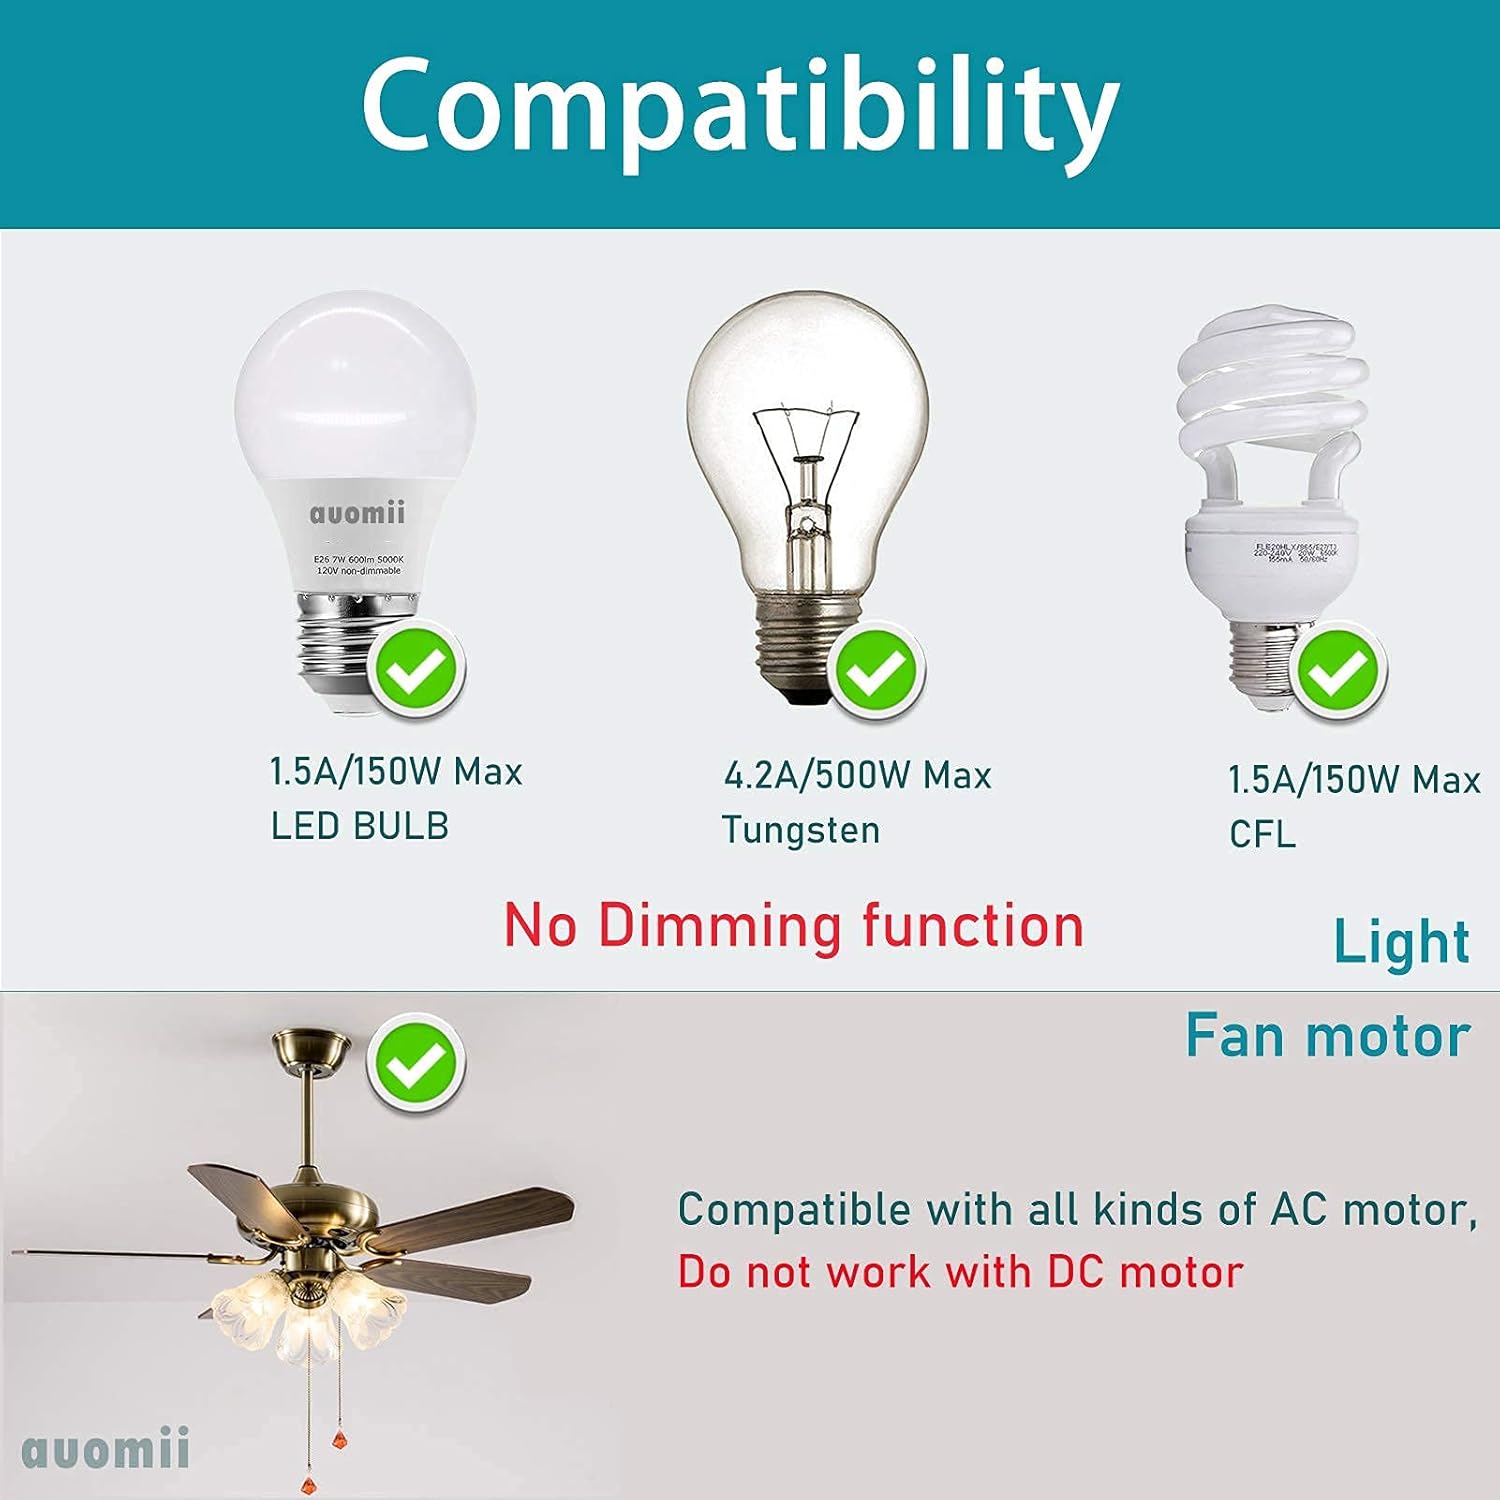
Verenigbaarheid
The auomii Universal Ceiling Fan Remote Control Kit is designed for broad compatibility with many popular ceiling fan brands and types of lighting. Please review De volgende compatibiliteitsdetails:
- Fan Brands: Compatible with Hunter, Harbor Breeze, Westinghouse, Honeywell, and other well-known ceiling fan brands.
- Motortype: Works with all kinds of AC motors. Does not work with DC motors.
- Gloeilampen: Supports LED bulbs (1.5A/150W Max), Tungsten bulbs (4.2A/500W Max), and CFL bulbs (1.5A/150W Max).
- Dimfunctie: The light control function is strictly ON/OFF and does not support dimming.
- Integratie van slimme woningen: This kit does not have WiFi functionality and cannot be controlled by Alexa or other phone applications.
Veiligheidsinformatie
Please read and understand all safety instructions before attempting installation or operation. Failure to follow these instructions may result in electric shock, fire, or other hazards.
- Stroomonderbreking: Always disconnect power at the circuit breaker or fuse box before installing, cleaning, or performing any maintenance on your ceiling fan or light fixture.
- Gekwalificeerde elektricien: If you are unsure about wiring or electrical connections, consult a qualified electrician.
- Deeltage: Zorg ervoor dat de voltage supply to your fan is compatible with the receiver unit.
- Beveiligde verbindingen: All electrical connections must be secure and properly insulated.
- Ontvanger plaatsing: Ensure the receiver is installed in a location where it will not be exposed to moisture or extreme temperatures.
Installatie-instructies
The receiver unit is designed to be compact (approximately 2.07 x 3.0 x 1.0 inches) to fit within most ceiling fan canopies. Ensure there is sufficient space in your fan's canopy before proceeding.
- Stroom loskoppelen: Turn off the power to your ceiling fan at the circuit breaker. Verify power is off before proceeding.
- Toegang tot bedrading: Remove the canopy cover of your ceiling fan to access the existing wiring.
- Draden identificeren: Identify the AC Live Line (Black), AC Neutral Line (White), Live Line for Fan (Black), and Live Line for Light (Blue).
- Connect Receiver Input:
- Sluit de Zwarte draad from your house wiring (AC Live Line) to the Black input wire op de ontvanger.
- Sluit de Witte draad from your house wiring (AC Neutral Line) to the White input wire op de ontvanger.
- Connect Receiver Output:
- Sluit de Black output wire van de ontvanger naar de Zwarte draad of your ceiling fan (Live Line for Fan).
- Sluit de Blue output wire van de ontvanger naar de Blauwe draad of your ceiling fan (Live Line for Light).
- Sluit de White output wire van de ontvanger naar de Witte draad of your ceiling fan (Neutral Line).
- Antenne: The yellow wire on the receiver is the antenna. Do not break or cut the wire surface. Position it carefully within the canopy.
- Beveiligde verbindingen: Use the provided wire nuts to secure all connections. Ensure they are tight and properly insulated.
- Positie ontvanger: Carefully tuck the receiver unit and all wiring into the fan canopy. Ensure no wires are pinched.
- Reattach Canopy: Securely reattach the fan canopy cover.
- Batterijen voor de afstandsbediening installeren: Plaats 2 AAA-batterijen (niet meegeleverd) in de afstandsbediening.
- Herstel de stroom: Schakel de stroom weer in via de stroomonderbreker.
- Testfunctionaliteit: Test all functions of the remote control (fan speeds, light on/off, timer).


Gebruiksaanwijzing
Once installed, operate your ceiling fan and light using the remote control transmitter.
- Ventilatorsnelheidsregeling: Druk op de LAAG, MEDIUM, of HI buttons to select the desired fan speed.
- Ventilator uit: Druk op de STOP knop om de ventilator uit te schakelen.
- Licht aan/uit: Druk op de LICHT AAN/UIT button to toggle the fan light on or off. Note that this function is not dimmable.
- Timerfunctie: Druk op de 1H, 2H, 4H, of 8H buttons to set the fan to automatically turn off after the selected duration.
- Piep aan/uit: To toggle the audible beep sound (which occurs with each button press), press and hold the STOP button for approximately 3-5 seconds until you hear a confirmation sound or the beep function changes.
Probleemoplossing
| Probleem | Mogelijke oorzaak | Oplossing |
|---|---|---|
| Ventilator of lamp reageert niet op de afstandsbediening. |
|
|
| Light turns on/off quickly or flickers. |
|
|
| Audible beep sound is annoying. | Beep function is enabled by default. | Houd de STOP button on the remote for 3-5 seconds to disable the beep sound. Repeat to re-enable. |
| Fan speeds do not change or seem incorrect. |
|
|
Specificaties
| Modelnummer | KLK19008 |
| Merk | auomii |
| Receiver Dimensions (LxWxD) | 3 x 2.07 x 1 inch |
| Artikelgewicht | 0.006 ons |
| Batterijen vereist (afstandsbediening) | 2 AAA-batterijen (niet inbegrepen) |
| Max aantal ondersteunde apparaten | 2 (Fan and Light) |
| Compatibele apparaten | Ceiling fan and lights (AC motor only, non-dimmable light) |
| Speciale kenmerken | Beep on/off setting, small size receiver, RF wireless remote, easy to install |

Garantie en ondersteuning
For any questions, concerns, or support regarding your auomii Universal Ceiling Fan Remote Control Kit, please contact auomii customer service through the platform where the product was purchased. Please have your model number (KLK19008) and purchase details ready for faster assistance.
While specific warranty details are not provided in this manual, standard consumer protection laws apply. Please retain your proof of purchase for any warranty claims.