1. Inleiding en veiligheidsinformatie
Thank you for choosing the ANENG V8 Digital Multimeter. This device is designed for safe and accurate measurement of AC/DC voltage, AC/DC current, resistance, capacitance, frequency, temperature, diode, continuity, and battery testing. Please read this manual thoroughly before use to ensure proper operation and to prevent potential hazards.
1.1 Veiligheidsmaatregelen
- Zorg er altijd voor dat de multimeter in goede werkende staat verkeert voordat u hem gebruikt. Controleer de meetsnoeren op beschadigingen.
- Niet toepassen voltage of stroom die de maximaal toegestane waarden voor de multimeter overschrijdt.
- Wees uiterst voorzichtig bij het werken met voltagGebruik geen spanningen hoger dan 36V DC of 25V AC RMS, aangezien deze een risico op een elektrische schok kunnen opleveren.
- Koppel altijd de stroom naar het circuit los en ontlaad alle hoog-voltage condensatoren voordat u weerstand, continuïteit, diodes of capaciteit meet.
- Zorg ervoor dat de draaischakelaar in de juiste stand staat voor de gewenste meting voordat u de meetsnoeren op het circuit aansluit.
- Gebruik de multimeter niet in omgevingen met explosieve gassen, dampen of stof.
- Vervang de batterijen onmiddellijk wanneer de indicator voor een bijna lege batterij verschijnt, zodat de metingen nauwkeurig zijn.
2. Product voorbijview
2.1 Pakketinhoud
The ANENG V8 Digital Multimeter package typically includes the following items:
- ANENG V8 Digital Multimeter
- Testkabels (rood en zwart)
- Temperatuursonde
- Draagtas
- Gebruiksaanwijzing

Image: ANENG V8 Digital Multimeter with its standard accessories, including test leads, a temperature probe, and a protective carrying case.
2.2 Bedieningselementen en weergave
The multimeter features an 8000-count LCD backlight display for clear readings in various lighting conditions. Key controls include a rotary switch for function selection and buttons for range, data hold, and other features.

Afbeelding: Gedetailleerd view of the multimeter's front panel, highlighting the LCD screen, the central rotary selector, and various control buttons.
3. Instellen
3.1 Batterij installatie
The ANENG V8 Digital Multimeter is powered by batteries. To install or replace batteries:
- Zorg ervoor dat de multimeter is uitgeschakeld en koppel alle meetsnoeren los.
- Zoek het batterijklepje aan de achterkant van het apparaat.
- Gebruik een schroevendraaier om de schroef/schroeven waarmee het batterijklepje is vastgezet los te draaien.
- Verwijder het deksel.
- Insert new batteries, observing the correct polarity (+ and -) as indicated inside the compartment. The device typically uses AA batteries.
- Plaats het batterijklepje terug en zet het vast met de schroef/schroeven.
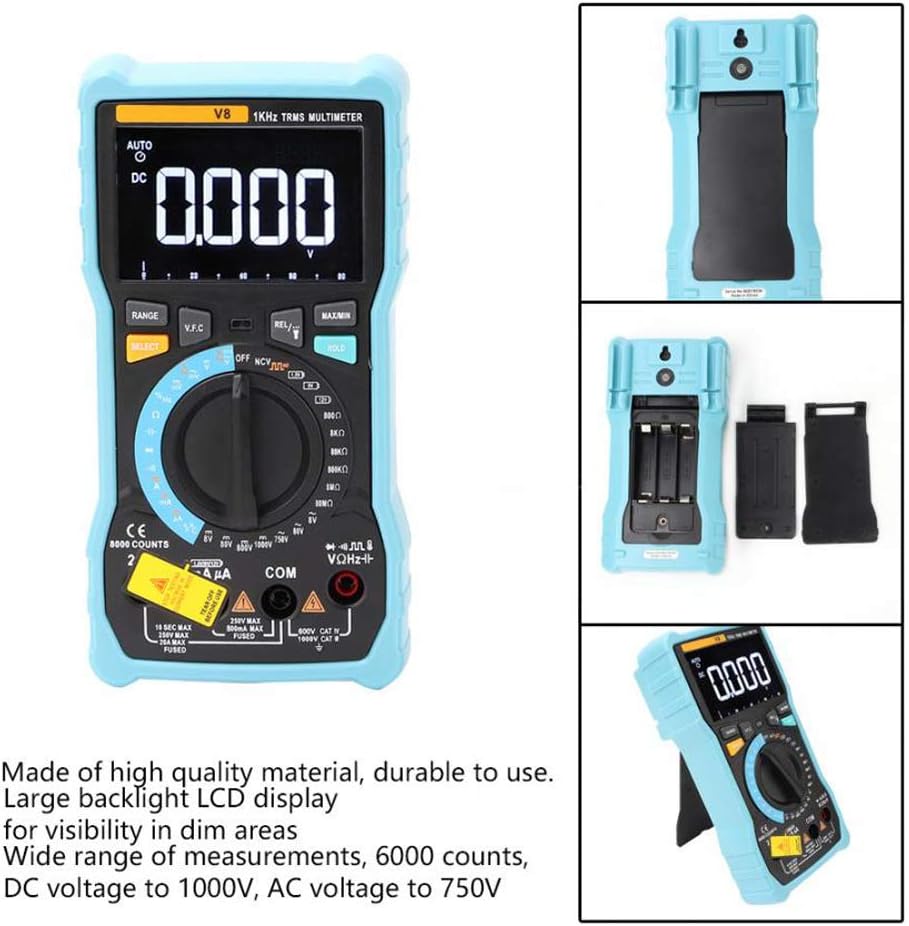
Afbeelding: De achterkant view of the multimeter with the battery compartment open, illustrating the correct placement for three AA batteries.
4. Gebruiksaanwijzing
Before any measurement, ensure the test leads are correctly inserted into the input jacks and the rotary switch is set to the appropriate function.
4.1 Meting van gelijkstroom/wisselstroomtage
- Set the rotary switch to the 'V–' (DC Voltage) of 'V~' (AC Voltage) positie.
- Sluit de rode meetsnoer aan op de 'VΩmA'-aansluiting en de zwarte meetsnoer op de 'COM'-aansluiting.
- Sluit de testkabels parallel aan op het circuit of het onderdeel dat u wilt meten.
- Lees het deeltage-waarde op het display.
4.2 Het meten van gelijkstroom/wisselstroom
- Set the rotary switch to the 'A–' (DC Current) or 'A~' (AC Current) position. For milliampere (mA) of microampere (µA) measurements, select the corresponding range.
- For current up to 800mA, connect the red test lead to the 'VΩmA' jack. For current up to 20A, connect the red test lead to the '20A' jack. Connect the black test lead to the 'COM' jack.
- Disconnect power to the circuit. Open the circuit where you want to measure current. Connect the multimeter in series with the circuit.
- Schakel de stroom naar het circuit in en lees de huidige waarde af op het display.
4.3 Weerstand meten
- Set the rotary switch to the 'Ω' (Resistance) position.
- Sluit de rode meetsnoer aan op de 'VΩmA'-aansluiting en de zwarte meetsnoer op de 'COM'-aansluiting.
- Ensure the circuit is de-energized and all capacitors are discharged. Connect the test leads across the component to be measured.
- Lees de weerstandswaarde af op het display.
4.4 NCV (Non-Contact Voltage) Detectie
- Set the rotary switch to the 'NCV' position.
- Move the top end of the multimeter near the conductor or outlet.
- The multimeter will emit an audible beep and the NCV indicator light will flash if AC voltage is detected, indicating the presence of live voltage zonder fysiek contact.
4.5 Temperatuurmeting
- Set the rotary switch to the '°C/°F' (Temperature) position.
- Connect the temperature probe to the 'VΩmA' and 'COM' jacks, observing polarity if applicable.
- Plaats de punt van de temperatuursonde op of vlakbij het object waarvan u de temperatuur wilt meten.
- Lees de temperatuurwaarde af op het display.
4.6 Andere functies
- Capaciteit: Set the rotary switch to the 'F' position. Connect leads across the discharged capacitor.
- Frequency/Duty Cycle: Set the rotary switch to the 'Hz/%' position. Connect leads to the signal source.
- Diodetest: Set the rotary switch to the 'Diode' position. Connect leads across the diode.
- Continuïteitstest: Set the rotary switch to the 'Continuity' position. Connect leads across the circuit. An audible beep indicates continuity.
- Batterijtest: Set the rotary switch to the 'Battery' position. Connect leads to the battery terminals (1.5V, 9V, or 12V).
- Gegevensopslag: Druk op de 'HOLD'-knop om de huidige waarde op het display vast te zetten. Druk nogmaals om de vastzetting te verwijderen.
- Achtergrondverlichting/zaklamp: Press the backlight button to turn on/off the display backlight or flashlight.
- Automatisch uitschakelen: De multimeter schakelt na een periode van inactiviteit automatisch uit om de batterijduur te verlengen.
5. Onderhoud
5.1 Reinigen
Veeg de behuizing af met advertentieamp doek en een mild schoonmaakmiddel. Gebruik geen schuurmiddelen of oplosmiddelen. Houd de ingangsaansluitingen vrij van vuil en vocht.
5.2 Zekering vervangen
Als de huidige meetfunctie uitvalt, moet de zekering mogelijk worden vervangen. Raadpleeg de specificaties voor het juiste type en de juiste waarde van de zekering. Het vervangen van de zekering mag alleen worden uitgevoerd door gekwalificeerd personeel.
5.3 Opslag
When not in use for extended periods, remove the batteries to prevent leakage and store the multimeter in a dry, cool place.
6. Probleemoplossing
- Geen scherm: Controleer of de accu goed geplaatst en opgeladen is. Vervang de accu's indien nodig.
- Onjuiste metingen: Ensure the rotary switch is set to the correct function and range. Check test lead connections. Verify battery charge.
- Huidige meting werkt niet: Check the fuse. Replace if blown (refer to fuse replacement section).
- NCV wordt niet gedetecteerd: Ensure the NCV function is selected and the multimeter is close enough to the AC voltagDe bron.
7. Specificaties
| Parameter | Waarde |
|---|---|
| Weergave | 8000 Counts LCD with Backlight |
| DC voltage (V) | 8.000V / 80.00V / 800.0V / 1000V |
| DC voltage (mV) | 800mV |
| AC voltage (V) | 8.000V / 80.00V / 750V |
| AC voltage (mV) | 800mV |
| Gelijkstroom (A) | 8.000A / 20.00A |
| DC-stroom (mA) | 8.000mA / 80.00mA / 800.0mA |
| Gelijkstroom (µA) | 800 µA / 8000 µA |
| AC-stroom (A) | 8.000A / 20.00A |
| AC-stroom (mA) | 8.000mA / 80.00mA / 800.0mA |
| Wisselstroom (µA) | 800 µA / 8000 µA |
| Weerstand | 800.0Ω / 8.000kΩ / 80.00kΩ / 800.0kΩ / 8.000MΩ / 80.00MΩ |
| Capaciteit | 9.999nF / 99.99nF / 999.9nF / 9.999µF / 99.99µF / 999.9µF / 9.999mF / 99.99mF |
| Frequentie | 9.999Hz / 99.99Hz / 999.9Hz / 9.999kHz / 99.99kHz / 999.9kHz / 9.999MHz |
| Inschakelduur | 1% tot 99% |
| Temperatuurbereik | -20°C tot 1000°C (-4°F tot 1832°F) |
| Batterijtest | 1.5V / 9V / 12V |
| Bereiken | Auto / Handmatig |
| Update-snelheid | 3 keer / seconde |
| Echte RMS | Ja |
| Gegevens vasthouden | Ja |
| Tegenlicht/zaklamp | Ja |
| Waarschuwing voor lage batterij | Ja |
| Automatisch uitschakelen | Ja |
| Materiaal | ABS / PVC |
| Energiebron | Op batterijen |
8. Garantie en ondersteuning
This product is covered by a standard manufacturer's warranty against defects in materials and workmanship. Please refer to the warranty card included with your purchase for specific terms and conditions. For technical support or service inquiries, please contact your retailer or the manufacturer's customer service department.
9. Officiële productvideo's
Er zijn op dit moment geen officiële productvideo's van de verkoper beschikbaar om te embedden.