1. Inleiding
Thank you for choosing the Petlibro Automatic Pet Feeder. This device is designed to provide consistent and timely meals for your pet, ensuring they are fed according to a set schedule, even when you are away. Please read this manual thoroughly before use to ensure proper operation and maintenance of your feeder.
2. Belangrijke veiligheidsinformatie
Neem de volgende veiligheidsmaatregelen in acht om letsel of schade aan het product te voorkomen:
- Lees alle instructies zorgvuldig door voordat u de voederautomaat in gebruik neemt.
- Houd de voederautomaat buiten bereik van kinderen en huisdieren wanneer deze niet in gebruik is of tijdens de montage.
- Dompel de hoofdeenheid niet onder in water of andere vloeistoffen.
- Use only dry pet food with a diameter between 5-15mm. Do not use wet, canned, or moist food.
- Zorg ervoor dat de voederbak op een stabiele, vlakke ondergrond staat.
- Haal de stekker van de voederautomaat uit het stopcontact voordat u deze schoonmaakt of onderhoudswerkzaamheden uitvoert.
- Do not attempt to repair or modify the feeder yourself. Contact customer support for assistance.
- Gooi batterijen op verantwoorde wijze weg, volgens de plaatselijke voorschriften.
3. Inhoud van het pakket
Controleer de inhoud van het pakket om er zeker van te zijn dat alle artikelen aanwezig zijn:
- Petlibro Automatic Pet Feeder Main Unit
- Eetbak
- USB-C Power Adapter and Cable
- Droogmiddelzak (vooraf geïnstalleerd of apart)
- Gebruiksaanwijzing
4. Product voorbijview
Familiarize yourself with the different parts of your Petlibro Automatic Pet Feeder:
- Voedseltank: Bewaar droog dierenvoer.
- Deksel: Covers the food tank to keep food fresh.
- Configuratiescherm: Buttons and display for setting schedules and manual feeding.
- Voedselverkooppunt: Where food dispenses into the bowl.
- Voedselkom: Afneembare voerbak voor uw huisdier.
- Power Port (USB-C): Wordt aangesloten op de voedingsadapter.
- Batterijcompartiment: Holds backup batteries (not included).
5. Instellen
Follow these steps to set up your Petlibro Automatic Pet Feeder:
5.1 Montage
- Uitpakken: Haal alle onderdelen voorzichtig uit de verpakking.
- Install Food Bowl: Place the food bowl securely at the base of the feeder.
- Install Food Tank: Align the food tank with the base and twist to lock it into place.
- Plaats het droogmiddelzakje erin: If not pre-installed, open the desiccant compartment (usually under the lid) and insert the desiccant bag to keep food fresh. Replace every 15-30 days.

Image: Step-by-step assembly guide for the Petlibro Automatic Pet Feeder. It shows how to twist open the lid, take out the food bowl, put the desiccant bag into its compartment, install the food tank, put the lid back on, and finally install the food bowl.
5.2 Voeding
The feeder can be powered by a USB-C adapter or backup batteries.
- Primaire kracht: Connect the USB-C power adapter to the feeder's power port and plug it into a wall outlet.
- Batterijback-up (optioneel): voor stroomuitvaltages, install 3 D-cell batteries (not included) into the battery compartment at the bottom of the feeder. This ensures continuous operation.
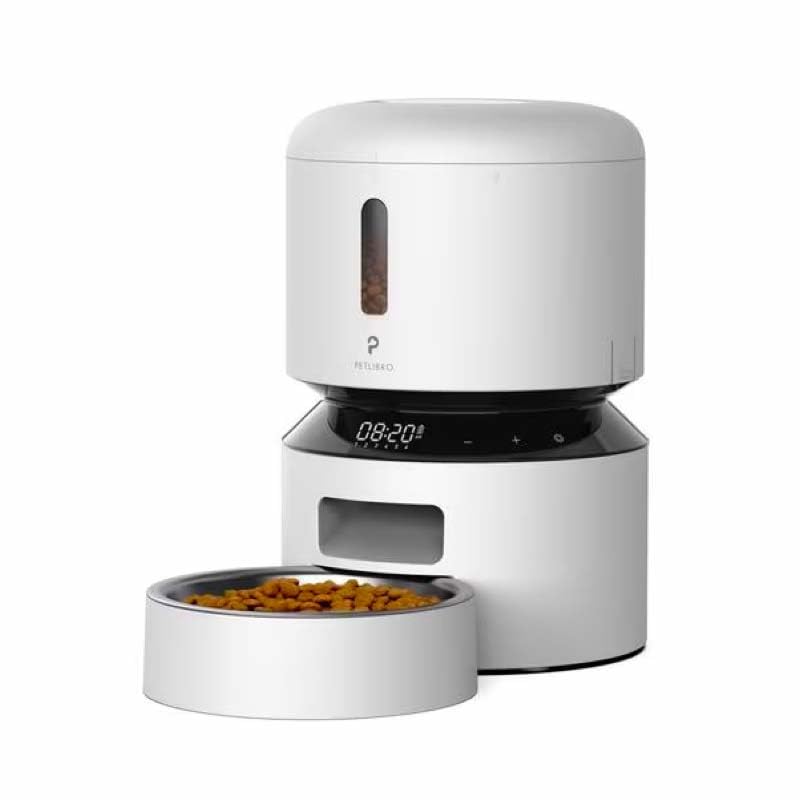
Image: Diagram illustrating the dual power supply system of the Petlibro Automatic Pet Feeder. It shows the USB-C adapter connected for primary power and the battery compartment for backup power. A note indicates that batteries are not included.
6. Gebruiksaanwijzing
Once assembled and powered, you can begin programming your feeder.
6.1 Het vullen van de voedseltank
- Open het deksel van de voedseltank.
- Pour dry pet food into the tank. Ensure the food is within the recommended size (5-15mm diameter).
- Close the lid securely to maintain freshness.
6.2 Setting Meal Schedules and Portions
The feeder allows you to schedule up to 6 meals per day, with 1 to 50 portions per meal.

Image: A cat eating from the Petlibro Automatic Pet Feeder, illustrating the feeder's function. Text overlays indicate "Portion: 1-50" and "Meals: 1-6", highlighting the customizable feeding schedule.
- Stel huidige tijd in: Use the control panel buttons (e.g., "SET", "UP", "DOWN") to set the current time.
- Programma Maaltijdtijden: Press the "MEAL" button to enter meal programming mode. Select the desired meal number (e.g., Meal 1) and set the feeding time.
- Porties instellen: For each programmed meal, set the number of portions (1-50) using the "PORTION" or "UP/DOWN" buttons.
- Repeat for all meals: Program up to 6 meals as needed.
- Instellingen opslaan: Ensure all settings are saved according to the feeder's specific interface (usually by pressing "SET" or waiting for auto-save).
6.3 Handmatig voeren
To dispense food instantly, press the manual feed button (often labeled "FEED" or a paw icon) on the control panel. Each press typically dispenses one portion.
7. Onderhoud en reiniging
Regelmatig schoonmaken zorgt voor hygiëne en verlengt de levensduur van uw voederautomaat.
- Stekker uit het stopcontact: Always unplug the feeder from the power outlet before cleaning.
- Demonteren: Remove the food bowl and food tank.
- Schone componenten: Wash the food bowl and food tank with mild soap and water. Rinse thoroughly and dry completely before reassembling.
- Hoofdeenheid afvegen: Veeg het hoofdapparaat schoon met een zachte, damp lap. Dompel het hoofdapparaat niet onder in water.
- Droogmiddel vervangen: Replace the desiccant bag every 15-30 days to maintain food freshness.
- Opnieuw monteren: Ensure all parts are dry before reassembling the feeder.
8. Probleemoplossing
If you encounter issues with your feeder, refer to the following common problems and solutions:
| Probleem | Mogelijke oorzaak | Oplossing |
|---|---|---|
| Voedingseenheid schakelt niet in. | No power connection; batteries depleted or incorrectly installed. | Check power adapter connection; replace batteries or ensure correct polarity. |
| Er wordt geen voedsel uitgedeeld. | Food tank empty; food jammed; dispenser blocked; incorrect schedule settings. | Refill food tank; clear any food jams; check dispenser for blockages; verify meal schedule and portion settings. |
| Food dispenses too much/too little. | Onjuiste portie-instellingen. | Adjust portion settings for each meal. |
| Het scherm werkt niet. | Stroomprobleem; beeldschermstoring. | Check power supply; if problem persists, contact customer support. |
9. Specificaties
| Functie | Detail |
|---|---|
| Productnaam | Petlibro Automatic Pet Feeder |
| Model | 3L automatische voerbak voor huisdieren |
| Capaciteit | 3 liter |
| Materiaal | ABS-kunststof van voedselkwaliteit |
| Stroomvoorziening | USB-C adapter (5V/1A); 3 x D-cell batteries (backup, not included) |
| Maaltijden per dag | Tot 6 maaltijden |
| Porties per maaltijd | 1-50 portions (approx. 5-10g per portion, depending on food density) |
| Recommended Food Size | 5-15mm dry kibble |
| Kleur | Wit |
10. Garantie en ondersteuning
Your Petlibro Automatic Pet Feeder comes with a standard manufacturer's warranty. For detailed warranty information, please refer to the warranty card included in your package or visit the official Petlibro webplaats.
If you have any questions, require technical support, or need assistance with your product, please contact Petlibro customer service. Contact details can typically be found on the product packaging, the official website, or by searching for "Petlibro customer support" online.