1. Inleiding
Thank you for choosing the Einhell RT-AG 230/180 Angle Grinder. This manual provides important information regarding the safe operation, setup, maintenance, and troubleshooting of your new tool. Please read this manual thoroughly before using the angle grinder and keep it for future reference. Proper use and care will ensure long-lasting performance and safety.
2. Veiligheidsinstructies
Always observe basic safety precautions when using electric tools to reduce the risk of fire, electric shock, and personal injury. Keep this manual handy for quick reference.
Algemene veiligheidswaarschuwingen voor elektrisch gereedschap:
- Veiligheid werkgebied: Houd de werkplek schoon en goed verlicht. Gebruik geen elektrisch gereedschap in explosieve atmosferen, zoals in de aanwezigheid van ontvlambare vloeistoffen, gassen of stof.
- Elektrische veiligheid: De stekker van elektrisch gereedschap moet op het stopcontact passen. Wijzig de stekker op geen enkele manier. Vermijd lichamelijk contact met geaarde oppervlakken.
- Persoonlijke veiligheid: Stay alert, watch what you are doing and use common sense. Use personal protective equipment such as eye protection, hearing protection, dust mask, and heavy-duty gloves.
- Gebruik en onderhoud van gereedschap: Forceer het elektrische gereedschap niet. Gebruik het juiste elektrische gereedschap voor uw toepassing. Haal de stekker uit het stopcontact voordat u aanpassingen uitvoert, accessoires verwisselt of elektrisch gereedschap opbergt.
Specific Angle Grinder Safety Warnings:
- Gebruik altijd de extra handgreep die bij het gereedschap is meegeleverd.
- Ensure the wheel guard is securely attached and correctly positioned for the operation.
- Do not use cutting-off wheels for grinding operations.
- Do not use damaged or incorrect accessories.
- Laat het wiel op volle snelheid komen voordat u het werkstuk raakt.
- Wees alert op steekpenningen en neem voorzorgsmaatregelen om ze te vermijden.
3. Inhoud van het pakket
Upon opening the package, please ensure all items are present and undamaged. If any parts are missing or damaged, contact your retailer immediately.
- Einhell RT-AG 230/180 Angle Grinder Unit
- Hulphandgreep
- Wielbeschermer
- Flange Nut Wrench
- Gebruiksaanwijzing
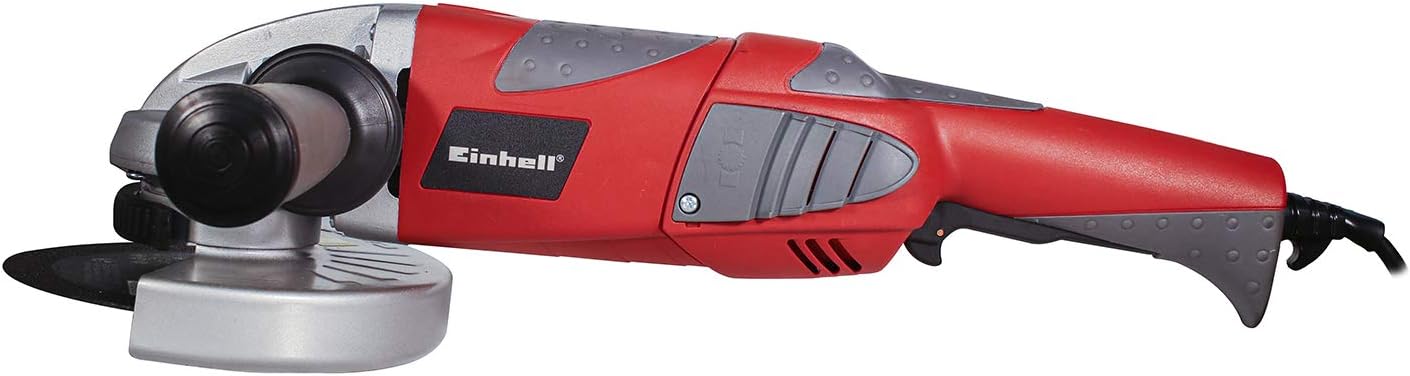
4. Product voorbijview
Familiarize yourself with the components of your Einhell Angle Grinder before operation.


5. Instellen
5.1 Het hulphandvat bevestigen
The auxiliary handle can be screwed into one of the three available positions on the gear head (left, right, or top) to provide optimal grip and control for various applications. Ensure it is tightened securely before use.
5.2 Het afstellen van de wielbescherming
The wheel guard is essential for safety. It can be adjusted quickly without tools. Loosen the clamping lever, rotate the guard to the desired position to protect against sparks and debris, and then tighten the clamping lever firmly.
5.3 De slijpschijf monteren/vervangen
- Zorg ervoor dat het gereedschap losgekoppeld is van het stroomnet.
- Houd de asvergrendelingsknop ingedrukt.
- Use the provided flange nut wrench to loosen the clamping moer tegen de klok in.
- Remove the old disc (if applicable) and clean the flanges.
- Place the new grinding or cutting disc onto the lower flange, ensuring it sits flush.
- Schroef de cl . vastamping nut and tighten it firmly with the wrench while holding the spindle lock button. Do not overtighten.
- Laat de asvergrendelingsknop los.
6. In bedrijf
6.1 In-/uitschakelen
- Aanzetten: Push the ON/OFF switch forward. For continuous operation, press the front part of the switch down until it locks.
- Uitschakelen: For continuous operation, press the rear part of the switch. For momentary operation, simply release the switch.
6.2 Het gereedschap vasthouden
Always hold the angle grinder firmly with both hands, one on the main handle and one on the auxiliary handle. Maintain a stable stance and good balance.
6.3 Basic Grinding and Cutting Techniques
- Laat de schijf de volledige bedrijfssnelheid bereiken voordat u het werkstuk raakt.
- Apply light, even pressure. Do not force the tool, as this can lead to overheating and damage.
- Houd bij het slijpen de schijf in een lichte hoek (meestal 15-30 graden) ten opzichte van het werkstuk.
- For cutting, hold the disc perpendicular to the workpiece and make straight, steady cuts. Avoid twisting or bending the disc.
- Always work away from your body and ensure sparks are directed away from flammable materials.
7. Onderhoud
Regelmatig onderhoud zorgt voor een lange levensduur en een veilige werking van uw haakse slijper.
7.1 Reinigen
- Haal altijd de stekker uit het stopcontact voordat u gaat schoonmaken.
- Keep the ventilation slots clean to prevent motor overheating. Use a soft brush or compressed air.
- Veeg de gereedschapsbehuizing af met adamp lap. Gebruik geen agressieve schoonmaakmiddelen of oplosmiddelen.
7.2 Vervanging van de koolborstels
This tool uses carbon brushes. If the motor sparks excessively or the tool stops working, the carbon brushes may need replacement. This should be performed by a qualified technician or an authorized service center.
7.3 Opslag
Store the angle grinder in a dry, secure place, out of reach of children. Protect it from dust and moisture.
8. Probleemoplossing
Below are common issues and their potential solutions. If the problem persists, contact customer support.
| Probleem | Mogelijke oorzaak | Oplossing |
|---|---|---|
| Tool start niet | Geen stroomtoevoer; Defecte schakelaar; Versleten koolborstels | Check power outlet/cord; Check switch operation; Have carbon brushes inspected/replaced |
| Overmatige vonkvorming bij motor | Versleten koolborstels; Vervuilde commutator | Have carbon brushes inspected/replaced; Have commutator cleaned by technician |
| Gereedschap raakt oververhit | Verstopte ventilatiesleuven; Overbelasting van het gereedschap | Clean ventilation slots; Reduce pressure/load during operation |
| Overmatige trillingen | Damaged or unbalanced disc; Loose auxiliary handle | Replace disc; Tighten auxiliary handle |
9. Specificaties
Technical data for the Einhell RT-AG 230/180 Angle Grinder:
| Specificatie | Waarde |
|---|---|
| Fabrikant | Eenheid |
| Onderdeelnummer | RT-AG 230/180, 127V, 7'' |
| Kleur | Rood |
| Stijl | Hoek |
| Energiebron | Elektrische kabel |
| Deeltage | 127 Volt |
| Wattage | 2000 W |
| Hoeveelheid artikelpakket | 1 |
| Zijn batterijen nodig? | Nee |
| Artikelgewicht | 6.2 kilogram |
| Productafmetingen | 54x14.5x16.5cm |
| Modelnummer | RT-AG 230/180, 127V, 7'' |
| ASIN | B076XCCRR2 |
10. Garantie en ondersteuning
Einhell products are manufactured to high-quality standards and undergo strict quality controls. For information regarding warranty terms and conditions, please refer to the warranty card included with your product or visit the official Einhell website. For technical support, spare parts, or service inquiries, please contact Einhell customer service or an authorized service center in your region. Keep your purchase receipt as proof of purchase for any warranty claims.