1. Inleiding en systeemoverzichtview
The 3M 4US-RO-S01H Reverse Osmosis Drinking Water Filter System is designed to provide high-quality filtered water directly from your kitchen tap. This system effectively reduces a wide range of contaminants, offering a convenient source of clean water for drinking, cooking, and ice making.
The system utilizes a multi-stage filtration process, including pre-filtration, reverse osmosis membrane, and post-filtration, to remove particles as small as 0.5 microns, as well as chlorine taste and odor, microbial cysts, lead, select pharmaceuticals, chemicals, total dissolved solids, nitrates, nitrites, radium, and arsenic.

Figuur 1: Overview of the 3M 4US-RO-S01H Reverse Osmosis Water Filter System, showing the main unit, storage tank, and dedicated faucet.
2. Veiligheidsinformatie
- Lees alle instructies zorgvuldig door vóór installatie en gebruik.
- Ensure the water supply is turned off before performing any installation or maintenance.
- Niet gebruiken met water dat microbiologisch onveilig is of van onbekende kwaliteit is, zonder adequate desinfectie voor of na het systeem.
- The system is designed for cold water use only (up to 113°F / 45°C).
- Check all connections for leaks after installation and during maintenance.
- Houd alle onderdelen en gereedschappen buiten het bereik van kinderen.
3. Inhoud van het pakket
Controleer of alle componenten aanwezig zijn voordat u met de installatie begint:
- 1 x 3M Reverse Osmosis System Unit
- 1 x Installation Kit (includes tubing, fittings, mounting hardware)
- 1 x 4US-RO-PREH Pre-Filter
- 1 x 4US-RO-M01H Reverse Osmosis Membrane
- 1 x 4US-RO-POSTH Post-Filter
- 1 x Dedicated Faucet

Figuur 2: The 4US-RO-PREH Pre-Filter and 4US-RO-POSTH Post-Filter, essential for multi-stagen filtratie.

Figuur 3: The 4US-RO-M01H Reverse Osmosis Membrane, the core component for contaminant reduction.
4. Installatie en installatie
Installation of the 3M 4US-RO-S01H system requires careful attention to detail. If you are not comfortable with plumbing tasks, it is recommended to seek professional assistance.
4.1 Controles vóór installatie
- Locatie: Choose a suitable under-sink location with adequate space for the system unit, storage tank, and access for filter changes.
- Watervoorziening: Ensure you have access to a cold water line and a shut-off valve. Consider installing an additional 1/4" valve for easier maintenance without turning off the main water supply.
- Afvoer: A drain connection point is required for the RO system's reject water. Inspect the saddle drain valve for any damage prior to installation.
- Kraangat: A dedicated hole for the RO faucet is needed. If one is not available, drilling may be required.
4.2 Installatiestappen (Algemene handleiding)
- Watertoevoer afsluiten: Zoek de koudwaterkraan onder uw gootsteen en draai deze dicht.
- Installeer de watertoevoeradapter: Connect the feed water adapter to the cold water line.
- Kraan installeren: Mount the dedicated RO faucet through the countertop or sink. Ensure the plastic spacer is correctly positioned next to the shim under the faucet to prevent leaks and interference with tubing. Improper installation of the O-ring or spacer can cause leaks.
- Afvoerzadel monteren: Attach the drain saddle to the drain pipe. Ensure it is securely fastened and free from cracks.
- Mount System Unit and Tank: Secure the main RO unit to the cabinet wall and place the storage tank in its designated location.
- Sluit slangen aan: Follow the color-coded tubing connections as indicated in the diagram. Connect the inlet tube (yellow), drain tube (black), outlet tube (blue), and storage tank tube (red) to their respective ports on the system and faucet.
- Filters installeren: Insert the pre-filter, RO membrane, and post-filter into their housings. The quick-change design allows for easy, mess-free installation without needing to turn off the water supply for future changes.
- Turn on Water Supply & Check for Leaks: Slowly turn on the cold water supply and carefully inspect all connections for any leaks. Tighten connections as necessary.
- Spoelsysteem: Before initial use, flush the system as described in the Operating Instructions section.
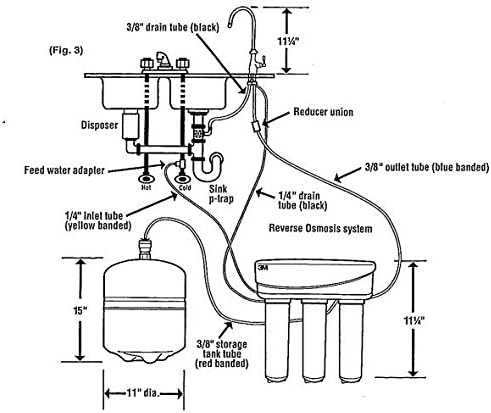
Figuur 4: Detailed installation diagram showing component placement and tubing connections for the 3M 4US-RO-S01H system.
5. Gebruiksaanwijzing
5.1 Eerste systeemspoeling
After installation, it is crucial to flush the system to remove air and carbon fines from the new filters:
- Open the dedicated RO faucet and allow water to flow until it becomes a steady stream.
- Close the faucet and allow the storage tank to fill completely (this may take several hours).
- Once the tank is full, open the faucet again and let it run until the tank is completely empty.
- Repeat steps 2 and 3 at least two more times. This ensures proper conditioning of the filters and membrane.
- Het systeem is nu klaar voor gebruik.
5.2 Normale werking
To dispense filtered water, simply open the dedicated RO faucet. The system will automatically refill the storage tank as water is drawn. The regeneration cycle, which involves the system refilling the tank, may produce a noticeable sound; this is normal operation.
6. Onderhoud
Regular maintenance, primarily filter replacement, is essential to ensure optimal performance and water quality.
6.1 Filtervervanging
The 3M 4US-RO-S01H system uses quick-change filters, making replacement simple and mess-free. You do not need to turn off your main water supply to change filters.
- Pre-Filter (4US-RO-PREH) and Post-Filter (4US-RO-POSTH): Replace approximately every 6 months, or sooner if water flow significantly decreases or taste/odor issues arise.
- RO Membrane (4US-RO-M01H): Replace approximately every 24 months, or sooner if total dissolved solids (TDS) levels increase significantly or water production drops.
Vervangingsprocedure:
- Twist the old filter cartridge counter-clockwise a quarter turn to release it from the manifold.
- Pull the old cartridge straight down to remove.
- Align the new filter cartridge with the manifold head.
- Push the new cartridge up into the manifold and twist clockwise a quarter turn until it locks into place.
- After replacing any filter, open the RO faucet and allow water to run for several minutes to flush out any air or carbon fines.
7. Probleemoplossing
| Probleem | Mogelijke oorzaak | Oplossing |
|---|---|---|
| Low Water Flow / Trickle | Clogged filters (pre-filter, post-filter, or membrane), low water pressure, kinked tubing, air in system, depleted storage tank. | Replace clogged filters. Check household water pressure. Inspect tubing for kinks. Allow tank to refill. Perform system flush. |
| Waterlekken | Loose connections, damaged O-rings, improperly seated faucet spacer, cracked drain saddle. | Tighten all connections. Inspect O-rings and replace if damaged. Ensure faucet spacer is correctly installed. Replace damaged drain saddle. |
| Onaangename smaak of geur | Expired filters (especially post-filter), new system not flushed adequately, contaminated storage tank. | Replace filters. Perform thorough system flush. Sanitize storage tank if necessary. |
| Loud Regeneration Cycle | Normal operation as the system refills the storage tank. | No action required. This is a characteristic sound of the system. |
8. Specificaties
- Merk: 3M
- Modelnaam: 4US-RO-S01H
- Zuiveringsmethode: Omgekeerde osmose
- Installatietype: Onder gootsteen
- Materiaal: Plastic
- Artikelgewicht: 6 Pounds (approximate, system only)
- Hogere temperatuurclassificatie: 113 graden Fahrenheit (45 °C)
- Speciale eigenschap: Chloorreductie
- Meegeleverde componenten: 1 system, 3 filters (pre, membrane, post), 1 faucet, 1 installation kit
- Vervangingsfilters: 4US-RO-PREH (Pre-Filter), 4US-RO-M01H (RO Membrane), 4US-RO-POSTH (Post-Filter)
9. Garantie en ondersteuning
For specific warranty information regarding your 3M 4US-RO-S01H Reverse Osmosis Drinking Water Filter System, please refer to the documentation provided at the time of purchase or contact 3M customer support directly. Warranty terms typically cover manufacturing defects and may vary by region and retailer.
For technical assistance, replacement parts, or further inquiries, please contact 3M customer service through their official webwebsite of de contactgegevens die u bij uw productverpakking vindt.